background image


19 


10. Parameters settings 

 
It’s possible, with the "Widoor" application, to adjust settings. This app can be 
downloaded on stores. 


10.1. Peering a smartphone 

a.  Turn OFF the switch 1 and turn ON the switch 4. 
b.  Press briefly one time on the BP Prog. 
c. 

The LED lights up in magenta

d.  When the LED is lighted: start the peering on your smartphone. 
e. 

The LED flashes quickly and then goes out: 

the smartphone is peered

.


Note: It is possible to peer several products on a same smartphone, or until 3 smartphones on the 
same product. For that, repeat the operations below. 
 
If a 4

th

 smartphone is paired, the product desynchronized the oldest used smartphones. To pair 

this smartphone, remove the product in the Bluetooth setting of the smartphone. 


10.2. Disabling all smartphones 

a.  Turn OFF the switch 1. 
b.  Press briefly one time on the BP Prog. 
c. 

The LED lights up in magenta

d.  When the LED is lighted: Press and hold down the BP Prog during 10 seconds 
e. 

The LED flashes quickly and then goes out

: all smartphone are disabled.


Note: All smartphones and all radio switches will be deleted. All settings will be reseted to default 
values. 


10.3. Adjustable parameters via mobile application 

Opening speed 

Range: 50 mm/s - 350 mm/s * 

Closing speed 

Range: 50 mm/s - 200 mm/s * 

End of open speed 
End of close speed 

It allows to adjust a soft arrival on the stoppers 

Opening deceleration 

It allows to adjust the opening deceleration 

Delay before closing 

Time: 0 to 60 s 

* Measure is given for indicative purpose, using a 50kg door. 


Additional features are available in the mobile application. 


Содержание WIDOOR

Страница 1: ...INSTALLATION INSTRUCTIONS DOOR MOTOR WIDOOR VERSION 3 02 EN 2 rue des M tiers 21110 Genlis Tel 33 03 80 37 85 71 http www mantion smt fr...

Страница 2: ...ing that the control circuit is disconnected from the power supply Check the installation frequently to detect any signs of wear and tear or damage Do not use the device if it needs repairing or adjus...

Страница 3: ...n to return the products the said products are returned to MANTION SMT forthwith with the details of the fault and a copy of the installation engineer or dealer s bill stating the date of installation...

Страница 4: ...odes 17 8 1 Switches settings 17 8 2 Closing modes 17 9 Bringing into service 18 10 Parameters settings 19 10 1 Peering a smartphone 19 10 2 Disabling all smartphones 19 10 3 Adjustable parameters via...

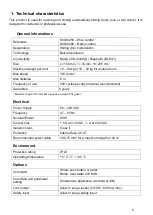
Страница 5: ...ance 6 m Frequency of use 500 cycles per day maximal recommended Guarantee 5 years Measure is given for indicative purpose using a 50kg door Electrical Power Supply 80 264 VAC Frequency 47 63 Hz Nomin...

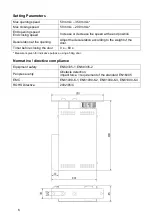
Страница 6: ...e opening Adjust the deceleration according to the weight of the door Timer before closing the door 0 s 60 s Measure is given for indicative purpose using a 50kg door Normative directive compliance Eq...

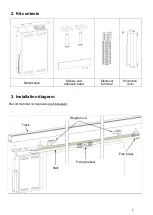
Страница 7: ...Kit contents Motorization Screws and adhesive band Electrical terminal Protection cover 3 Installation diagram Recommended components not included x 4 Fixing bracket Free pulley Stoppers x 2 Belt Tra...

Страница 8: ...8 4 Pre installation checking Operating reserve 150 mm in width and 45 mm for thickness Do not use locking stoppers 150 mm min 70 to 77 mm 45 mm min Porte...

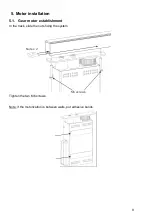
Страница 9: ...5 Motor installation 5 1 Gear motor establishment In the track slide the nuts fixing the system Tighten the two M6 screws Note if the motorization is between walls put adhesive bands Nuts x 2 M6 screw...

Страница 10: ...10 5 2 Belt fixing on the door not included 5 3 Free pulley installation not included...

Страница 11: ...safety The electrical installation must be carried out in accordance with the national standard in force as well as any obligations foreseen by the law and or by all obligations in force laid down fo...

Страница 12: ...t the input Test radar necessary to be conform with the EN16005 standard C3 Opening control 2 It allows to use an external command pushbutton non contact pushbutton radar security cell etc Power consu...

Страница 13: ...n Pushbutton switch C0001290 Add a shunt between the terminals 4 and 5 Non contact pushbutton C0001300 Add a shunt between the terminals 4 and 5 Radar C0001310 Add a shunt between the terminals 4 and...

Страница 14: ...d C3 Security cell C0003760 6 2 3 Locking system C4 Fail secure locking system without power supply Fail safe Locking system with power supply Fail safe suction Fail secure Fail safe C0013750 C0013760...

Страница 15: ...l circuit breaker and a disconnector or selector switch on the primary side in order to isolate the product if necessary Supply voltage 80 264 VAC Frequency 47 63 Hz Power rating 65 W Recommended powe...

Страница 16: ...on After electrical connections put the protection cover Step 1 Arrange wires Step 2 Put the protection cover in openings Step 3 Press the protection cover against the product Be careful with the wire...

Страница 17: ...n ON position 8 2 Closing modes Automatic mode switch 3 on OFF Press on the control button The door is opening Automatic closing after few seconds adjustable with mobile application Press the button w...

Страница 18: ...won t work as the stoppers learning has not been carried out Modus operandi a Powering the system b If you want to use a radio product refer to the wireless setup instructions part 6 Peering c Turn ON...

Страница 19: ...e product in the Bluetooth setting of the smartphone 10 2 Disabling all smartphones a Turn OFF the switch 1 b Press briefly one time on the BP Prog c The LED lights up in magenta d When the LED is lig...

Страница 20: ...a remote control transmitter a Turn OFF the switch 1 b Press briefly one time on the BP Prog c The LED lights up in magenta d When the LED turns on press the open and close buttons simultaneously on...

Страница 21: ...switch is disabled 11 4 Disabling all transmitters switches remote control etc a Turn OFF the switch 1 b Press briefly one time on the BP Prog c The LED lights up in magenta d When the LED is lighted...

Страница 22: ...tart after power outage In case of a power outage the door can move manually easily Once electrical power is restored the door needs a stoppers searching The door will open and close slowly after the...

Страница 23: ...nection Check the command connection chapter 6 Learning problem Do another learning chapter 9 The learning is done and the door doesn t open with a radio command Defective battery Check the command ba...

Страница 24: ..._______________________ _____________________________________________________________________________ _____________________________________________________________________________ ____________________...

Отзывы: