10
Timer function
The timer function works as follows:
Timer function for a selected cooking zone, from 1 to 99 min: at the end of the set time, an acoustic
signal will be emitted and the timed zone will be turned off. All three cooking zones may be programmed
independently to different timer settings. During the last minute of the set time, the timer display (7) will
show the time remaining in seconds.
Timer programming on cooking zones
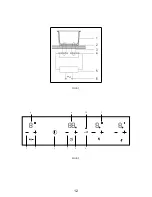
Activate the timer by pressing UP TIMER (9) or DOWN TIMER (8). The timer display will show “00”
(7) and the symbol “t” will appear on the power level displays for each cooking zone for which the timer
is being set.
Press the power level UP (3) or DOWN (2) button on the cooking zone to be timed; the desired zone is
selected and the timer indicator LED illuminates (6) for the selected zone.
Having selected the zone to be timed, press UP TIMER (8) or DOWN TIMER (9) to select a time
between 1 and 99 minutes.
Holding the time selection buttons pressed will cause the time to increase or decrease more quickly.
If no cooking zone is selected for the timer function within 5 seconds, the timer function will be
automatically deactivated.
After selecting the cooking zone to be timed, the time must be selected within 5 seconds; otherwise, the
timer function will be automatically deactivated.
The selected time will start 5 seconds after setting the timer. The timer setting can be modified during
timer cycle by pressing the buttons UP TIMER (9) or DOWN TIMER (8). The new timer setting will start
5 seconds after programming the new timer setting.
To deactivate the timer function at any time press simultaneously the UP TIMER (9) and DOWN
TIMER (8). Pressing the DOWN TIMER (8) button until the timer display (7) shows “00” also
deactivates the timer function.
When the set time has elapsed, the selected cooking zone will switch off and the timed zone indicator
(6) and time indicator (7) LEDs will illuminate intermittently while a warning beep will sound for 1
minute. To cancel this acoustic warning before the set time has elapsed, press any button on the touch
control.
Cooking vessels (Fig. 3)
-
A magnet-attracting vessel may be a suitable vessel for induction cooking prefer vessels which
are especially declared to be suitable for induction cooking flat- and thick bottomed vessels
-
A vessel with the same diameter as zones ensures the maximum exploitation of power
-
A smaller vessel reduces power exploitation, but does not cause any energy loss We would
anyhow not recommend the use of vessels with diameters smaller than 10 cm.
-
Stainless steel vessels with multi-layer or ferritic stainless- steel bottoms when specifically
suited for induction cooking.
-
Cast-iron preferably enamel-bottomed vessels to avoid scratching the pyroceram surface.
-
We do not recommend the use of any glass, ceramic, earthenware, alluminium, copper or non-
magnetic (austenitic) stainless steel vessels.
-
Maintenance
Any remains of aluminium foil, food, fat, sugar or food with high sugar content must be immediately
removed from the hob surface to prevent potential damage to the hob surface.
Subsequently clean the surface with some towel and appropriate product, rinse with water and dry by
means of a clean cloth. Under no circumstance should sponges or abrasive cloths be used; also avoid
using aggressive chemical detergents such as oven sprays and spot removers.
Содержание MI 593W
Страница 2: ...2...
Страница 3: ...3 Fig 1 4 6 10 5 2 3 1 7 8 9 Fig 2...
Страница 4: ...4 Fig 3 Fig 4 Fig 5...
Страница 12: ...12 H nh 1 4 6 10 5 2 3 1 7 8 9 H nh 2...
Страница 13: ...13 H nh 3 H nh 4 H nh 5...
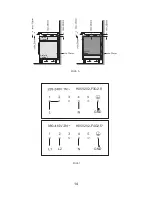
Страница 14: ...14 Horno Caj n Drawer Armario Cabinet min 20mm min 20mm H nh 6 H nh 7 H05V2V2 F4G2 5 L2 GND H05V2V2 F3G2 5 GND...


