background image

Cup Washer 45

Compression spring 55

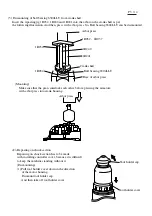
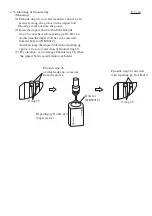
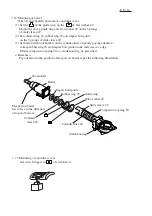
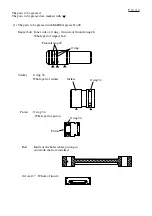
<3> Repairing of piston and striker
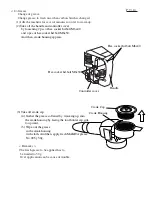
      Take off only handle, not remove controller cover.
      (Dismounting)
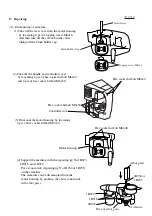
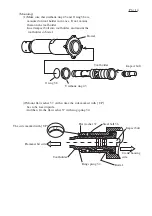
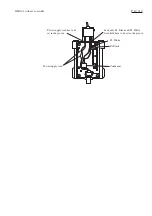
     (1) Take off change ring after dismounting of chuck section.
           And then, take off ring spring 46 
           with pawl for retaining ring .
           Dismount housing cover.

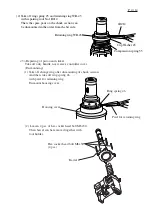
       (2) Take off ring spring 25 and retaining ring WR-45
             with repairing tool No.1R212.
             Then, the spare parts on the chuck section can 
             be dismounted in the order from the bit side.

1R212

 Retaining ring WR-45

Ring spring 46 

Housing cover

Pawl for retaining ring 

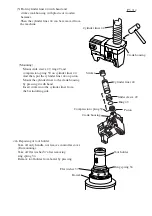
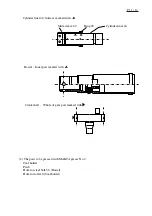
(2) Loosen 4 pcs. of hex socket head bolt M8x30. 
     Then barrel can be removed together with 
     tool holder.

Hex socket head bolt M8x30
(4 pcs.)

Barrel

P 4 / 14

Содержание HM1202

Страница 1: ...ories These demolition hammers are newly developped as a 10 Kg hammer middel class between HM1201 and HM1303 series models Considerable strong demolishing power in this class However softened reaction...

Страница 2: ...the motor housing by loosening 4 pcs of hex socket hd bolt M6x40 4 Support the machine with the repairing jig No 1R023 1R218 and 1R022 Put a round stick repairing jig No 1R234 or 1R235 on the armature...

Страница 3: ...4 1R240 1R241 1R032 1R037 1R034 Mounting Make sure that the gears interlock each other before pressing the armature with arbor press into crank housing 2 Repairing on chuck section Repairing on chuck...

Страница 4: ...retaining ring Dismount housing cover 2 Take off ring spring 25 and retaining ring WR 45 with repairing tool No 1R212 Then the spare parts on the chuck section can be dismounted in the order from the...

Страница 5: ...linder liner to the crank housing by pressing it with hand Insert striker into the cylinder liner from the bit installing side 4 Repairing of tool holder Take off only handle not remove controller cov...

Страница 6: ...mount the tool holder in barrel 2 Mount flat washer 37 At this time the side marked with UP has to be faced upside And then fix the flat washer 37 with ring spring 34 Impact bolt Tool holder Urethane...

Страница 7: ...time the impact bolt has to be inserted from the hole for HR5001C And then keep the impact bolt in the repairing jig approx 10 sec for correction of fluoride ring 28 3 Pay attention not to damage fluo...

Страница 8: ...paying attention to keep rubber ring 25 and impact bolt guide on the slide sleeve s edge Mount compression spring 50 on crank housing by pressing it Remarks Pay attention to the position of flat part...

Страница 9: ...then crank housing appears Hex socket hd bolt M6x40 Hex socket hd bolt M6x30 Handle Crank Housing Crank Cap Controller cover Remarks The fresh grease to be applied has to be limited to 30 g Over appl...

Страница 10: ...lt Inner side of O ring Out side of fluoride ring 28 Whole part of impact bolt Striker O ring 34 Whole part of striker Fluoride ring 28 O ring Striker O ring 34 Piston O ring 34 Whole part of piston O...

Страница 11: ...sleeve 49 Ring 49 Cylinder liner 44 Barrel Inner part marked with Crank shaft Whole of gear part marked with 2 The parts to be greased with MAKTA grease No 2 Tool holder Pin 8 Hole for steel ball 5 6...

Страница 12: ...te side of control dial Brush holder on control dial side Controller F2 White r3 White F1 Black r1 Red P1 P2 r2 Black Black Black Power supply cord Pick up coil HM1202 without controller Black 1 4 3 6...

Страница 13: ...y cord has to be set in the groove Lead wire r2 black and r3 white have to be set in the groove as per the illustration Rib C Controller Boss A Boss B Rib D Rib E Cord from power supply cord lead wire...

Страница 14: ...Power supply cord Condenser F1 Black F2 White HM1202 without controller Power supply cord has to be set in the groove Lead wire F1 Black and F2 White from field have to be set in the groove P 14 14...

Отзывы: