background image

 9

/ 1

0

R

epair

ASSEMBLING

Fig. 13

Fig. 14

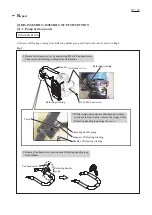
1. Align the hole for Stopper of Refueling winding

    to the curve of Refueling handle group.

2. Insert Stopper of Refueling winding

    into the hole along the curve.

3. Put the inner cable of Refueling 

    winding into the groove of Refueling

    handle group.

4. Connect the sheath of Refueling

    winding to the original position of

    Refueling handle group.

Stopper

Refueling handle group

Curve

Groove

Sheath

(9) Assemble Refueling winding to Refueling handle group as drawn in 

Fig. 13

.

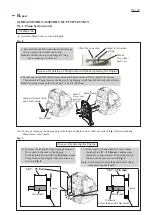
(10) Assemble Refueling winding to Throttle lever of Carburetor as drawn in 

Fig. 14

.

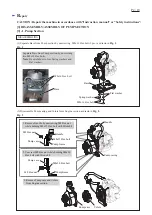
1. Connect the other end of Refueling winding to Carburetor.  Then align the lever of 

    Refueling handle group 

to “L” position. And then make sure that Adjusting screw of 

    Carburetor is contacted to

 Throttle lever of Carburetor

.  

    If the screw is not connected to the lever, regulate 

Adjust screw

 until Adjusting screw

    of Carburetor contacts 

Throttle lever of Carburetor

.

Adjust screw

Air cleaner cover

Adjusting screw of Carburetor comes

in contact with Throttle lever of 

Carburetor at “L” position of

Refueling handle group.

2. Assemble Air cleaner cover with M5x14 Pan head screw.

Pump frame

[3] DISASSEMBLY/ASSEMBLY OF PUMP SECTION

[3] -1. Pump Section (cont.)

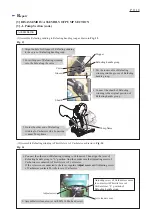
5. Guide the other end of Refueling

    winding to Carburetor side by passing

    it under Pump frame.

Содержание EW1060H

Страница 1: ...ase 2 EU Stage 2 Starting system Max suction head m ft Max output kW PS Diaphragm Suction discharge diameter mm 25 4 1 4 stroke 8 0 26 Max pumping capacity L min US oz min 130 4 400 Primer pump Yes Yes 7 3 16 1 1 07 1 5 at 7 000 min ˉ 1 35 at 5 500 min ˉ Max torque N m Speed at no load min ˉ rpm 7 000 Recoil starter with mechanical decompression Max total head m ft 45 148 Fuel tank capacity L US o...

Страница 2: ...n in Fig 2 Separate Base from Pump section by unscrewing two M8x16 Hex bolts Note Be careful not to lose Spring washers and Flat washers Base Base Spring washer Flat washer M8x16 Hex bolt M8x16 Hex bolt M8x30 Hex bolt Handle 2 Unscrew M8 Hex nut while holding M8x30 Hex bolt with Wrench 8 M8 Hex nut Pump case Pump casing Pump frame 1 Remove Handle by unscrewing M8 Hex nut while holding M8x35 Hex bo...

Страница 3: ...ing Stopper of Refueling winding Refueling handle group Refueling handle group Curve Pan head screw Air cleaner cover Refueling winding 1 Remove Air cleaner cover by unscrewing M5x14 Pan head screw Then remove Refueling winding from Carburettor M5x14 Pan head screw Refueling winding Fig 3 DISASSEMBLING 3 DISASSEMBLY ASSEMBLY OF PUMP SECTION 3 1 Pump Section cont 3 Remove Refueling winding from Ref...

Страница 4: ... Note Mechanical oil seals on front and rear sides have to be replaced as a set 4 After removing Washers 0 5mm and 0 2mm unscrew four M6x40 Hex socket head bolts to remove Pump frame from Engine section 3 Apply 1R090 to the rib Fin of Impeller then turn Impeller counterclockwise by tapping 1R090 with a hammer to remove Impeller from Pump frame And then remove Mechanical oil seal on front side from...

Страница 5: ...ng torque is 2 5 3 5 N m And make sure that the mounted Refueling handle group does not wobble on the Handle 2 Assemble Mechanical oil seals to Pump body rear and to Impeller as drawn in Fig 6 3 Assemble Water blocks Valve and Joint to Pump casing as drawn in Fig 7 Water block 1 Install O rings to Water blocks 2 Tighten Water block to the top side of Pump casing by hand 3 Mount Water block to the ...

Страница 6: ...torque of their bolts have to be 2 5 3 5 N m Washers 0 5mm thick and 0 2mm thick Drive shaft 1A Measure the length from the stepped portion of Drive shaft to the neck of the Engine If the length is between 34 7 to 35 8 mm mount Pump frame to the Engine without Washers as drawn in Fig 8 2A If the length is shorter than 34 7 mm adjust the length to 34 7 35 8 mm by adding some Washer s as drawn below...

Страница 7: ...mble Pump casing and Handle to Pump frame by securing them with Flat washers Spring washers M8 Hex nuts and M8x35 Hex bolts Pump casing Pump frame Pump frame M8x35 Hex bolt 2 pcs M8x30 Hex bolt 2 pcs Pump casing 5 Assemble Impeller and Volute to Pump frame as illustrated in Fug 10 6 Assemble Pump casing and Handle to Pump body rear as drawn in Fug 11 3 DISASSEMBLY ASSEMBLY OF PUMP SECTION 3 1 Pump...

Страница 8: ...e Flat washer Spring washer M6x15 Hex bolt Fig 12 7 Assemble Base as drawn in Fig 12 and check the condition of Impeller in case of replacing the Engine to the new one 3 DISASSEMBLY ASSEMBLY OF PUMP SECTION 3 1 Pump Section cont In case of replacing the Engine to the new one 1 Make sure that the fuel is removed completely from the Engine 2 Switch off 3 Pull Recoil starter in order to make sure tha...

Страница 9: ...uretor as drawn in Fig 14 1 Connect the other end of Refueling winding to Carburetor Then align the lever of Refueling handle group to L position And then make sure that Adjusting screw of Carburetor is contacted to Throttle lever of Carburetor If the screw is not connected to the lever regulate Adjust screw until Adjusting screw of Carburetor contacts Throttle lever of Carburetor Adjust screw Air...

Страница 10: ...in Fig 15 After removing Blower housing separate two M6x16 Pan head screws Ring 17 and Shaft from Flywheel The other disassembly assembly is the same as Makita brush cutters Fig 15 Parts breakdown of Engine section Shaft section Blower housing Oil tube EH035 only Ring 17 Shaft section EH035P only M6x16 Pan head screw 2 pcs Shaft Clutch section EH035 only ...

Отзывы: