
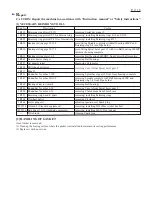


P 1
5
/ 1
8
R
epair
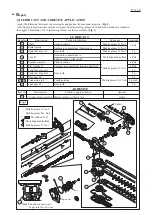
[4] DISASSEMBLY/ASSEMBLY
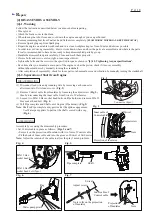
[4]-11. Carburetor (cont.)
Carefully assemble each part in right direction and order.
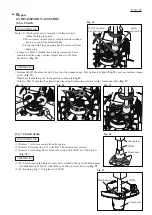
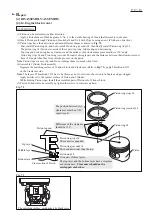
Connect 1R127 to the nipple of Carburetor as drawn in
Fig. 63
.
Give air pressure from 1R127 and check if the pressure gauge indicates
0.05Mpa for around 10 seconds, then, there is no problem with Carburetor.
(1) Assemble Cleaner plate assembly, Carburetor and Gasket to Insulator with two M5x60 Hex socket head bolts.
(2) Connect black tube of Fuel tank to the nipple of Carburetor.
Connect yellow tube of Fuel tank to the other nipple of Carburetor. (
Figs. 63 and 64
)
Connect Tube from Cylinder and
Breather pipe
to the Cleaner plate assembly.
Note
: Make sure that fuel tubes do not touch on Cylinder cover.
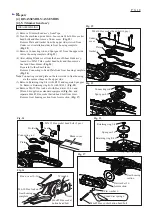
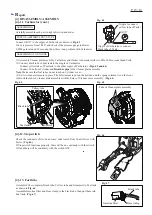
(3) Set Air cleaner elements in place. The felt element is put on the bottom, and the sponge element is on the front.
(4) Hook the tabs of Cleaner plate assembly with the holes of Cleaner cover assembly. (
Fig. 64
)
Check the continuity of two Lead wires’ ends routed from Control lever with
Tester. (
Fig. 66)
If Stop switch functions properly, there will be no continuity with the switch
ON and there will be continuity with the switch OFF.
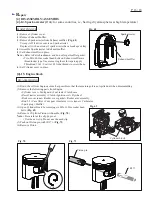
Assemble Tube complete (Black tube, Yellow tube and Grommet) to Fuel tank
as drawn in
Fig. 64
.
Assemble Gasoline filter and Hose clamp to the black tube, then put them into
Fuel tank. (
Fig. 67
)
Fig. 63
Fig. 64
Fig. 65
Fig. 66
Fig. 67
ASSEMBLING
ASSEMBLING TO ENGINE
TEST OF AIRTIGHT STRUCTURE
Nipple of Carburetor to connect
black tube of Tank
(Nipple to connect
yellow tube of Tank)
1R127
[4]-12. Stop switch
[4]-13. Fuel tube
Hose clamp
Black tube
Gasoline filter
Tabs of Cleaner plate assembly
Fuel tank
Yellow tube
Black tube
Grommet


