
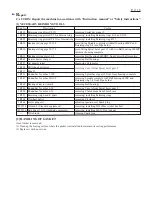


P 1
2
/ 1
8
R
epair
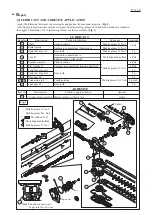
[4] DISASSEMBLY/ASSEMBLY
[4]-9. Flywheel
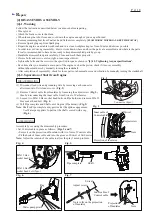
Note:
• Flywheel can be easily removed with Impact driver without holding the piston.
• Do not remove Spark plug as compressed air resistance has to be used for the disassembling.
• Plug cap with Plug cap spring has to be removed from Spark plug to prevent Engine from running. (
Fig. 40
)
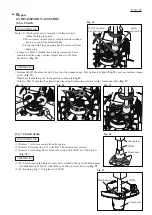
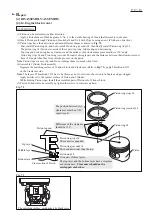
(1) Turn M8 Flange nut in the center of Flywheel counterclockwise using Cordless impact driver with 13mm Socket bit.
(
Fig. 45
)
(2) Install 1R364 on Flywheel then screw two M6 bolts into Flywheel as drawn in
Fig. 46
instead of M6x25 shoulder
hex bolts. Flywheel is removed from Engine.
Important
: Screw two M6 bolts evenly.
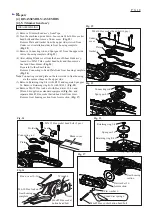
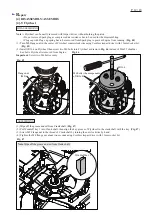
ASSEMBLING
(1)
W
ipe off the grease and oil from Crank shaft.
(
Fig. 47
)
(2) Put Woodruff key 3 into Crank shaft, then align the key groove of Flywheel to the crank shaft with the key. (
Fig. 47
)
(3) Screw M8 Flange nut to the thread of Crank shaft by turning the nut clockwise by hand.
(4) Tighten the M8 flange nut about two seconds using Cordless impact driver with 13mm socket bit.
Fig. 45
Fig. 46
Fig. 47
DISASSEMBLING
1R364
M6 bolts (the components
of 1R364)
Flange nut
(M8)
Note
: W
ipe off the grease and oil from Crank shaft.
W
oodruff key 3


