background image

7

MakerBot Replicator

MakerBot

7

MakerBot Replicator

MakerBot

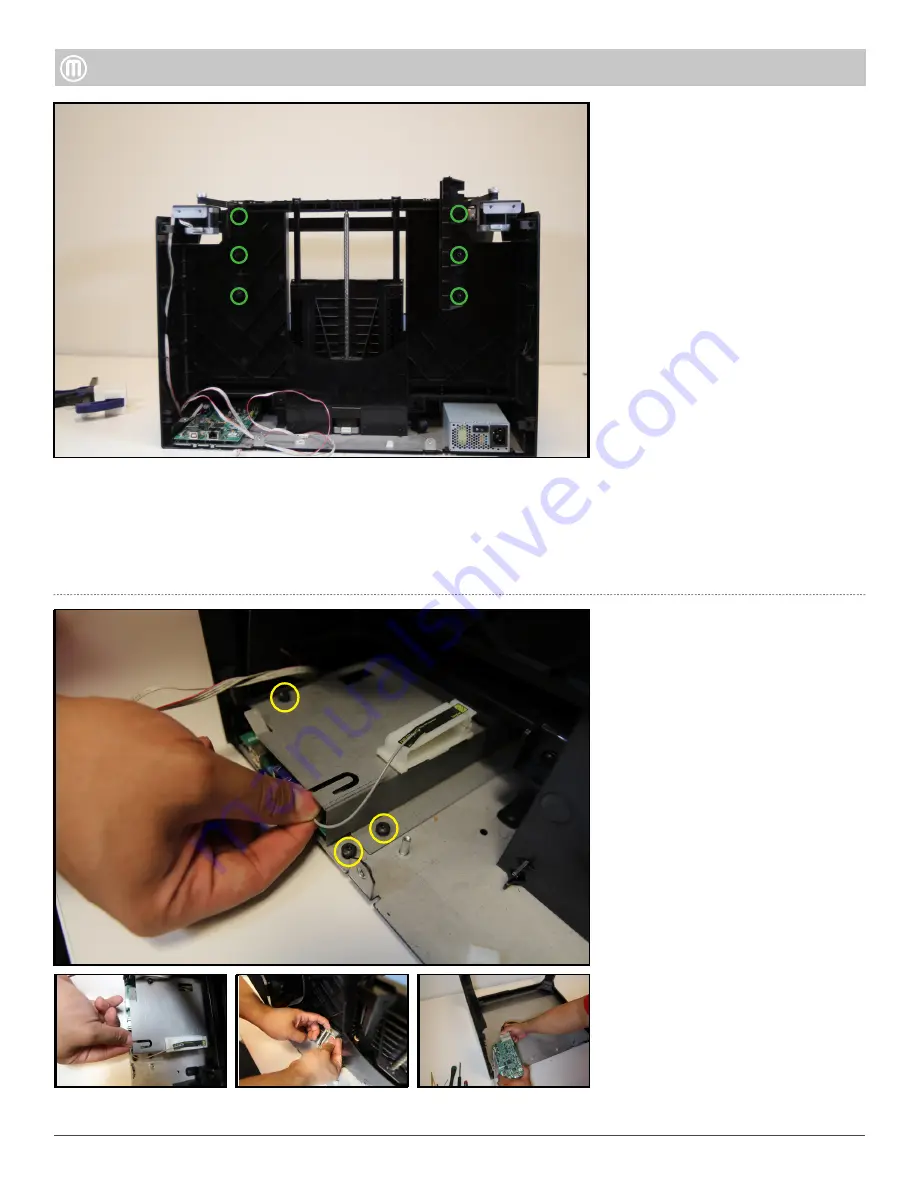
Remove the six (6) Torx button 
heads that hold the Spool Drawer 
Alignment Brackets to the Z-Case.

Pull Alignment Brackets away 
from the body of the Replicator.

Step 10-Remove Spool Drawer 
Alignment Brackets

Unplug the HDMI Cable and 
remove the Electrostatic Discharge 
Cover (ESD) by removing the two 
(2) Torx button heads using a T20.

Remove the one (1) Torx button 
head attaching the PCB Adapter 
Plate to the Base Plate

Gently lift the ESD cover and 
unplug the WiFi Antenna, next 
open the white cable clip located 
on the top of the ESD cover and 
remove the Motor Cable Harness.  
Unplug the Z-Motor and set aside.

Pull the Brooklyn PCB towards 
yourself to give some slack, press 
down the white tab on the 20 pin 
Power Supply connector and pull 
out of Brooklyn PCB, slide out of 
metal slot to remove.

Step 11 -Remove Brooklyn PCB

Содержание Replicator

Страница 1: ...ardown Guide MakerBot Tools Needed 1 3mm Hex Driver T10 T20 Torx Driver Phillips Screw Driver 2 0mm Hex Driver 1 5mm Hex Driver 2 5mm Hex Driver T10 Security Torx Drive 1 Pair of thin Tweezers Small C...

Страница 2: ...om the body of the Replicator Step 1 Remove the Back Panel Six 6 Torx socket head screws Six 6 Torx Button Head bolts Four 4 Torx socket head screws surrounding Power Supply Remove the following screw...

Страница 3: ...steps are only if you need to disassemble the UI Step 4 Remove User Interface Assembly UI Disconnect the Camera Wire Harness located behind the User Interface Assembly UI Gently lift the back of the...

Страница 4: ...iage from the bracket optional Use a 1 3mm hex driver to remove the set screw holding the Castle Gear on to the Carriage Motor axle To disconnect the LCD Screen lift the brown tab on the back of the H...

Страница 5: ...ss the to tabs on each side of the connector and unplug the FFC from the Bronx PCB Gently unplug both the Active Cooling Blower and the Extruder Cooling Fan from the Bronx PCB Remove three 3 socket ca...

Страница 6: ...oosen the two 2 button head screws holding down the Tensioned Pulley Bracket using a 1 5mm hex driver located on the front left Next using a T15 or a 3mm hex driver loosen up the Tensioning Bolt to gi...

Страница 7: ...by removing the two 2 Torx button heads using a T20 Remove the one 1 Torx button head attaching the PCB Adapter Plate to the Base Plate Gently lift the ESD cover and unplug the WiFi Antenna next open...

Страница 8: ...aside To remove Z Stage Assembly remove the four 4 Torx button head screws using a T15 To remove Z Stage Assembly remove the four 4 Torx button head screws using a T15 To open up the Z Stage remove th...

Страница 9: ...ads that attach the Brass Nut to the Z Case using a 2 5mm screwdriver Two 2 located on the front of the printer on the Floor Plate using a T15 Two 2 that attach the Floor plate to the Base Plate insid...

Страница 10: ...10 MakerBot Replicator MakerBot 10 MakerBot Replicator MakerBot Remove the Camera by pushing on the Camera Mount Clip that holds it on to the Left Panel Step 14 Remove the Camera...

Отзывы: