


8
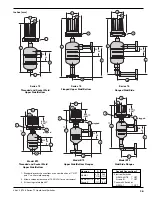
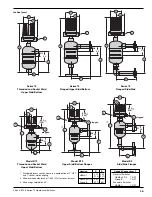
46-620 B73 & Series 75 Liquid Level Switches
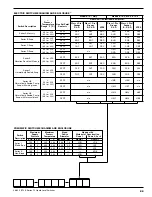
2.5.2 Differential Adjustment
Caution:
No differential adjustment should be made on tandem
float models in the field. Switch actuation levels have been
set at the factory to meet customer specifications.
Variations in actual conditions, from design conditions,
usually require special control modifications.
3.0
Troubleshooting
Usually the first indication of improper operation is failure
of the controlled equipment to function, i.e., pump will
not start (or stop), signal lamps fail to light, etc. When
these symptoms occur, whether at time of installation or
during routine service thereafter, check the following
potential external causes first:
a. Fuses may be blown
b. Reset button(s) may need resetting
c. Power switch may be open
d. Controlled equipment may be faulty
e. Wiring leading to control may be defective
If a thorough inspection of these possible conditions fails
to locate the trouble, proceed next to a check of the
control's switch mechanism.
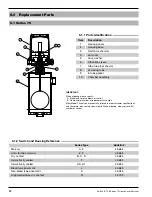
3.1
Check Switch Mechanism
1. Pull disconnect switch or otherwise disconnect power to
the control.
2. Remove switch housing cover.
3. Disconnect power wiring from switch assembly.
4. Swing magnet assembly in and out by hand to check care-
fully for any sign of binding. Assembly should require
minimal force to move it through its full swing.
5. If binding exists, magnet may be rubbing enclosing tube.
If magnet is rubbing, loosen magnet clamp screw and shift
magnet position. Retighten magnet clamp screw.
6. If switch magnet assembly swings freely and mechanism
still fails to actuate, check installation of control to be
certain it is within the specified 3° of vertical.
7. If mechanism is equipped with a mercury switch, examine
glass mercury tube closely as described in
Section 4.0,
Preventive Maintenance
on page 11. If switch is damaged,
replace it immediately. If microswitch, check continuity
with ohmmeter.


