Magnavox MDV3300 Скачать руководство пользователя страница 9

– 9 –

EN

SETUP

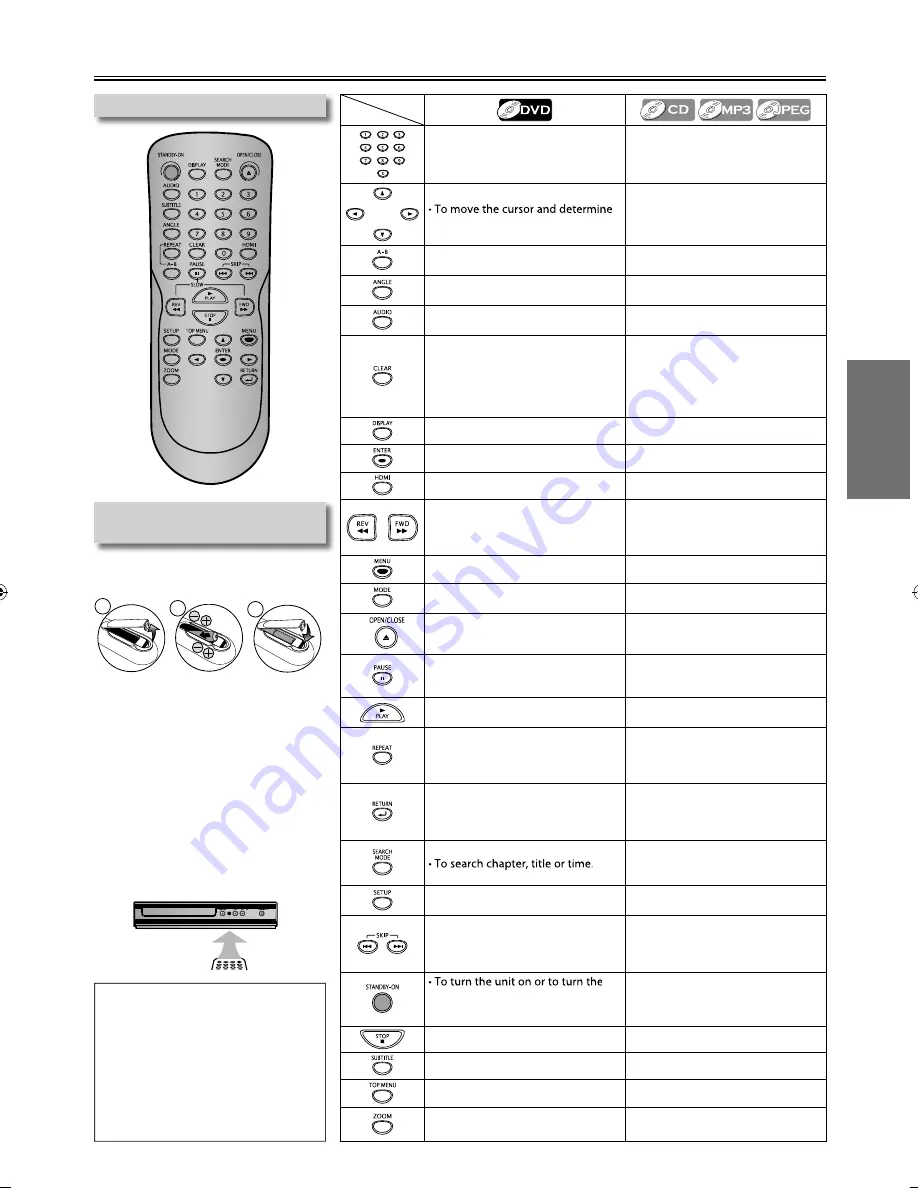
Installing the Batteries for the 
Remote Control

Install 2 AA (1.5V) batteries matching
the polarity indicated inside battery
compartment of the remote control.

2

2

3

1

* Batteries not supplied.

Keep in mind the following when using
the remote control:
• Make sure that there are no obstacles

between the remote control and the
remote sensor on the unit.

•  The maximum operable ranges from the

unit are as follows.

-

Line of sight

:


approx. 23 feet (7m)

-

Either side of the center

:

approx. 16 feet (5m) within 30°

-

Above

: approx. 16 feet (5m) within 15°

-

Below

:  approx. 10 feet (3m) within 30°

Remote Control

Note:

• Do not mix alkaline, standard (carbon-

zinc), or rechargeable (ni-cad, ni-mh, 
etc) batteries.

• Do not mix old and new batteries.
• Always remove batteries from remote

control if they are dead or if the 
remote control is not to be used for 
an extended period of time. This will 
prevent battery acid from leaking into
the battery compartment.

About the Remote Control

Button

(Alphabetical

order)

• To enter values in the input field.
• To select chapter or title directly.

• To enter values in the input field.
• To select track directly. (CD)
•  To select folder / file directly. 

(MP3 / JPEG)

its position.

•  To move the cursor and determine 

its position.

•  To rotate the JPEG.

•  To repeat between your chosen

point of A and B.

•  To repeat between your chosen 

point of A and B. (CD / MP3)

•  To select camera angles on a disc.

------

•  To select audio language on a disc.

•  To select “Stereo”, “L-ch” or “R-ch”. 

(CD)

•  To cancel the point for A-B repeat.
•  To clear the numbers entered

incorrectly.

•  To cancel the point for A-B repeat.

(CD / MP3)

•  To remove status number in 

program input.

•  To clear the numbers entered 

incorrectly.

•  To display the current disc mode.

•  To display the current disc mode.

•  To select items or settings.

•  To select items or settings.

• To set the HDMI output mode.

• To set the HDMI output mode.

•  To search forward / backward through

a disc. (×2, ×4, ×8, ×16, ×32)

•  To begin slow forward/backward

playback in the pause mode.

•  To search forward / backward through 

a disc. (×2, ×4, ×8, ×16, ×32)

•  To call up the menu on a disc.

------

------

•  To arrange the playing order or play 

randomly.

•  To open or close the disc tray.
•  To turn on the unit.

•  To open or close the disc tray.
•  To turn on the unit.

•  To pause disc playback.
•  To advance playback one frame at

a time.

•   To pause disc playback.

•  To start playback or resume

playback.

•  To start playback or resume 

playback.

•  To play back a chapter or title

repeatedly.

•  To play back a track or disc 

repeatedly. (CD)

•  To play back a file, folder or disc 

repeatedly. (MP3 / JPEG)

•  To return to the previously

displayed menu screen.

•  To return to the previously 

displayed menu screen.

•  When file list is shown, press to 

switch folder list. (MP3 / JPEG)

•  To search tracks or files.
•  To search time. (CD / MP3)
•  To search folders. (MP3 / JPEG)

•  To call up the setup menu.

•  To call up the setup menu. 

•  To skip chapters or titles.

•  To skip tracks or files.
•  When file list / folder list is shown, 

press to switch between pages.
(MP3 / JPEG)

unit into the standby mode. (To
completely turn off the unit, you
must unplug the AC power cord.)

•  To turn the unit on or to turn the 

unit into the standby mode. (To 
completely turn off the unit, you 
must unplug the AC power cord.)

•  To stop playback.

•  To stop playback. 

•  To select subtitle language on a disc.

------

•  To call up the title menu on a disc.

------

•  To magnify part of a picture.

(x2, x3, x4, x1/2, x1/3, x1/4)

•  To magnify part of a picture. (JPEG)

(x2

,

x3, x4, x1/2, x1/3, x1/4)

Media

E6MY3UD̲E6MY3UH̲MDV3300̲F7̲EN̲v1.indd   9

E6MY3UD̲E6MY3UH̲MDV3300̲F7̲EN̲v1.indd   9

2012/01/30   17:44:34

2012/01/30   17:44:34

Содержание MDV3300

Страница 1: ...s an Antenna input no A V inputs you will need a RF modulator NOT INCLUDED to connect this player RF modulator AUDIO IN R L VIDEO IN CHANNEL 4 3 TO TV TV ANT IN ANT IN No Antenna RF Output Connecting...

Страница 2: ...to Part 15 of the FCC Rules These limits are designed to provide reasonable protection against harmful interference in a residential installation This equipment generates uses and can radiate radio f...

Страница 3: ...y the plug Do not put your fingers or objects into the unit Location and Handling Do not install the unit in direct sunlight near strong magnetic fields or in a place subject to dust or strong vibrati...

Страница 4: ...ear the unit Such chemicals may discolor the surface or damage the unit Cleaning Discs g When a disc becomes dirty clean it with a cleaning cloth Wipe the disc from the center to out Do not wipe in a...

Страница 5: ...tain DVD video do not operate as described in this manual due to the intentions of the disc s producers 3 Discs recorded in the VR Video Recording format cannot be played back 4 Scratched or stained d...

Страница 6: ...f your TV is compatible with 525 480 progressive scanning and you want to enjoy that high quality picture You must select the connection COMPONENT VIDEO OUT above and progressive scanning mode To set...

Страница 7: ...r display device or AV receiver amplifier for more information Note When using HDCP incompatible display device the picture will not be viewed properly The audio signals from the HDMI jack including t...

Страница 8: ...coder for Dolby Digital audio output Bitstream Connecting to the other device an MD deck or DAT deck etc without Dolby Digital decoder LPCM Connection Setting digital audio input jack Rear Terminals 1...

Страница 9: ...us number in program input To clear the numbers entered incorrectly To display the current disc mode To display the current disc mode To select items or settings To select items or settings To set the...

Страница 10: ...reverse speed To continue playback press PLAY B Paused and Step by Step Playback p y p y Press PAUSE F during playback To continue playback press PLAY B PAUSE F is pressed in the pause mode To contin...

Страница 11: ...automatically Note Some selections may take a while to be recognized Refer to On Screen Display on page 12 for more details p If you record data over 20 times it may not be played back correctly y For...

Страница 12: ...rack time 00 00 21 00 03 19 Disc time 00 00 25 00 40 15 elapsed time of the current time current repeat mode Off All Track A B elapsed time of current track 1 2 3 remaining time of current track elaps...

Страница 13: ...Note During random playback you cannot go back to the previous track or file using SKIP G allows you to search tracks or files randomly Note While a program is being played back STOP C works as follow...

Страница 14: ...ot simultaneously from various angles You can change the camera angle if appears on the TV screen If the Angle Icon setting is Off in Display menu will not appear Refer to pages 15 16 1 1 3 Note Some...

Страница 15: ...play Video Audio Others Player Menu Subtitle Audio Disc Menu Language Display Video Audio Others Player Menu Subtitle Audio Disc Menu Language menu Display menu Video menu Audio menu Others menu Langu...

Страница 16: ...anging Progressive setting is not available while HDMI cable is connected Before proceeding Make sure your TV supports the selected item Connect with component video cable NOTE If a blank screen appea...

Страница 17: ...gital Out On Off Dual mono Down Sampling DRC Digital Out Select the desired setting DRC Dynamic Range Control Default On Set to On to compress the range between soft and loud sounds Display Video Audi...

Страница 18: ...tal menu Note Parental If you forget the password press 4 7 3 7 at step 3 above then enter your new password Initialize When you do not wish to initialize press SETUP to exit the menu at step 4 The se...

Страница 19: ...wiping from center to edge Disc cannot be played back Clean the disc Ensure the disc is inserted in correct direction Check if the disc is defective by trying another disc Cancel the parental lock or...

Страница 20: ...rar los n meros mal entrados Para mostrar el modo de disco actual Para mostrar el modo de disco actual Para seleccionar opciones o valores de configuraci n Para seleccionar opciones o valores de confi...

Страница 21: ...TERIALS ANY ACCESSORIES EXCEPT REMOTE CONTROL ANY COSMETIC PARTS COMPLETE ASSEMBLY PARTS DEMO OR FLOOR MODELS FUNAI CORP AND ITS REPRESENTATIVES OR AGENTS SHALL IN NO EVENT BE LIABLE FOR ANY GENERAL I...

Отзывы: