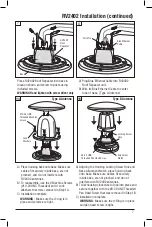
Place RV2402 Roof Repeater into base in
location shown and screw to posts using
included screws.
WARNING Hand tighten with screw driver only
A) Plug Blue Ethernet Cable into RV2402
B) Wire tie Blue Ethernet Cable to center
tube of base. (Type A Antenna)
Roof Repeater unit.
A) Place housing back onto base. Make sure
cables fit securely inside base, are not
pinched, and do not interfere with
RV2402 antennas.
A) Aligning the Housing Locking Screw Hole and
Base Alignment Notch, place housing back
onto base. Make sure cables fit securely
inside base, are not pinched, and do not
interfere with RV2402 antennas.
B) Twist housing clockwise to lock into place and
secure together with the #8-32 UNC Threaded
Pan Head Screw that was removed in Step 1B.
C) Installation complete.
WARNING -
Make sure the 0-Ring is in place
and pan head screw is tight.
B) To reassemble, use the 4
Machine Screws
(
#10-24 UNC Threaded)
and 4 Lock
Washers that were removed in Step 1A.
C) Installation complete.
WARNING - Make sure the O-ring is in
place and screws are tight.
Lock
Locking Screw
Hole
Alignment
Notch
Washers
7
8
9B
9A
RV2402
Roof
Repeater
Blue Ethernet
Cable
Wire Tie
Base
#10-24 UNC
Threaded Machine
Screws
#8-32 UNC
Threaded Pan Head
Screw
RV2402 Installation (continued)
Type A Antenna
Type B Antenna
7


