background image

Type A

Type B

WF-CON-LTE 

Installs Into These Pre Wired Antenna Models

2

Содержание RV2458

Страница 1: ...WF CON LTE Installation Manual RV2402 Extender RV2458 Router For Technical Assistance please call 310 735 2000 or visit www magnadyne com Patent No US 10 622 709 B2 Patent No US D855 591 S ...

Страница 2: ...Type A Type B WF CON LTE Installs IntoThese PreWired Antenna Models 2 ...

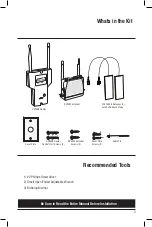
Страница 3: ... Router Control Unit Screws 2 Whats in the Kit Recommended Tools 1 2 Phillips Screwdriver 2 Small Open Ended Adjustable Wrench 3 Rubbing Alcohol 3 RV2458 Router RV2402 Extender LTE Paddle Antennas 2 with Self Adhesive Tape Be Sure to Read the Entire Manual Before Installation ...

Страница 4: ...f new cover plate B Screw new cover plate to wall using original mounting holes 1 2 3 310 735 2000 RV Link com Connect Blue Ethernet and Blue Power Cables to RV2458 Control Unit as pictured Router Control Unit Interior Installation Complete WARNING Do not connect a computer or electronic device to Ethernet port Will Cause Damage Bottom View Roof Repeater Only 5 Mount Router Control Unit to wall ne...

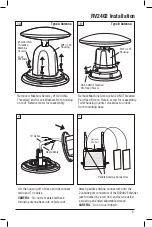
Страница 5: ...UNC Threaded Machine Screws Lock Washers WiFi LTE Housing TV Cable Radio Cable Paddle Antenna Connectors Wi Fi LTE Optional GPS Port Housing Remove Machine Screw 8 32 UNC Threaded Pan Head Screw Retain screw for reassembly Twist housing counter clockwise to unlock from mounting base 1B 8 32 UNC Threaded Pan Head Screw Attach paddle antenna connectors onto the 2 outsideport connectorsof theRV2402 E...

Страница 6: ...s wipe down the inside of the Wi Fi LTE housing with rubbing alcohol B Peel off adhesive back from paddle antennas C Firmly place into interior housing as shown IMPORTANT Paddles should be positioned opposite from each other for best reception A To create a clean surface for the paddle antennas wipe down the inside of the Wi Fi LTE housing with rubbing alcohol B Peel off adhesive back from paddle ...

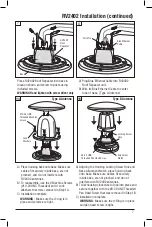
Страница 7: ...de base are not pinched and do not interfere with RV2402 antennas B Twist housing clockwise to lock into place and secure together with the 8 32 UNC Threaded Pan Head Screw that was removed in Step 1B C Installation complete WARNING Make sure the 0 Ring is in place and pan head screw is tight B To reassemble use the 4 Machine Screws 10 24 UNC Threaded and 4 Lock Washers that were removed in Step 1...

Страница 8: ...ories used in connection with this product or any damage to recording or recording tape or any damage to the products resulting from improper installation alteration accident misuse abuse or acts of nature MAGNADYNE CORPORATION OR ITS AUTHORIZED AGENTS SHALL NOT BE LIABLE TO ANYONE FOR CONSEQUENTIAL OR INCIDENTAL DAMAGES OR CLAIMS EXCEPT THOSE ACCORDED BY LAW NO EXPRESSED WARRANTY OR IMPLIED WARRA...

Отзывы: