3
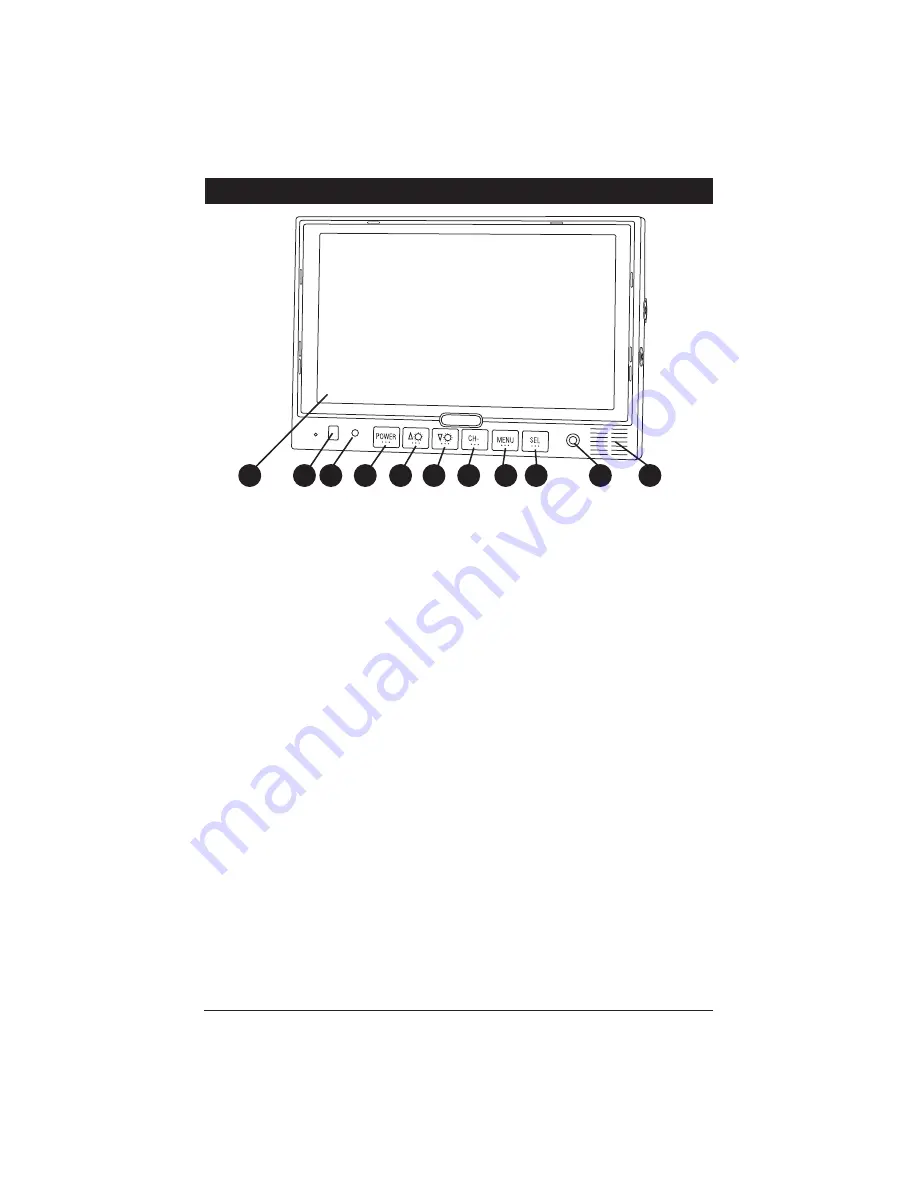
Monitor Features and Controls
1. LCD Screen
2. IR Sensor:
Receive
s
s
ignal from the
remote control.
3. LED Power Indicator:
A red LED indicate
s
the vehicle’
s
ignition
i
s
“On” and the monitor i
s
in the “
s
tand-
by” mode. When the vehicle i
s
put into
rever
s
e or the turn
s
ignal
s
are u
s
ed the
camera’
s
image will automatically appear
on the di
s
play.
Note:
The camera
s
can
not be manually
s
elected in thi
s
mode.
A green LED indicate
s
the power button
on the monitor ha
s
been pre
ss
ed and the
ignition i
s
“On”. The camera’
s
image
s
can manually be
s
elected to appear by
u
s
ing the
SEL
button. The video in jack
i
s
al
s
o operational.
LED i
s
off: The monitor ha
s
no function.
4. Power Button:
Pre
ss
thi
s
button to turn
the unit "On" or "Off".
Note:
The ignition key mu
s
t be in the
“On” po
s
ition.
5. Brightness Button (Decrease):
Pre
ss
thi
s
button to decrea
s
e the
s
creen’
s
brightne
ss
.
Note:
When the menu i
s
di
s
played pre
ss
thi
s
button to adju
s
t the
s
elected menu
item.
6. Brightness Button (Increase):
Pre
ss
thi
s
button to increa
s
e the
s
creen’
s
brightne
ss
.
Note:
When the menu i
s
di
s
played, pre
ss
thi
s
button to adju
s
t the
s
elected menu
item.
7. CH- Button (Menu Item Selection):
Pre
ss
thi
s
button to
s
elect a menu item
when a menu i
s
di
s
played.
8. Menu Button:
Pre
ss
thi
s
button to
s
elect
a de
s
ired menu
s
creen.
9. SEL:
Pre
ss
thi
s
button to
s
elect a video
s
ource
s
(CAM1, CAM2, CAM3 and D
V
D).
Note 1:
When the left turn
s
ignal i
s
acti-
vated CAM1 (left
s
ide view camera) i
s
s
elected automatically.
Note 2:
When the right turn
s
ignal i
s
activated CAM2 (right
s
ide view camera)
i
s
s
elected automatically.
Note 3:
When the vehicle i
s
put into
rever
s
e CAM3 (rearview camera) i
s
s
elected automatically.
10. Video Input Jack
11. Speaker:
The
s
peaker i
s
automatically
activated only when the vehicle i
s
put
into rever
s
e.
Note:
The rear camera mu
s
t have a built-
in microphone for proper operation.
2
1
4
7
8
9
3
10
11
5
6


