background image

Chapter 2: Magellan RoadMate

6

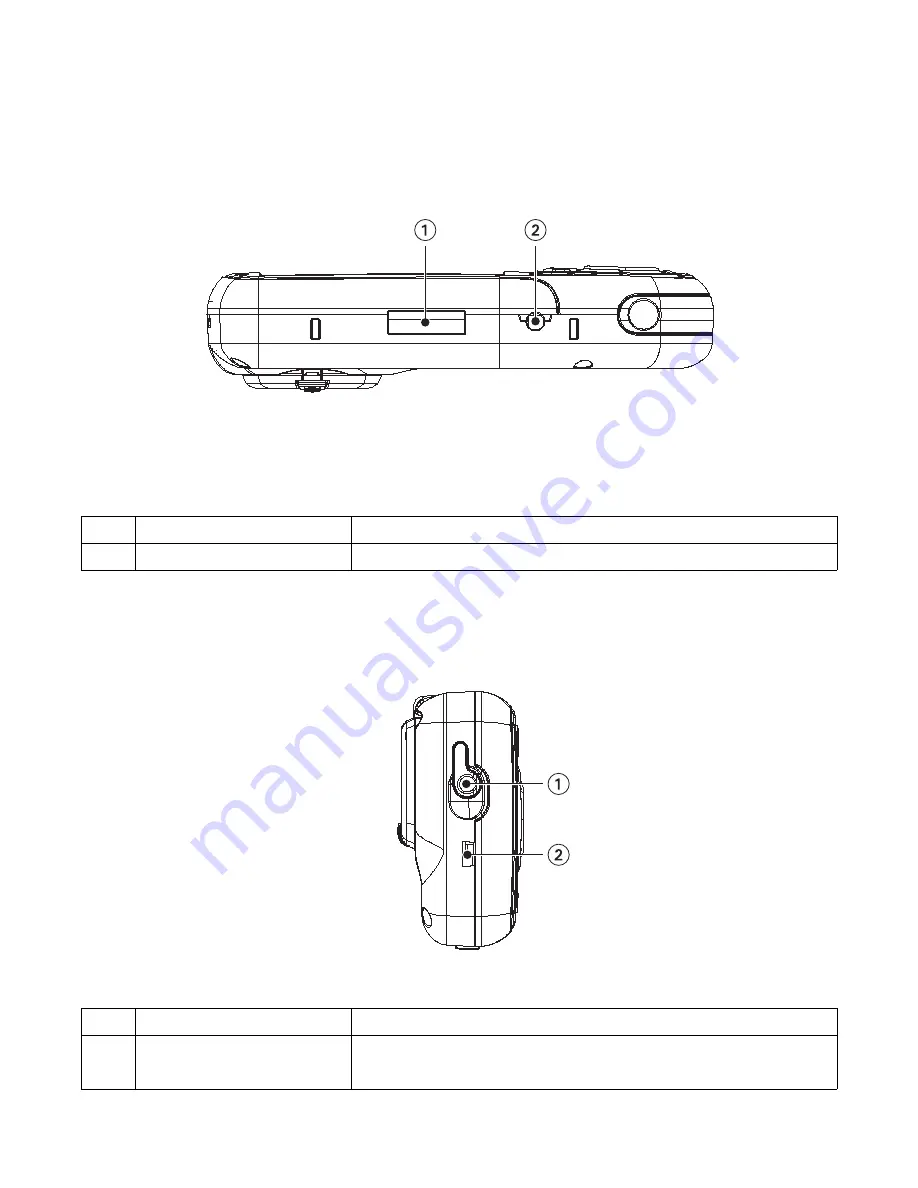
2.4 Bottom View

2.5 Left Side View

1

16-pin Connection

Used for future expansion.

2

External Power Connection

Plug in the AC Adapter or the 12 volt vehicle power adapter.

1

Stereo Headphone Connection

Used to connect the stereo headphones.

2

USB Connection

Plug the Magellan RoadMate into your PC to upload music, photos, and 
custom POI’s.

Содержание RoadMate 860T

Страница 1: ...Magellan RoadMate Reference Manual Instructions for Operating the Magellan RoadMate 860T...

Страница 2: ...he windshield mount or other mount or accessories that it does not obstruct the driver s view of the road interfere with the operation of the vehicle s safety devices such as air bags or present a haz...

Страница 3: ...posed to excess moisture About the Battery Use the charger approved for provided with your Magellan RoadMate 860T Do not mutilate puncture or dispose of the battery in fire The battery can burst or ex...

Страница 4: ...an outlet on a circuit different from that to which the receiver is connected Consult the dealer or an experienced radio TV technician for help In order to maintain compliance with FCC regulations sh...

Страница 5: ...2 Signal Acquisition Time 2 GPS Maps and Your Safety 3 Chapter2 Magellan RoadMate 4 Front View 4 Rear View 5 Top View 5 Bottom View 6 Left Side View 6 Right Side View 7 Enhanced Cradle Back View 7 Us...

Страница 6: ...g Your Route 25 Chapter 7 Selecting Destinations 27 Destination Screen 27 Country Selection Globe Button 27 Entering and Routing to Your Home Address 27 Selecting a Destination Using Select Address 28...

Страница 7: ...Information 74 User Storage 74 Diagnostics 74 Audio Test 74 Touchscreen Test 7 4 Keypad Test 74 Video Test 74 Chapter 11 Help 75 Quick Tips 75 Contact Us 75 Chapter 12 Magellan RoadMate Tools Installa...

Страница 8: ...Single Photo 88 Previous Image left arrow 88 Zoom 88 Slideshow 89 Pan 89 Rotate Image 89 Next Image right arrow 89 ESC 89 Manage Photos 89 List View 89 Thumbnail 89 Rename 89 Properties 90 Tools 90 Pr...

Страница 9: ...hnical Support by Fax 909 494 7777 Attn Tech Support or E Mail magellansupport thalesnavigation com 1 2 Warranty Service To obtain warranty service on your unit you must contact us for a return author...

Страница 10: ...rtified precision positioning 1 2 How Satellite Navigation Works Global navigation satellites continuously transmit time and distance information as they orbit Earth in a precise formation Navigation...

Страница 11: ...these changes After processing the data we test the compatibility of the map with our GPS devices to ensure that the products we release work properly on our GPS devices We also beta test our product...

Страница 12: ...ellan RoadMate GPS receiver should be operated only by vehicle passengers or by the driver when the vehicle has come to a complete stop The driver must not attempt to view the display while driving Di...

Страница 13: ...charged orange while battery is charging 6 Zoom Out Button While viewing the map press to zoom out from the center of the display The Zoom Out Button can also be used with long lists to scroll one pag...

Страница 14: ...hapter 4 Antenna Position on page 13 3 External Antenna Connection Plug in an external antenna optional for better signal acquisition 1 Storage Card slot Used to backup and restore personal navigation...

Страница 15: ...on Used for future expansion 2 External Power Connection Plug in the AC Adapter or the 12 volt vehicle power adapter 1 Stereo Headphone Connection Used to connect the stereo headphones 2 USB Connectio...

Страница 16: ...Battery Compartment Cover Rechargeable battery External GPS Antenna Input External GPS antenna sold separately Audio Out Note There are two audio out jacks one on the receiver and one on the enhanced...

Страница 17: ...r gasket The storage card can only be inserted in one direction Do not force the card into the slot Insert the storage card into the slot with the metal contacts going in first and the bevelled edge t...

Страница 18: ...ve the battery compartment cover Remove the battery 2 9 2 Installing the Battery Insert the new battery with the battery diagram label side up and the pins facing inward Then replace the battery compa...

Страница 19: ...lt of how you choose to mount the Magellan RoadMate 3 1 Installing the Windshield Mount Position the antenna If an external antenna will be used leave the antenna folded down against the Magellan Road...

Страница 20: ...he TrafficKit Module into the enhanced cradle Connect the antenna cable to the TrafficKit Module Connect the power in cable from the TrafficKit Module to the cigarette lighter adapter cable Press the...

Страница 21: ...in the vehicle Using the suction cups at the end of the FM antenna stretch out the FM antenna and attach it to the windshield Route the cabling and the TrafficKit module so that it is secure and out o...

Страница 22: ...most vehicles the antenna should be rotated to approximately 90 from the unit to receive the best possible satellite signal The antenna positioning shown above should be used whenever an external ante...

Страница 23: ...Mate can be configured to automatically go into sleep mode after a specified amount of time Press the MENU key on the unit then select System Settings and select Power Management Select the Auto Power...

Страница 24: ...me The Spacebar is used to insert spaces between characters or words 5 7 Additional Characters More Button When you are entering characters you may need to add punctuation or other special characters...

Страница 25: ...ess of entering data Example Suppose that you need to input the name of a city in this case San Francisco Select S Select A Select N Select the spacebar When enough characters have been entered the Ma...

Страница 26: ...ns with Fort The list returned is subject to the additional parameters set by the search such as the city or state entered The database only indexes the main names of streets In the example above only...

Страница 27: ...nly when a route has been calculated This screen displays a list of maneuvers to follow in order to arrive at the destination It can also be used exclude a maneuver and then recalculate the route To a...

Страница 28: ...or and 3D view overhead and slightly behind The 3D view offers a more realistic view showing a perspective of the roads ahead While in 3D Map mode you can still touch icons on the screen to route to t...

Страница 29: ...n key to scroll the list up one page at a time 6 5 Maneuver List Screen The Maneuver List screen can be viewed only after a route has been calculated From the Map screen press the VIEW key to bring up...

Страница 30: ...wice to view the TrueView 3D screen In split mode the left half of the screen shows TrueView 3D while the right half of the screen shows the Map Estimated Time to Destination Direction of Travel Dista...

Страница 31: ...eways This selection calculates the route avoiding freeways whenever possible Most Use of Freeways This selection calculates the route using freeways as much as possible This option will use toll road...

Страница 32: ...respond reset the unit as described on page 14 The Resume Guidance screen will appear Select Resume to continue the route to the selected destination Select Cancel to clear the route and display the D...

Страница 33: ...e you are in the Locate screen you can save your current location to your Address Book Select Save Location The information about your location is displayed Select Edit Name and or Edit Information an...

Страница 34: ...ed at the new destination you will be prompted to resume guidance to your original destination Select Resume The Magellan RoadMate will calculate the route to your original destination using the Route...

Страница 35: ...Custom and select the custom distance Enter the number of miles for your detour and then select OK Select Route The Magellan RoadMate will recalculate the alternate route to your destination You can a...

Страница 36: ...er Search by City Search by Zip Code or Search by State For this example select Search by CIty Enter characters that start a word within the city name see Multi Word Indexing on page 17 Select OK Use...

Страница 37: ...ate or Previous City Use Search By City when you know the city that the address can be found in Use Search by Zip Code if you aren t sure of how to spell the city but know the zip code Use Search By S...

Страница 38: ...he list up or down if necessary and select the desired street Enter the street address The acceptable range of numbers is displayed at the top of the screen Select Done Select the desired Route Method...

Страница 39: ...ter characters that start a word within the street name see Multi Word Indexing on page 17 Do not enter prefixes such as North or N or the type of street such as Ave or Street Select OK Use the Naviga...

Страница 40: ...e 17 Do not enter prefixes such as North or N or the type of street such as Ave or Street Select OK Use the Navigation key to scroll the list up or down if necessary and select the desired street Ente...

Страница 41: ...you a shortened list of entries from your Address Book marked as Favorites Create New Entry lets you add a new address to your Address Book and Trip Planner indicated by the Trip button lets you creat...

Страница 42: ...rom the Destination screen select Address Book then select Previous Destinations Use the Navigation key to scroll the list up or down if necessary and select the desired previous destination Select Ed...

Страница 43: ...electing the Favorites box at the bottom of the Edit Address Book screen Only address book entries can be saved as Favorites Previous Destinations must be saved to the Address Book first and can then...

Страница 44: ...ted The address cannot be changed Select the line you want to modify Use the keypad to enter the desired text and select OK When you have finished making changes select Save and then press ESCAPE 7 5...

Страница 45: ...RoadMate will calculate the route When the calculations are complete the Map screen will be displayed 7 5 3 1 Editing an Address From the Destination screen select Address Book then select List Addre...

Страница 46: ...m the list and you are returned to the Address Book screen 7 5 4 Create New Entry Use Create New Entry to add entries to your address book These entries can then be designated as Favorites to include...

Страница 47: ...splayed at the top of the screen Select Done The top line Name and the bottom line Information can be edited The address cannot be changed Select the line you want to modify Use the keypad to enter th...

Страница 48: ...p of the screen Select Done The top line Name and the bottom line Information can be edited The address cannot be changed Select the line you want to modify Use the keypad to enter the desired text an...

Страница 49: ...loaded database that have the street name you selected Enter the street address The acceptable range of numbers is displayed at the top of the screen Select Done The top line Name and the bottom line...

Страница 50: ...ptable range of numbers is displayed at the top of the screen Select Done The top line Name and the bottom line Information can be edited The address cannot be changed Select the line you want to modi...

Страница 51: ...to your trip Map Map button will add a destination by selecting a point on the map Select Address will add a destination by creating a new address Address Book will add a destination from a previous d...

Страница 52: ...h Route Optimization you can sort the destinations in your trip from closest to farthest From the Trip Planner screen select Edit Select the trip to optimize Select Optimize The destinations are sorte...

Страница 53: ...the second destination in the list will exclude the first destination selecting the third destination in the list will exclude the first and second destinations and so on Select the desired Route Meth...

Страница 54: ...to delete and select Delete from the pop up menu Select the destination you wish to change and select Move Up from the pop up menu When you have finished select Save and you are returned to the Trip...

Страница 55: ...7 Selecting Destinations 46 Select Delete Select the trip you wish to delete A dialog box will appear to confirm your selection Select Yes The trip has been deleted Select Rename Select the trip to be...

Страница 56: ...parks gas stations and banks to schools and police stations and more The purpose of the POI database accessed through the Dining ATM Gas menu option is to provide you with a list of popular destinatio...

Страница 57: ...omplete the Map screen will be displayed 7 6 1 2 List By City Selecting List by City will list the POIs matching the name you entered within a selected city Select List by City Enter characters that s...

Страница 58: ...the desired POI Select the desired Route Method The Magellan RoadMate will calculate the route When the calculations are complete the Map screen will be displayed 7 6 2 Select Category If you do not...

Страница 59: ...if necessary and select the desired city Use the Navigation key to scroll the list up or down if necessary and select the desired POI Select the desired Route Method The Magellan RoadMate will calcul...

Страница 60: ...additional method for finding POIs Select Cuisine Type Use the Navigation key to select the type of restaurant you prefer Use the Navigation key to scroll the list up or down if necessary and select t...

Страница 61: ...hen the calculations are complete the Map screen will be displayed 7 7 Selecting an Intersection as a Destination An intersection of two streets can be used as a destination for your trip The search f...

Страница 62: ...within the name of the second street and select OK Use the Navigation key to scroll the list up or down if necessary and select the second street from the list Select the desired Route Method The Mag...

Страница 63: ...he list Enter characters that start a word within the street name see Multi Word Indexing on page 17 Do not enter prefixes such as North or N or the type of street such as Ave or Street Select OK Use...

Страница 64: ...hich icons you choose to display in order to prevent your map screen from being cluttered For a list of POI Categories see POI Categories on page 91 Select POI Selection Select Mark All to display all...

Страница 65: ...isplay or hide on the Map screen When you have finished press the ESCAPE key to return to the Custom POIs menu You can also be alerted when you approach a custom POI The Set Alarm function works for C...

Страница 66: ...POI alerts set you can now choose at what point you will be alerted Select Alert Parameters Select the POI category to customize The Detection Angle is set to alert you when you are within so many de...

Страница 67: ...s in which to set the alert When you have finished select OK The First Warning is set to alert you when you are within a certain number of feet from the POI Select First Warning Use the numeric keypad...

Страница 68: ...s a final alert when you are within a certain number of feet from the POI Select Last Warning Use the numeric keypad to enter the number of feet in which to alert you When you have finished select OK...

Страница 69: ...ilable in 2D Map mode Select Miles or Kilometers as the unit of measure for distance When you have finished select Save 8 1 4 TrueView Options TrueView options enable you to control how and when the T...

Страница 70: ...color scheme for driving at night When you have finished select Save Select from nine available color schemes When you have finished select Save and you will be returned to the Select Map Color menu 8...

Страница 71: ...elow 15 MPH you may press the detour icon on the Map screen in order for the Magellan RoadMate to calculate an alternate route around traffic Select Detour Options Select the distance of the detour Yo...

Страница 72: ...when it will alert you once more 8 1 8 Voice Options From the voice options menu you can select to have your voice prompts announced in either a male or a female voice in the language currently enabl...

Страница 73: ...S Status screens refer to GPS Status Screen on page 93 8 1 11 2 Set GPS Position Set GPS Position enables you to manually set the location of the Current Position icon If you have travelled a long dis...

Страница 74: ...capabilities of the Magellan RoadMate without actually driving In order for the simulation to work you must set a route first Select Simulator Mode Select Simulate to begin the simulation Set the spee...

Страница 75: ...When you have finished select OK Select Unlock The database is unlocked Select OK Select Europe and then select Switch Select Yes After the unit has powered down turn the unit back on and the new map...

Страница 76: ...route instructs the Magellan RoadMate to modify the route to avoid the traffic incident at a selected distance or it can be set to just provide an alert at a selected distance Subscriptions is used t...

Страница 77: ...Storage Card If you do not have a card inserted you will be prompted to insert a card Insert a card and reselect Restore from Mass Storage Card A dialog box will appear asking you to confirm your sel...

Страница 78: ...r vacation The information for the trip can be saved and viewed at any time providing you easy access to information on your current trip as well as previous trips To access these features press the M...

Страница 79: ...rrently running select Stop The Trip Computer will stop recording until restarted or reset While the Trip Computer is in a Stopped state select Start to continue recording the current trip or select r...

Страница 80: ...uter will remain in a Running state 8 2 1 4 Viewing a Saved Trip Report From the Trip Computer screen select the Trip Report you wish to view The saved Trip Report is displayed Press the ESCAPE key wh...

Страница 81: ...at will conserve battery power and display life Select Power Management Select the time period to put the unit in sleep mode Select to enable or disable turning the screen off when music is being play...

Страница 82: ...ished select OK Then from the Set New Password screen select OK 9 4 Language To change the language for the menu text and voice prompts for navigation select Language Select the desired language A dia...

Страница 83: ...ard Note Although 10 GB of storage on the unit hard disk is available the actual storage may vary and can be slightly less 10 3 Diagnostics Diagnostics enables you to test key performance elements of...

Страница 84: ...Quick Tips Quick Tips for New Users provides information in the following categories on basic usage and how to get the best signal reception Getting Started Unobstructed View Remain Stationary Antenn...

Страница 85: ...Program Folder to place the application icons The Magellan RoadMate Tools software will be installed After it has finished installing a dialog box pertaining to Microsoft DIgital Signatures may appear...

Страница 86: ...ts totalling 360 degrees Starting at the Prime Meridian which is The Royal Observatory in Greenwich England or zero degrees Longitude lines are drawn in 10 degree increments 180 degrees to the West an...

Страница 87: ...n available USB port on your computer Turn on your Magellan RoadMate by sliding the Reset switch to position 1 see Top View on page 5 or by pressing the Suspend button see Front View on page 4 to wake...

Страница 88: ...ick on the arrow to copy the file to your unit When you have finished copying files remove the USB cable from the unit 13 5 Creating a New POI FIle There are two ways to create a POI file You can eith...

Страница 89: ...Image icon for the POI The Description field is optional The Alert feature is an audible alarm that lets you know when you are within a certain distance from the POI You can set an initial reminder D...

Страница 90: ...r data file has a header row this row will generate an error so you should start at line two or below Next choose how the data is separated and click on Next You now need to define the data columns Cl...

Страница 91: ...ressing the Suspend button see Front View on page 4 to wake up the receiver if the unit is in sleep mode When the Warning screen appears insert the small end of the USB cable into the USB port on your...

Страница 92: ...e Music Use the Navigation key or the Down arrow to select the song file you wish to play and press OK The song will begin playing automatically At the top of the screen is displayed the name of the s...

Страница 93: ...ons to highlight the song files you wish to add to the playlist Select Add to Playlist right arrow to add the highlighted song to the playlist Continue adding files to the playlist When you have finis...

Страница 94: ...play select Play Mode for song play options Repeat All Repeats all the songs in the current playlist starting at the beginning of the order This function works only if there are two or more songs in...

Страница 95: ...ng preconfigured options Default flat Jazz Classical Rock Techno Dance Hall Live Full Bass Full Treble and Full Bass Treble You are not able to however manually set the equalizer Select the Equalizer...

Страница 96: ...the Suspend button see Front View on page 4 to wake up the receiver if the unit is in sleep mode See Top View on page 5 When the Warning screen appears insert the small end of the USB cable into the U...

Страница 97: ...Select List Files Use the Navigation key or the Down arrow to highlight the photo you wish to view and select View While viewing the image double clicking on the image that is tapping twice on the sc...

Страница 98: ...te the image 90 counterclockwise 90 clockwise or 180 17 1 6 Next Image right arrow Press the right arrow button to view the next image in the folder This button is grayed out not functional when viewi...

Страница 99: ...to either thumbnail or file list view Slideshow The slideshow preferences enable you to set the view properties the sequence of photos the transition between photos and the duration between photos Ba...

Страница 100: ...y Center The geographical center of a selected city Clothing Clothing retail stores Convention Center Major Convention Centers Education Schools Colleges and other learning institutions Emergency Serv...

Страница 101: ...VD Drive for Map Upgrades USB Port Professional Services Business office locations Public Buildings Libraries museums and government buildings Rest Area Rest stops along major highways Shopping Malls...

Страница 102: ...means got satellite time for this channel d2 Azimuth in degrees d3 Elevation angle in degrees d4 SNR signal to noise ratio it is ratio Hz not dB unit c1 U Used for position fix U Not used for position...

Страница 103: ...city no position fix 31 BAD_VELOCITY_PDOP 50 too big pdop for velocity 32 TOO_MANY_SATS_FOR_2D_VEL there are 4 or more satellites but 2D fix provided 51 WRONG_NUMSAT number of satellite for fix 12 or...

Страница 104: ...ltitude in mean sea level meter TTFF XXXXs Time To First Fix in second Satellite U T XX XX the number of satellite used and tracked PDOP XX X Position Dilution Of Precision VDOP XX X Vertical Dilution...

Страница 105: ...tellite U T 11 12 PDOP 2 3 VDOP 1 7 TTFF 0 0 HDOP 1 3 FOMS P V H 2 UTC TIME 08 16 2004 22 56 53 CH PRN AZ EL SNR U N 01 27V 311 54 334 U 02 03E 078 29 135 U 03 13e 079 81 204 U 04 20e 175 06 90 N 05 3...

Страница 106: ...You can add custom POIs to your Magellan RoadMate to make up for those you route to often see Chapter 13 Magellan RoadMate POI Manager on page 77 and Custom POIs on page 55 The GPS signal is weak What...

Отзывы: