background image

16

  DE

Nutzung der Ausgabe über USB

MADRIX

®

 NEBULA kann direkt über USB mit dem Computer verbunden werden, 

auf dem die MADRIX

®

-Software genutzt wird. Daten werden über USB zum 

Gerät und intern zu den beiden Anschlüssen gesendet (Port 1 und Port 2):

Schritt 1)  Nehmen Sie MADRIX

®

 NEBULA wie zuvor beschrieben in Betrieb.

Schritt 2)  Verbinden Sie das Gerät mit Hilfe des mitgelieferten USB-Kabels
 

mit einem freien USB 2.0-Anschluss Ihres Computers.

Schritt 3)  Starten Sie die MADRIX

®

-Software und aktivieren Sie die USB- 


Treiber unter “Systemeinstellungen...” 

à

 “Optionen…” 

à

 Reiter 

 “USB-Geräte” 

à

 “MADRIX NEBULA” und bestätigen Sie mit “OK”.

Schritt 4)  Konfigurieren Sie die Ausgabe unter “Systemeinstellungen...” 

à


 “Geräteverwaltung...” 

à

 Reiter “DMX-Geräte” und aktivieren Sie  


“Einschalten” für jeden benötigten Anschluss unter “Einstellungen”.

Schritt 5)  Stellen Sie die virtuelle LED-Matrix unter “Systemeinstellungen...” 
 

à

 “Matrixgenerator...” oder 

à

 “Beleuchtungsplaner...” ein.

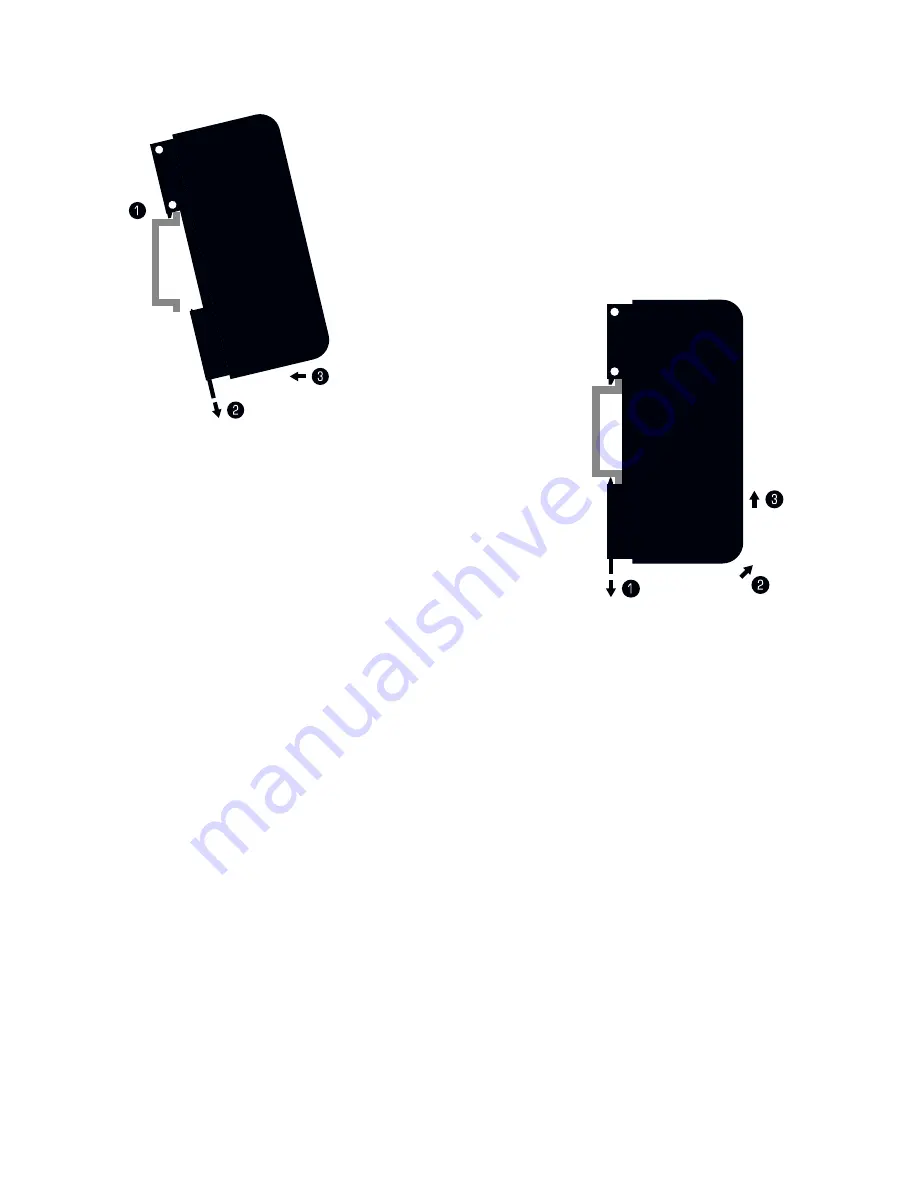
Montage auf Hutschienen

  Montage

 (Links abgebildet)


Schritt 1)  Hängen Sie das Gerät schräg auf die  


obere Kante der Hutschiene ein.


Schritt 2)  Lösen Sie die Entriegelung.


Schritt 3)  Drücken Sie das Gerät auf die Schiene  


und lassen Sie die Entriegelung einrasten.

Demontage

 (Rechts abgebildet)

Schritt 1)  Lösen Sie die Entriegelung.
Schritt 2)  Ziehen Sie den unteren Teil des Gerätes 
 

schräg von der Schiene.

Schritt 3)  Heben Sie das Gerät von der Hutschiene.

Содержание Nebula

Страница 1: ...NEBULA Quick Start Guide T echnical Manual...

Страница 2: ...at you fully understand all information This MADRIX NEBULA Quick Start Guide is written in English and German Diese Kurzanleitung wurde in englischer und deutscher Sprache verfasst Developed and made...

Страница 3: ...e happenings circumstances or actions that inoage GmbH does not have influence on no matter if the damages as well as consequential damages are direct or indirect whether they are special damages or o...

Страница 4: ...ther liquids Turn off the power if you are not using the device for a long time Avoid unwanted voltage on the cables at all times Do not remove any parts from the unit or connect to an ungrounded circ...

Страница 5: ...nge Relative humidity Supported LEDs As of September 2017 see www madrix com for the latest information DC 5 V 24 V A via 2 pin screw terminal 12 A max B via 5 V USB C via Port 1 or 2 sourced from LED...

Страница 6: ...are in order to access all features of MADRIX NEBULA including the USB connection Art Net and Sync Mode MADRIX Minimum System Requirements And MADRIX Supported Operating Systems For the latest informa...

Страница 7: ...st please choose your preferred language and confirm with OK You may abort the process at any time by clicking Cancel Fourth the Choose Components window allows you to select which items you want to i...

Страница 8: ...Status LED for USB 6 Status LED for Port 1 7 Status LED for Port 2 8 Port 1 9 Reset button 10 DIN rail unlocking clip 11 Port 2 2x Mounting brackets GR OU ND DATA CLOCK V GR OU ND DATA CLOCK V 11 10...

Страница 9: ...minal into the device The screws must face upwards Step 4 Connect to USB or to Ethernet network for data as required Step 5 Do not switch on your supply of power until all required power cables and LE...

Страница 10: ...r GROUND DATA Connection possible for CLOCK if needed Connection required for V Represents single LEDs or multiple LED stripes LED strips LED tape up to the maximum possible amount per port Represents...

Страница 11: ...plied separately to the LEDs as required The LEDs are connected only to Port 1 or only to Port 2 via GROUND DATA and possibly CLOCK but not via V Variation C1 Port 1 or 2 Description Power is supplied...

Страница 12: ...to both LEDs as required LEDs are connected to both ports via GROUND DATA possibly CLOCK but only once via V This variation is suitable for LEDs that use 9 V due to the expected voltage drop over the...

Страница 13: ...Ds and NEBULA for LEDs with 5 V power supply Variation X1 Port 1 or 2 Description Power is supplied only once It is supplied to NEBULA with 12 A max and routed through to the LEDs which are connected...

Страница 14: ...routed through to all LEDs which are connected to both ports via GROUND DATA possibly CLOCK and V with 6 A max load for each port Variation Z Description Power is supplied only once and it is only su...

Страница 15: ...t the MADRIX Software and enable USB drivers Go to Preferences Options tab Devices USB Activate MADRIX NEBULA and click OK The driver is activated by default Step 2b For the Ethernet connection enable...

Страница 16: ...ff No data is sent No data is sent Blinking green Sending data to Port 1 The output port works Sending data to Port 2 The output port works STATUS STATUS LED ETHERNET Green off 10 MBit s connected Gre...

Страница 17: ...MADRIX Software Data is distributed to MADRIX NEBULA via USB cabling and sent to the output ports Port 1 and Port 2 Step 1 Put MADRIX NEBULA into operation by connecting the LEDs supplying power and...

Страница 18: ...ton loupe icon and the device appears in the list Step 5 Go to Preferences Device Manager tab DMX Devices to configure the output Activate Enable for each required output port in the section Settings...

Страница 19: ...formity The device complies with the requirements set forth in the council Directive of the law of the Member States relating to electromagnetic compatibility 2014 30 EU the Low Voltage Directive 2014...

Страница 20: ...to create a network Where do I activate the Sync Mode You can activate it in the MADRIX Software under Preferences Device Manager tab Art Net Where can I find the latest firmware update The latest MA...

Страница 21: ...ationen verstanden haben Diese Kurzanleitung wurde in englischer und deutscher Sprache verfasst This MADRIX NEBULA Quick Start Guide is written in English and German Entwickelt und hergestellt in Deut...

Страница 22: ...t nde oder Handlungen auf die inoage GmbH keinen Einfluss hat ganz gleich ob es sich um direkte oder indirekte Sch den Folgesch den oder spezielle Sch den handelt und ob diese vom Besitzer oder einer...

Страница 23: ...iten Trennen Sie das Ger t bei l ngerer Nichtbenutzung von der Spannungsversorgung Entfernen Sie keine Teile vom Ger t oder andere Bauteile und verbinden Sie es niemals mit einem ungeerdeten Stromkrei...

Страница 24: ...e Abma e Gewicht Temperaturbereich Relative Luftfeuchte Datenprotokolle Stand September 2017 Neueste Informationen auf www madrix com 5 V 24 V Gleichstrom ber A 2 polige Schraubklemme max 12 A B 5 V U...

Страница 25: ...g Art Net und Synchronisationsmodus wird die MADRIX Software empfohlen Min Systemanforderungen f r MADRIX und unterst tzte Betriebssysteme Die aktuellsten Informationen stehen zur Verf gung auf www ma...

Страница 26: ...che aus Best tigen Sie mit OK Der Installationsvorgang kann jeder Zeit mit Cancel Abbrechen beendet werden Das vierte Fenster stellt die Komponenten zur Auswahl Eine Erkl rung ist f r jede Komponente...

Страница 27: ...r Strom 5 Status LED f r USB 6 Status LED f r Anschluss 1 7 Status LED f r Anschluss 2 8 Anschluss 1 Port 1 9 Reset Taste 10 Hutschienen Entriegelung 11 Anschluss 2 Port 2 2x Wandhalterungen GR OU ND...

Страница 28: ...en Die Schrauben der Klemme m ssen dabei nach oben zeigen Schritt 4 Datenverbindung wie ben tigt ber USB oder Netzwerk herstellen Schritt 5 Die Spannungsversorgung erst herstellen wenn alle Stromkabel...

Страница 29: ...E V NICHT MEHRFACH EIN Legende Verbindung erforderlich f r MASSE DATEN Verbindung bei Bedarf m glich f r TAKT Verbindung erforderlich f r V Repr sentiert einzelne oder mehrere LED Ketten bis zur maxim...

Страница 30: ...rd separat f r NEBULA und die LEDs wie ben tigt bereitgestellt Die LEDs sind entweder an Anschluss 1 oder 2 angeschlossen ber MASSE DATEN und TAKT bei Bedarf aber nicht ber V Variante C1 Port 1 od 2 B...

Страница 31: ...rd f r alle LEDs wie ben tigt bereitgestellt LEDs sind an beiden Anschl ssen verbunden ber MASSE DATEN und TAKT bei Bedarf aber nur einmal ber V DurcherwartbarenSpannungsabfall berdieL ngederLED Kette...

Страница 32: ...ungsversorgung wird separat f r NEBULA ber USB und die LEDs wie ben tigt bereitgestellt Die LEDs sind mit NEBULA verbunden ber MASSE DATEN und TAKT bei Bedarf aber nicht ber V Variante D Beschreibung...

Страница 33: ...ersorgung zw LEDs und NEBULA f r LEDs mit 5 V Variante Y2 Beschreibung Die Spannungsversorgung wird separat f r NEBULA ber USB und die LEDs wie ben tigt bereitgestellt LEDs sind an beiden Anschl ssen...

Страница 34: ...emeinstellungen Optionen Reiter USB Ger te MADRIX NEBULA aktivieren Mit OK best tigen Der Treiber ist standardm ig aktiviert Schritt 2b F r die Netzwerkverbindung in MADRIX unter System einstellungen...

Страница 35: ...g Das Ger t hat keinen Strom Permanent gr n Spannungsversorgung liegt an Das Ger t hat Strom Gr n blinkend Bootloader aktiviert Ger t zur cksetzen siehe unten STATUS STATUS LED USB Ausgeschaltet USB n...

Страница 36: ...BULA und best tigen Sie mit OK Schritt 4 Konfigurieren Sie die Ausgabe unter Systemeinstellungen Ger teverwaltung Reiter DMX Ger te und aktivieren Sie Einschalten f r jeden ben tigten Anschluss unter...

Страница 37: ...Einschalten und bet tigen Sie das Lupen Symbol Das Ger t erscheint in der Liste Schritt 5 Konfigurieren Sie die Ausgabe unter Systemeinstellungen Ger teverwaltung Reiter DMX Ger te und aktivieren Sie...

Страница 38: ...habung oder technische Probleme auftauchen konsultieren Sie bitte die weiteren Benutzerhandb cher kontaktieren Sie Ihren H ndler oder besuchen Sie die Internetseite www madrix com Anfragen k nnen auch...

Страница 39: ...GBit s als Netzwerk verbinden Wo kann ich den Modus zur Synchronisation einstellen Dieser kann in der MADRIX Software im Men Systemeinstellungen Ger teverwaltung Reiter Art Net aktiviert werden Wo fi...

Страница 40: ...www madrix com...

Отзывы: