40
Appendix A – Quick Set-up
IMPORTANT:
To properly and effectively program the system you must configure the Sensors, Relays, Zones and Signals. If the user
has not entered any parameters, the system WILL NOT be monitoring the sensors or controlling the ventilation system. The relays will
be in the not actuated state and the horn and strobe outputs will be off.
Be sure that the 4-20mA output on each sensor is set to “On”.
1.
Configure System
; allows the installer to set the time of day, day of the week, load the default configuration, configure custom
sensors and change the password.
2.
Configure Sensors
; defines the Sensor type – CO, NO2, EX, NH3, H2S, REF, CO2, O2, Custom (wildcard) or None and sets
Alarm Level, Warning Level, and Sensor Range
3.
Configure Relays, Horn and Strobe:
defines operation as Normally Off or On, Delay Time, Minimum Runtime – this applies to all
three relays as well as the horn and strobe.
Note:
The Delay Time default is 1 minute. If the duration of a test procedure or gas exposure is less than 1 minute,
the relays, horns and strobes may not engage even though the DVP-120 display and the sensors respond. When
testing the system disable the delay (set Delay Time to zero minutes/seconds).
4.
Configure Zones:
defines Sensor Input & Relay/Alarm Output and sets up the sensor Groups (set of sensors of same type and
output within the same zone) - Sensor type, Sensor Number, Rising Trip point and Falling Trip point
5.
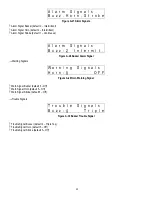
Configure Signals:
defines the output of the Alarm, Warning and Trouble Signals (Buzzer, Horn and Strobe) as On, Off,
Intermittent, Continuous, etc.
Note 1:
The default Password is 1234. If the password has been changed and/or lost:
• Power down the unit. Remove the Jumper Shorting Connector from the EXT header and place it onto the top two pins of the
SYS header.
• Power up the DVP-120. The first display is the current password on the unit.
• Power down the unit. Remove the Jumper Shorting Connector from the SYS header and place it back onto the two bottom
pins of the EXT header.
Note 2:
When entering multiple digit values the Up arrow (
) acts as an enter key and it is not necessary to enter all allowed fields.
Any other key is ignored or cancels the current parameter change.
Note 3:
The MENU key will cause the system to shift to the Configuration Menu. The up and down and left and right arrow keys will
scroll through all configuration parameters.
Default Configuration:
The default configuration is:
Password 1234
Sensors
Undefined
Alarm signals
Buzzer = Intermittent, Horn = Intermittent, Strobe = Continuous
Warning signals
Buzzer = Off, Horn = Off, Strobe = Off
Trouble signals
Buzzer = Triple Tap, Horn = Off, Strobe = Off
Relay 1
Normally off, 1 minute turn on delay, 1 minute minimum on time
Relay 2
Normally off, 1 minute turn on delay, 1 minute minimum on time
Relay 3
Normally off, 1 minute turn on delay, 1 minute minimum on time
Horn
Normally off, 1 minute turn on delay, 0 (zero) minimum on time
Strobe
Normally off, 1 minute turn on delay, 0 (zero) minimum on time
Zone1
Controls R1,
Zone2 Controls
R2,
Zone3 Controls
R3
Group 1 in each zone Type 1 CO, Voting mode, Quorum = 1


