background image

Manual URYXXON

®

 500

MN

42

Manual URYXXON

®

 500 V 01 / 03.10

8.7.3. Multi user
The  multi  user  mode  allows  you  to  set-up  multiple  users  with 

individual passwords. Only the first user in the user group has 

administrator  rights. All  other  users  cannot  access  the  instru-

ment settings. If the multi user mode is set, all print-outs show 

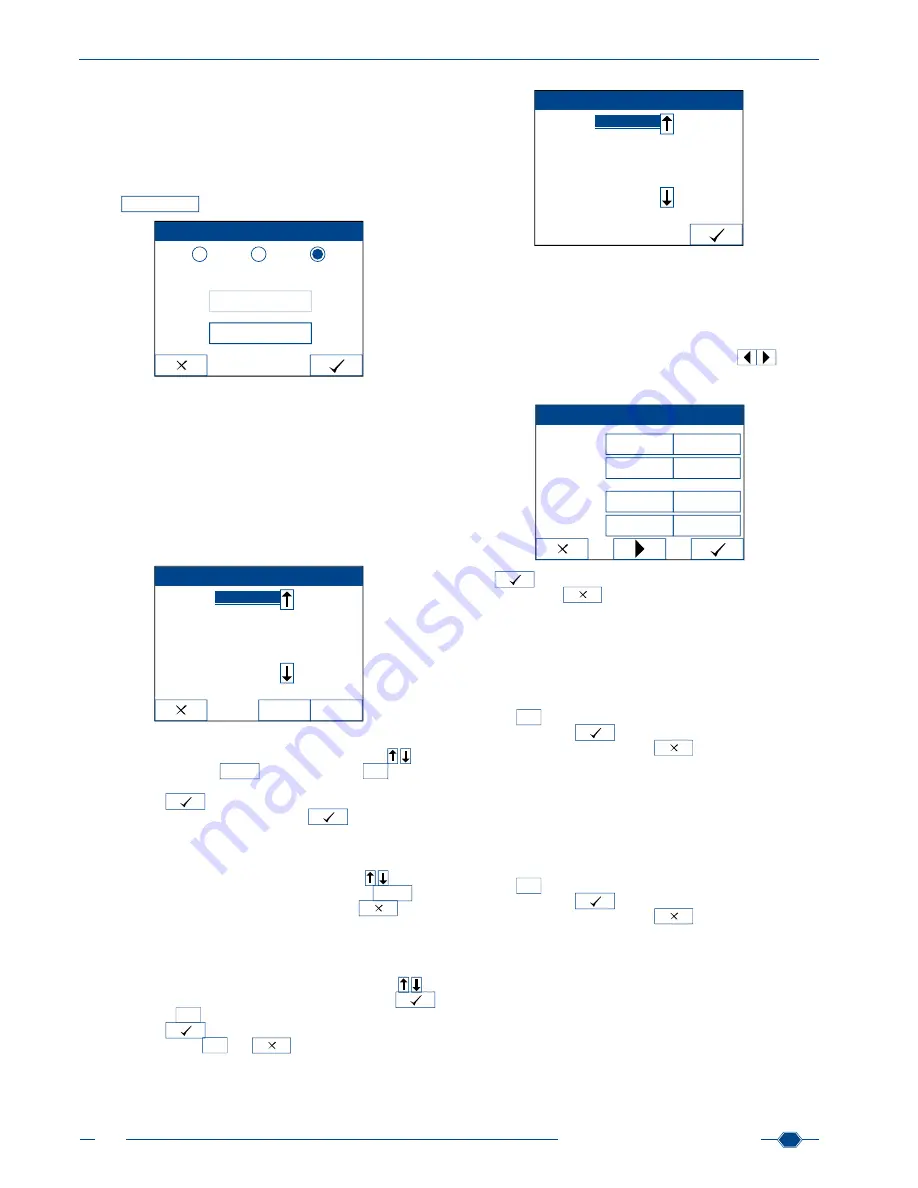
the user who performed the measurement. To set-up multiple us-

ers, press the choice-button 

Multi-user

 and press the activity-

button  

Edit user

User mode

Password

Edit users

 Single user 

User/Admin 

Multi user

8.7.3.1 Edit user
The multi-user mode allows you to create up to 10 different us-

ers with individual passwords. The first user always has to have 

administration  rights  and  is  the  only  one  who  can  access  the 

instrument settings. All other users cannot make any changes to 

the settings.

Within the 

Edit user 

menu, the middle of the screen shows an 

empty list with slots for new users. The first slot is underlined and 

designated for the administrator. The little star on the slots’ edge 

indicates the current user. 

Edit users

Edit

selected

Delete

– 

*


To initially set-up a new user, first create the user with administra

-

tion rights. Go to the first entry with the scroll-arrows 

 and 

press the activity-button 

Edit 

selected

. The input-menu 

abc

 appears 

and you can enter a name for the administrator. After confirming 

the name with 

, you have to enter a password. Choose 

a password and confirm your entry with 

. The 

Edit users


menu appears again and shows the name of the administrator in 

the first slot. To add more users, choose an empty slot and repeat 

the steps above. 

To delete a user from the list, use the scroll-arrows 

 to move 

to the respective slot. Then press the activity-button 

Delete

After having set-up the users, leave the menu via 

As soon as you have created different users and the instrument 

is set in the “Mulit user” mode, you have to choose a user every 

time the instrument is turned on. Once you turn on the instru-

ment,  a  login  screen  appears. The  screen  contains  a  list  with 

all users that have been created. Use the scroll-arrows 

 to 

choose the desired user and confirm your choice with 

The  input-menu 

abc


appears  to  enter  the  password.  Confirm 

your entry with 

 and the instrument starts as usual. If you 

leave the input-menu 

abc

 via 

, the login screen appears 

again.

Login

User 1

User 2
User 3


8.8. Customization
The 

Customization

 menu allows you to assign 4 different values 

for 

clarity 

and 

colour

, as visual sample information. Addi

-

tionally, you can define a welcome line and a printer header. 

Once you open the menu, the first screen allows you to enter 

values for clarity and colour. The browse-arrows 


let you 

switch to a second screen in which you can enter welcome line 

and printer header.

Customization

Clarity

Color

dark

clear

turbid

cloudy

brown

yellow

other

red

Press 

 to confirm and save your changes. If you leave the 

menu by pressing 

, none of your choices will be adopted.

8.8.1. Clarity

Clarity is a visual urine parameter, which you can assign to any 

sample as optional patient information 

(see Sample and patient 

information, chapter 13.1)

. There are four different options. By 

default, they are defined as „clear“, „turbid“, „cloudy“ and „dark“. 

To create new names, press the edit-buttons for clarity. The in

-

put-menu 

abc


appears and you can enter a new name (10 char

-

acters max.). Press 

 to confirm and save your changes. 

If you leave the menu by pressing 

, none of your choices 

will be adopted.
8.8.2. Colour

Colour is a visual urine parameter, which you can assign to any 

sample as optional patient information 

(see Sample and patient 

information, chapter 13.1)

. There are four different options. By 

default, they are defined as „yellow“, „red“, „brown“ and „bright“. 

To create new names, press the edit-buttons for colour. The in

-

put-menu 

abc


appears and you can enter a new name (10 char

-

acters max.). Press 

 to confirm and save your changes. 

If you leave the menu by pressing 

, none of your choices 

will be adopted.

Содержание URYXXON 500

Страница 1: ...URYXXON 500 Handbuch Manual...

Страница 2: ...URYXXON 500 MN Inhalt Index Deutsch 3 English 29...

Страница 3: ...URYXXON 500 Handbuch...

Страница 4: ...2 Bedienung der Benutzeroberfl che 10 6 2 1 Aktionsschaltfl chen 10 6 2 2 Optionsschaltfl chen 10 6 2 3 Bearbeitungsfl chen 10 6 2 4 Eingabefeld 10 6 3 Stand By Modus 10 7 Hauptmen 11 8 Einstellungen...

Страница 5: ...sung 23 13 3 Reihenmessung 23 13 4 Messung mit Liste 23 13 4 1 Liste erstellen 23 13 4 2 Liste bearbeiten 24 13 4 3 Messen mit der Liste 24 13 4 4 Optionen 24 13 4 4 1 Liste laden 24 13 4 4 2 Liste dr...

Страница 6: ...r Photodiode er fasst und gem der Kalibrierung in eine Konzentration des Ana lyten auf dem Testfeld umgewandelt 1 2 Technische Daten Allgemeines Gr e 24 cm x 28 cm x 15 cm 9 5 x 11 x 5 9 Gewicht 3 9 k...

Страница 7: ...ransportrechen wieder ent nehmen siehe Inbetriebnahme Kapitel 5 3 Ger t aufstellen 3 1 Ger teumgebung Stellen Sie das Ger t nur an einem daf r geeigneten Platz auf Es sollte auf einer trockenen sauber...

Страница 8: ...gespeichert Hinweis Das Ger t verf gt ber eine Vielzahl an Einstellungs m glichkeiten Optionen und Funktionen Wir empfehlen daher das Handbuch sorgf ltig zu lesen und individuelle Einstellungen vorzun...

Страница 9: ...e bzw ein Laborinforma tionssystem LIS Die obere Abbildung zeigt die vorhandenen Anschl sse 5 4 Druckerpapier einlegen Zum ffnen der Druckerpapierabdeckung dr cken Sie den ab gesetzten Schalter oberha...

Страница 10: ...v Streifen Eigene Reihenfolge Einheiten Conv SI ARB Cov ARB SI ARB Aus An Ber hren Sie einen Auswahlpunkt um diesen zu aktivieren Mit speichern und best tigen Sie die Auswahl Verlassen Sie Men s mit O...

Страница 11: ...en werden angezeigt 8 Einstellungen Im Men Einstellungen k nnen Sie das Ger t Ihren Bed rfnis sen anpassen Ber hren Sie die Aktionsschaltfl chen um nde rungen vorzunehmen Einstellungen Einstellungen S...

Страница 12: ...enfolge Ausw hlen Neu 1 PRO 2 BIL 3 LEU 4 SG 5 BLD 6 pH 7 UBG 8 NIT 9 GLU 10 KET Falls Sie mit Ihrer Auswahl nicht zufrieden sind bet tigen Sie die Taste Neu Die Auswahl auf der rechten Seite wird ver...

Страница 13: ...die Benennung der Abstufungen stehen Ihnen acht Zeichen zur Ver f gung Das Men Sedimentparameter bearbeiten besteht aus sechs frei editierbaren Bearbeitungsfl chen Links oben im Bildschirm se hen Sie...

Страница 14: ...ten Sedimentkri terien entsprechen Mit speichern und best tigen Sie Ihre Eingaben verlas sen Sie das Men ber werden keine nderungen ge speichert Hinweis Die Filterfunktion erfasst nur Ergebnisse die n...

Страница 15: ...lnutzer ist die Standardeinstellung f r das Ger t In diesem Modus kann jeder Benutzer das Ger t frei bedienen und es gibt keinerlei Einschr nkungen der Benut zerrechte Ist der Auswahlpunkt Einzelnutze...

Страница 16: ...nutzer angelegt haben ver lassen Sie das Men ber Sobald Sie verschiedene Benutzer angelegt haben und das Ge r t im Gruppen Modus ist muss nach jedem neuen Einschalten des Ger ts ein Benutzer ausgew hl...

Страница 17: ...Im Men Tastaturt ne k nnen Sie die T ne an bzw ausschal ten W hlen Sie den gew nschten Auswahlpunkt in der Options schaltfl che Tastaturt ne Tastaturt ne Aus Ein Mit speichern und best tigen Sie die...

Страница 18: ...Um f r eine ausgew hlte Messung Sedimentparameter einzuge ben dr cken Sie auf die Aktionsschaltfl che Es erscheint ein neues Men in dem Sie auf der linken Seite aus einer Liste Sedimentparameter ausw...

Страница 19: ...bnis wird an einen angeschlossenen Computer ausgegeben siehe Daten bertragung Kapitel 15 10 1 3 Mikroskop F r das aktuell angezeigte Ergebnis k nnen Sedimentbefun de nachtr glich eingeben oder ver nde...

Страница 20: ...suchen Datum Filter Aktion Alle Seq Nr Anzeigen 0000 Seq Nr Bereich W hlt einen bestimmten Sequenznummerbereich aus Nach Be r hrung erscheinen zwei Bearbeitungsfl chen Um die Seq Nr einzugeben ber hre...

Страница 21: ...en daher eine vorherige Ausgabe an einen PC 11 Testmodus Im Men Testmodus k nnen Sie Optionen f r die Qualit tskon trolle aufrufen Eine genaue Beschreibung der Optionen finden Sie unter Qualit tskontr...

Страница 22: ...ktiviert und wird nur durch Einlesen von Patien ten IDs aktiviert siehe Messung mit Liste Kapitel 13 4 Informationen zum Patienten und zur Probe k nnen optional eingegeben werden Dazu dr cken Sie Bear...

Страница 23: ...liebig viele Streifen hinter einander auflegen Hinweis Geben Sie die Zusatzinformationen immer ein bevor Sie den Streifen auflegen Informationen f r einen einmal einge zogenen Streifen k nnen nicht ed...

Страница 24: ...er gr n auf und im Display erscheint eine neue Sequenznummer Die ID auf der linken Seite wird durch die n chste ID aus der Liste ersetzt Auf der rechten Seite schiebt sich die Liste um eine ID nach ob...

Страница 25: ...l che Der Startbildschirm erscheint und enth lt eine aktivierte Liste mit zwei Messungen NEG Test und POS Test F hren Sie die jeweilige Messung mit negativer und positiver Kontrolll sung durch z B Med...

Страница 26: ...len Sie den Tisch mit klarem Wasser und ggf etwas Seife ab Zur Desinfektion k nnen Desinfektionsmittel auf alkoholischer Basis oder Alkohol 70 85 Ethanol oder Isopropanol benutzt werden Sp len Sie den...

Страница 27: ...ausgerichtet Der Streifen liegt nicht parallel zur Kante des Transporttischs Streifen vorsichtig auflegen Streifen nicht bei einziehendem Transportrechen auflegen und das L mpchen rot leuchtet Abfall...

Страница 28: ...erlischt die Gew hrleistung sie umfasst keine Defekte die auf die externe Stromversorgung zur ckzuf hren sind Die Gew hrleistung beschr nkt sich auf die Reparatur fehlerhaf ter Teile oder nach unsere...

Страница 29: ...URYXXON 500 Manual...

Страница 30: ...ouch screen 36 6 2 Operating the user interface 36 6 2 1 Activity buttons 36 6 2 2 Option fields 36 6 2 3 Edit buttons 36 6 2 4 Input menu 36 6 3 Stand by Mode 36 7 Main menu 37 8 Settings 37 8 1 Stri...

Страница 31: ...Successive measurements 49 13 4 Measurements with worklist 49 13 4 1 Create a worklist 49 13 4 2 Edit worklist 50 13 4 3 Measuring with the worklist 50 13 4 4 Options 50 13 4 4 1 Load list 50 13 4 4...

Страница 32: ...ibra tion the reflected light is transformed into the analyte s concen tration on the respective test pad 1 2 Technical data General info Size 24 cm x 28 cm x 15 cm 9 5 x 11 x 5 9 Weight 3 9 kg 10 5 l...

Страница 33: ...during transport Make sure to remove the transport rack before you ship the in strument see Initial operation chapter 5 3 Instrument set up 3 1 Set up location Only use the instrument in a suitable l...

Страница 34: ...colour Note The instrument features multiple different settings options and functions We recommend to read the manual carefully and to make individual adjustments to ensure the instrument func tions...

Страница 35: ...x RS232 d to connect different devices or a laboratory information system LIS see above 5 4 Insert printer paper To open the printer paper cover press the little button above the touch screen Move the...

Страница 36: ...ivate it Press to confirm and save your changes If you leave menus that include option fields by pressing none of your choices will be adopted 6 2 3 Edit buttons Edit buttons have blue frames and enab...

Страница 37: ...ditional choices 8 Settings In the Settings menu you can adapt the instrument to your re quirements Touch the activity buttons to make changes Settings Settings Enter sediment Memory Check mode Strip...

Страница 38: ...KET If you are not satisfied with your selection press Clear The selection on the right hand side is discarded and you can enter your personal order again Press to confirm and save your changes If you...

Страница 39: ...hese categories you can use up to 8 characters each The Edit sediment parameters menu consists of 6 edit buttons in which you can enter individual information In the upper left corner of the screen yo...

Страница 40: ...s that match your filter criteria Press to confirm and save your changes If you leave the menu by pressing none of your choices will be adopted Note The Enter sediment function and the sediment filter...

Страница 41: ...is set by default In the single user mode every user can use the instrument without restric tions to access rights If the choice button single user is acti vated both the activity buttons Password and...

Страница 42: ...have to choose a user every time the instrument is turned on Once you turn on the instru ment a login screen appears The screen contains a list with all users that have been created Use the scroll ar...

Страница 43: ...ows you to enable or disable the operating sounds Press the respective choice button Sound Sound Off On Press to confirm and save your changes If you leave the menu by pressing none of your choices wi...

Страница 44: ...s the activity button A new screen appears in which you can choose from a list of sediment parameters on the left side of the screen see Sediment options chapter 8 4 Enter sediment Select Clear LEUKOS...

Страница 45: ...end to a PC The current result is sent to a connected computer see Connec tion of external devices chapter 15 10 1 3 Microscope You can add supplementary sediment findings for any saved value see Ente...

Страница 46: ...it buttons with four 0 appear To enter the sequence numbers touch the buttons and enter the numbers via the input menu abc Press to confirm and save your changes If you leave the menu by pressing none...

Страница 47: ...nding the data to a PC first 11 Check mode The Check mode menu allows you to access the quality control functions for detailed description see Quality control chapter 14 Check mode Settings Enter sedi...

Страница 48: ...is only used as soon as patient IDs are imported see Measurements with Worklist chapter 13 4 You can add supplemental information concerning the patient and sample To do so press the activity button E...

Страница 49: ...successively Note Always enter patient and sample information before you place the strip on the transport tray Once the strip is drawn into the housing information cannot be edited anymore 13 4 Measu...

Страница 50: ...on the right The worklist on the right moves up by one entry If necessary add supplemental information and place the next strip onto the transport rack Thus you can work your way to the end of the lis...

Страница 51: ...e activity button Control measurement The start screen appears and includes an activated worklist and two measurements NEG Test and POS Test Perform a normal measurement with negative and positive con...

Страница 52: ...g To do so pull on the black handle on the transport tray s right side Empty the waste container Rinse the table with clear water if necessary you can use some mild cleaning agent as well To disinfect...

Страница 53: ...f the transport tray insert strip carefully do not insert strip while transport rack is moving and the light is red empty the waste container which may cause jams if it is full do not move transport t...

Страница 54: ...in cases of improper handling and the guarantee does not cover defects caused by the external power supply The guaran tee is limited to repairs of defective parts or in our sole discre tion replacemen...

Отзывы: