background image

17

MSID18-Li

Getting

 Started . . .

Battery pack

Release / Attach


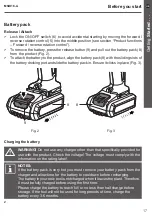
> Lock the ON/OFF switch (6) to avoid accidental starting by moving the forward / 

reverse rotation control (5) into the middle position (see section “Product functions 

– Forward / reverse rotation control”).


> To remove the battery, press the release button (9) and pull out the battery pack (8) 

from the product (Fig. 2).


> To attach the battery to the product, align the battery pack (8) with the sliding slots of 

the battery docking port and slide the battery pack in. Ensure it clicks in place (Fig. 3).

Fig. 2

Fig. 3

8

9

8

Charging the battery

WARNING! 

Do not use any charger other than that specifically provided for 

use with the product. Check the voltage! The voltage must comply with the 

information on the rating label!. 

NOTES:

If the battery pack is very hot you must remove your battery pack from the 

charger and allow time for the battery to cool down before recharging.

The battery in your new tool is not charged when it leaves the plant. Therefore, 

it must be fully charged before using the first time.

Please charge the battery to reach full or no less than half charge before

storage. If the tool will not be used for long periods of time, charge the

battery every 3-6 months.

z

Before you start

Содержание MSID18-Li

Страница 1: ...18V Impact Driver ORIGINAL INSTRUCTIONS MSID18 Li V09 13 07 2018 MSID18 Li EAN 3663602798804 WARNING Read the instructions before using the product ...

Страница 2: ...hem for future reference Getting Started 02 Safety information 03 Symbols 11 Your product 13 Technical specifications 14 Before you start 15 In more detail 19 Intended use 20 Product functions 20 General operation 23 Care and maintenance 24 Troubleshooting 25 Recycling and disposal 26 Guarantee 27 EC declaration of conformity 28 ...

Страница 3: ...ell lit Cluttered or dark areas invite accidents Do not operate power tools in explosive atmospheres such as in the presence of flammable liquids gases or dust Power tools create sparks which may ignite the dust or fumes Keep children and bystanders away while operating a power tool Distractions can cause you to lose control Electrical safety Power tool plugs must match the outlet Never modify the...

Страница 4: ... watch what you are doing and use common sense when operating a power tool Do not use a power tool while you are tired or under the influence of drugs alcohol or medication A moment of inattention while operating power tools may result in serious personal injury Use personal protective equipment Always wear eye protection Protective equipment such as a dust mask non skid safety shoes hard hat or h...

Страница 5: ... cause severe injury within a fraction of a second Power tool use and care Do not force the power tool Use the correct power tool for your application The correct power tool will do the job better and safer at the rate for which it was designed Do not use the power tool if the switch does not turn it on and off Any power tool that cannot be controlled with the switch is dangerous and must be repai...

Страница 6: ...tions different from those intended could result in a hazardous situation Keep handles and grasping surfaces dry clean and free from oil and grease Slippery handles and grasping surfaces do not allow for safe handling and control of the tool in unexpected situations Battery tool use and care Recharge only with the charger specified by the manufacturer A charger that is suitable for one type of bat...

Страница 7: ...tructions and do not charge the battery pack or tool outside the temperature range specified in the instructions Charging improperly or at temperatures outside the specified range may damage the battery and increase the risk of fire Service Have your power tools serviced by a qualified repair person using only identical replacement parts This will ensure that safety of the power tool is maintained...

Страница 8: ...cautionary markings on the charger and battery pack The charger and battery pack supplied with it are specifically designed to work together Only use the charger with the battery pack specified for this product Charge the battery pack indoors only as the charger is designed for indoor use only Do not charge non rechargeable batteries Protect the charger against moisture and wet conditions There is...

Страница 9: ...s open or cracks immediately discontinue its use and do not recharge it Do not store or carry a spare battery pack in a pocket or toolbox or any other place where it may come into contact with metal objects The battery pack may be short circuited causing damage to the battery pack burns or a fire Do not pierce the battery pack with nails strike the battery pack with a hammer step on the battery or...

Страница 10: ...ve the product checked by a qualified professional and repaired if necessary before you operate it again Residual risks Even if you are operating this product in accordance with all the safety requirements potential risks of injury and damage remain The following dangers can arise in connection with the structure and design of this product Health defects resulting from vibration emission if the pr...

Страница 11: ... kg Kilogram mA Milliampere dB A Decibel A rated mAh Milliampere hour m s2 Meter per second squared Lock to tighten or secure Wear hearing protection Unlock to loosen Wear eye protection Note Remark Wear protective gloves Caution Warning Wear protective slip resistant footwear Read the instruction manual yyWxx Manufacturing date code year of manufacturing 20yy and week of manufacturing Wxx Switch ...

Страница 12: ... out dust bin Batteries and battery packs should not be disposed of with household waste Please recycle where facilities exist Check with your Local Authority or local store for recycling advice Indoor use only Do not dispose of battery packs in rivers or immerse in water Do not dispose of battery packs in fire They will explode and cause injury 0 45 Do not expose battery packs to heat in excess o...

Страница 13: ... 3 4 5 6 7 8 9 11 12 10 1 Work light 2 Tool holder 3 Sleeve 4 Air vents 5 Forward reverse rotation control switch 6 ON OFF switch with variable speed 7 Handle 8 Battery pack 9 Release button 10 Power charging status indicator light 11 Charging base 12 Charger ...

Страница 14: ...ging time approx 1 h Weight approx 0 2 kg Sound values Sound pressure level LpA 92 dB A Sound power level LWA 103 dB A Uncertainty KpA KWA 3 dB A Hand arm vibration values Impact tightening of fasteners of the maximum capacity of the tool ah 14 2 m s2 Uncertainty K 1 5 m s2 The sound intensity level for the operator may exceed 80 dB A and ear protection measures are necessary The declared vibratio...

Страница 15: ...all parts and lay them on a flat stable surface 2 Remove all packing materials and shipping devices if applicable 3 Make sure the delivery contents are complete and free of any damage If you find that parts are missing or show damage do not use the product but contact your dealer Using an incomplete or damaged product represents a hazard to people and property 4 Ensure that you have all the access...

Страница 16: ...ead WARNING Always use driver bits according to the intended use For example never use a slotted driver bit for crosshead screws Observe the technical requirements of this product see section Technical specifications when purchasing and using driver bits Driver bits become hot during use Handle them carefully Wear protective gloves when handling driver bits in order to avoid injuries like burns In...

Страница 17: ...cks in place Fig 3 Fig 2 Fig 3 8 9 8 Charging the battery WARNING Do not use any charger other than that specifically provided for use with the product Check the voltage The voltage must comply with the information on the rating label NOTES If the battery pack is very hot you must remove your battery pack from the charger and allow time for the battery to cool down before recharging The battery in...

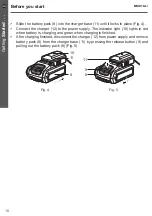
Страница 18: ...er supply The indicator light 10 lights in red when battery is charging and green when charging is finished After charging finished disconnect the charger 12 from power supply and remove battery pack 8 from the charger base 11 by pressing the release button 9 and pulling out the battery pack 8 Fig 5 8 8 9 11 11 10 Fig 4 Fig 5 Before you start ...
Страница 19: ...18 Li In more detail In more detail Intended use 20 Product functions 20 General operation 23 Care and maintenance 24 Trouble shooting 25 Recycling and disposal 26 Guarantee 27 EC declaration of conformity 28 ...

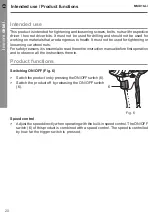
Страница 20: ...ening car wheel nuts For safety reasons it is essential to read the entire instruction manual before first operation and to observe all the instructions therein Product functions Switching ON OFF Fig 6 Switch the product on by pressing the ON OFF switch 6 Switch the product off by releasing the ON OFF switch 6 Speed control Adjust the speed directly when operating with the built in speed control T...

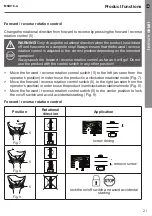
Страница 21: ... the product with the control switch in any other position Move the forward reverse rotation control switch 5 to the left as seen from the operator s position in order to use the product in a clockwise rotational mode Fig 7 Move the forward reverse rotation control switch 5 to the right as seen from the operator s position in order to use the product in anticlockwise rotational mode Fig 8 Move the...

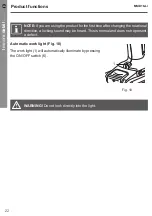
Страница 22: ...e first time after changing the rotational direction a locking sound may be heard This is normal and does not represent a defect Automatic work light Fig 10 The work light 1 will automatically illuminate by pressing the ON OFF switch 6 WARNING Do not look directly into the light 1 Fig 10 ...

Страница 23: ...hem from moving during operation WARNING Keep in mind that there are buried objects hidden in every household Ensure that there are no gas water or power lines hidden in the working area that may be hit before operation danger of electrical shock and serious damage to people and property Use a suitable detector to trace such objects in advance Screw driving Pre drill the holes with a smaller diame...

Страница 24: ...ct before each use for worn and damaged parts Do not operate it if you find broken and worn parts WARNING Only perform repairs and maintenance work according to these instructions All further works must be performed by a qualified specialist General cleaning Clean the product with a dry cloth Use a brush for areas that are hard to reach In particular clean the air vents after every use with a clot...

Страница 25: ...ge temperature is between 10 C and 30 C We recommend using the original package for storage or covering the product with a suitable cloth or enclosure to protect it against dust Transportation Switch the product off and remove the battery pack Attach transportation guards if applicable Always carry the product by its handle Protect the product from any heavy impact or strong vibrations which may o...

Страница 26: ...with a new one 3 2 Use suitable driver bit 4 Product suddenly stops 4 1 Product overloaded 4 2 Battery pack discharged 4 3 Battery too hot 4 1 Remove the product from the workpiece and switch it on again 4 2 Remove and charge battery pack 4 3 Remove battery pack and let it cool down Recycling and disposal Waste electrical products should not be disposed of with household waste Please recycle where...

Страница 27: ...e caused by or resulting from Normal wear and tear Overload misuse or neglect Repairs attempted by anyone other than an authorised agent Cosmetic damage Damage caused by foreign objects substances or accidents Accidental damage or modification Failure to follow manufacturer s guidelines Loss of use of the goods This guarantee is limited to parts recognised as defective It does not in any case cove...

Страница 28: ... 2014 30 EU Electromagnetic Compatibility Directive References to the following harmonized standard were made EN 55014 1 2017 EN 55014 2 2015 Charger MC18BS Li EN 55014 1 2017 EN 55014 2 2015 EN 61000 3 2 2014 EN 61000 3 3 2013 2014 35 EU Low Voltage Directive References to the following harmonized standard were made EN 60335 1 2012 A11 2014 A13 2017 EN 60335 2 29 2004 A2 2010 EN 62233 2008 2011 6...

Страница 29: ...heldon Square London W2 6PX United Kingdom www kingfisher com products Distributor B Q plc Chandlers Ford Hants SO53 3LE United Kingdom www diy com Screwfix Direct Limited Trade House Mead Avenue Yeovil BA22 8RT United Kingdom www screwfix com To view instruction manuals online visit www kingfisher com products ...

Отзывы: