background image

Instruction Manual

MAN-027

14

www.macmedical.com

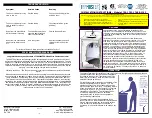
Adjustable height sinks only - for proper sink placement, a minimum distance spacing of 

7/8” is required between the sink back and sides to the wall.

(For clarity, spacing shown in this illustration is exaggerated.)

When placing the sink, note where the 

brackets for the pre-rinse faucet, spray 

gun, and air gun will be fastened to 

the wall (using wall anchors and screws 

supplied by others). Mount brackets to 

pegboard backframe if applicable.

Adjustable height sinks only

Содержание PS307237-1000

Страница 1: ...027 Rev K 10 2022 2022 MAC Medical Inc Read and understand all of the instructions and safety information in this manual before operating this product R Fixed and Adjustable Height Processing Sinks In...

Страница 2: ...tall Water Gun Kit PSKT 05 34 Safe Use of the Water Gun 39 Replaceable Water Gun Kit Parts 40 Cleaning Instructions for the Water Gun 41 Assemble and Install DI Water Faucet PSKT 03 42 Replaceable DI...

Страница 3: ...s Processing Sink models Fixed Height Processing Sinks Adjustable Height Processing Sinks PURPOSE OF THIS MANUAL This user manual details the installation operation maintenance and cleaning of the MAC...

Страница 4: ...point indicates the potential for minor injury to personnel and damage to equipment Note The exclamation point will not be visible where only equipment damage is present Burn Hazard Warnings Yellow tr...

Страница 5: ...cord from power source prior to attempting any repairs or servicing WARNING DO NOT operate in a potentially explosive atmosphere CAUTION POSSIBLE EQUIPMENT DAMAGE When cleaning the sink See complete...

Страница 6: ...7 6 www macmedical com Processing Sink Models Fixed Height without hydraulic system Sinks are available in any multiple basin configuration as required the fixed height standard single double and trip...

Страница 7: ...l MAN 027 7 www macmedical com Adjustable Height with hydraulic system Sinks are available in any multiple basin configuration as required the adjustable height standard single double and triple basin...

Страница 8: ...nsibility to ensure that water supplies are properly protected for internal cross connection control in accordance with local building and plumbing requirements g It shall be the customer s responsibi...

Страница 9: ...r supply voltage fluctuation is not to exceed 10 of the nominal supply voltage 5 Equipment Ratings a Pollution Degree 2 b Installation Category 2 c Altitude 2000 m d Humidity 80 rH to temperature up t...

Страница 10: ...elow shows an adjustable height triple basin sink with all the assemblies as called out in the table below Other sinks may have different features than shown here Item Part Description 1 PSKT 01 Pre R...

Страница 11: ...maged packing material 3 All damaged items must be listed on the Bill of Lading 4 Customer is responsible for the proper disposal of all packing materials The disposal of these items must meet all Sta...

Страница 12: ...le Height sinks It is recommended to have 7 8 in gap around sink 6 Level the sink by adjusting the feet levelers on the sink legs 7 For all sinks attach floor anchors and bolt sink feet to the floor U...

Страница 13: ...em Place the sink so that its right side where its power unit is located is near a 120 VAC GFCI power outlet A 9ft power cord is provided Note All power connections must be completed per local codes F...

Страница 14: ...ween the sink back and sides to the wall For clarity spacing shown in this illustration is exaggerated When placing the sink note where the brackets for the pre rinse faucet spray gun and air gun will...

Страница 15: ...Align bolt holes and install all bolts as shown first through lock washer then through washer Tighten securely 3 Install backsplash bracket shown in blue upward and under backsplash lip make sure brac...

Страница 16: ...nut Tighten securely 7 Install backsplash bracket shown in blue in Detail 4 upward and under backsplash lip make sure bracket is vertical as shown 8 Align bolt holes and install bolts as shown in Det...

Страница 17: ...be run through A The top of the frame by removing the plastic cap on the top or drilling a hole in the plastic cap then run down through frame B Grommet hole locations shown above in Green then run d...

Страница 18: ...tape when making threaded connections to water supply lines Assemble and Install Pre Rinse Water Faucet MMKL53 1000 AF2 STEP 1 Base Faucet Assembly MM KL53 Y001 Install base faucet body as shown FAUCE...

Страница 19: ...nk is moved to it s permanent location 5 Apply teflon tape to threads on end of short riser pipe attached to add on faucet 6 Thread short riser pipe into faucet body and tighten 7 Thread riser pipe Do...

Страница 20: ...th of support rod from wall to riser pipe Cut rod to approximate size with appropriate tool 10 Screw on to install NEW black bracket supplied onto support rod 11 Determine position of wall bracket bas...

Страница 21: ...cket continued 12 Unscrew and remove riser pipe from add on faucet body 14 Install compression nut and bracket ferrule and tighten securely RISER PIPE ADD ON FAUCET 12 13 Top View 14 13 Affix wall bra...

Страница 22: ...ten 17 Spread open clamp section of hook so that it will slide over riser without marking finish of riser 18 Orient spray head hook with hook up and assemble to riser Place 1 2 from thread on riser ST...

Страница 23: ...ten with wrench This will also tighten the Riser Pipe on the faucet body 20 Assemble Hose to spring retainer Ensure the O ring is in place inside of the hose coupling prior to assembly Additional O ri...

Страница 24: ...r the depressed lever When finished Turn off the hot cold water Reattach the spray head ring to the lever and grip Hook the spray head to the riser pipe hook Cleaning Instructions When cleaning the pr...

Страница 25: ...X077 Riser Pipe 18 7 MM K50 X178 Stainless Steel Spring 8 MM KL55 7008 Faucet Body Add on Faucet 9 MM KL53 Y001 Base Faucet Assembly Double Pantry see Detail 2 10 PS16C 01 Water Faucet Backsplash Plum...

Страница 26: ...K50 X016 SP Spray Handle with Screw Assembly 3 MM KL50 X025 Grip 4 MM K50 X017 Holding Ring Instruction Manual MAN 027 26 www macmedical com Detail 1 Spray Head Assembly MM KL50 Y002 FS The Spray Hea...

Страница 27: ...l 2 Base Faucet Assembly MM KL53 Y001 In the Pre Rinse Faucet Assembly the Base Faucet comes along with handles and hot cold valves pre assembled The Hot Cold Valve Assemblies and the Handle Replaceme...

Страница 28: ...P 1 Air Gun Base Assembly Install Air Gun Base as shown 1 Install Air Gun Base through hole in sink backsplash and secure to air water gun backsplash plumbing kit 2 Attach retracting hose to lower bus...

Страница 29: ...dical com STEP 2 Attach Upper Hose 3 Attach a hose end into the bushing in the Shut off Valve 4 Attach the other hose end into the back of the Air Gun IMPORTANT DO NOT continue with Steps 2 3 until si...

Страница 30: ...wall anchors and screws to mount the air gun tip bracket to the wall Mount bracket 15 from top of backsplash to top of bracket Qty needed 2 screws and 2 anchors for the air gun tip bracket Anchor and...

Страница 31: ...usage pressure 30 PSI Screen Tip Star Tip Needle Tip Maximum usage pressure 30 PSI How to Insert and Remove Gun Tips from the Air Gun To Insert Insert single grooved end of tip through the blue ring...

Страница 32: ...Thread Inlet 5 H0210 02 3 8 Male NPT X 1 4 Fem Pipe Size NPT Hex Reducing Bushing 6 H0210 21 Flange 7 PS16C 02 Air Water Gun Backsplash Plumbing Kit 2 3 3 7 4 5 6 1 Instruction Manual MAN 027 32 www...

Страница 33: ...te the air gun by pressing on the trigger lever 4 CAUTION Do not point the air gun toward the body The highly compressed air output can cause severe injury to exposed flesh 5 CAUTION The Shut off Valv...

Страница 34: ...Install Water Gun Base on backsplash as shown BUSHING SINK BACKSPLASH BUSHING Shut off Valve 1 1 Apply teflon tape to threads 2 Install Water Gun Base through hole in sink backsplash and secure to ai...

Страница 35: ...moved to it s permanent location 4 Insert hose into the bushing 5 Apply teflon tape to threads on bushing 6 Screw bushing into the handle of the spray gun 7 Insert the other end of the hose into the...

Страница 36: ...MAN 027 36 www macmedical com STEP 3 Assemble Water Gun Tip Bracket A Peel tape backing off bottom of Tip Holder and firmly press down on Water Gun Bracket to secure both parts together B Insert the e...

Страница 37: ...ion Manual MAN 027 37 www macmedical com STEP 4 Attach Water Gun Bracket to Wall 15 BACKSPLASH Use wall anchors and screws to mount the water gun tip bracket to the wall Mount bracket 15 from top of b...

Страница 38: ...g and blood pipettes D For syringes and cannulas with record cone E For syringes and cannulas with Luer cone F Spray Jet for rapid instrument cleaning G For drainage tubings H For catheters valves etc...

Страница 39: ...to exposed flesh 5 CAUTION Wear appropriate Personal Protection Equipment PPE Due to potential splashes of contaminated fluids it is recommended that a full face shield and protective gloves be worn d...

Страница 40: ...Male Thread Inlet 6 H0210 12 Stainless Swiftfit Straight Push in 3 8 MSWFT x 3 8 Tube 7 H0210 21 Flange 8 PS16C 02 Air Water Gun Backsplash Plumbing Kit 9 H0208 01 8 Retracting Air Water Hose Lower 4...

Страница 41: ...f the Spray Water Gun Decalcifying agents can include Distilled White Vinegar CLR etc For cleaning with Distilled White Vinegar disconnect the water gun from the hose and submerge the gun in a bowl fi...

Страница 42: ...PSKT 03 3 SINK BACKSPLASH DI FAUCET BACKSPLASH PLUMBING KIT 1 Install DI Water Faucet body through hole in sink backsplash to DI faucet backsplash plumbing kit 2 Install the gooseneck to the faucet bo...

Страница 43: ...er Turn Eterna Cartridge w Spring Check RTC 1H MM 002521 45NS 4 Arm Handle New Style 1I MM 000925 45 Lab Handle Screw 1J MM 001191 45NS Green CW Lab Button Index PSKT 03 Entire Kit Item Sales Descript...

Страница 44: ...SKT 02 SINK BACKSPLASH AIR WATER GUN BACKSPLASH PLUMBING KIT 1 Install the gooseneck to the faucet body 2 Install Water Faucet through holes in sink backsplash to water faucet backsplash plumbing kit...

Страница 45: ...tream Regulator Screen 1F MM KS11 12 X001 Gooseneck Spout 8 Adjustable 1G MM KN50 X120 Aerator 55 64 Stream Female 2 2 Gpm PSKT 02 Entire Kit Item Sales Description 1 H0192 14 Faucet Kit Including Bas...

Страница 46: ...er locations as circled in red The two floor anchors and their correct locations are also shown highlighted in green To level the sink use a wrench to rotate each foot leveler up or down to the desire...

Страница 47: ...er for Reducer 7 H0142 04 Stainless Steel Drain Reducer and Washer 8 S0700 180RD Poly Slip Nut Washer for 1 1 2 Drain Instruction Manual MAN 027 47 www macmedical com Fixed Height Sink Waste Drains Fi...

Страница 48: ...465 PVC Drain System with H0704 Trap Adapter 13 157466 Copper Drain System with H0704 Trap Adapter 2 1 9 10 11 12 3 5 4 Instruction Manual MAN 027 48 www macmedical com Adjustable Height Sink Waste Dr...

Страница 49: ...nks Attach P trap to drain line then connect P trap to either floor or wall drain Contractor must provide the P trap and make all drain connections in accordance with local codes The example below sho...

Страница 50: ...le basin processing sink 1 DI Faucet Connect the incoming water treated water line hose rated 145 PSI 2a Gooseneck Faucet Connect the incoming cold water for the gooseneck faucet 2b Connect the incomi...

Страница 51: ...Sinks to operate the hydraulics Features Electrical Specifications 4 Memory Positions Primary Voltage 120V 10A Digital Display of the Height Engine Voltage 24 VDC Overload Protection Nominal Rating Ap...

Страница 52: ...heating of the system a duty cycle of 2 18 ON OFF should be maintained The maximum continuous operating time is 2 minutes Afterwards a pause of at least 18 minutes needs to be observed before the syst...

Страница 53: ...ssed for about 5 seconds until the display starts flashing Example 3 Now the button plus or minus can be used to set the current height While doing so the system does not move 4 With the correctly set...

Страница 54: ...version in inch 3 To confirm press S Save After confirmation the display changes to 088 US 110 V version 035 still flashing 4 Press the button to drive to the desired upper end position or to the uppe...

Страница 55: ...l com Adjustable Height Sinks Only Maximum Minimum Height Levels The minimum height clearance from the floor for the adjustable height sink is 32 5 inches The maximum extended height clearance from th...

Страница 56: ...ure Assembly Removing the Existing Memory Control Pad To remove an existing PCB Enclosure Assembly due to damage and replace it with a new one 1 Unplug the PCB Enclosure Assembly cord from the Power S...

Страница 57: ...f the PCB Enclosure Assembly top with holes in the mounting bracket shown in green 2 Reinstall the three 8 2 X 1 2 self tapping screws shown in yellow attaching the PCB Enclosure Assembly to the sink...

Страница 58: ...aning pads Soft bristle brush Mild detergents Sodium Bicarbonate baking soda Distilled water pH rating 7 alone or with a mild detergent White vinegar in a spray bottle Isopropyl Alcohol Hospital grade...

Страница 59: ...ation 15 Outer Backframe Bracket Install 16 Bolt Locations and Wire Management 17 Power Adjustable Height Sinks Requirements 13 Pre Rinse Hot Cold Water Faucet Add on Faucet and Body Installation 19 B...

Страница 60: ...factory It is the customer s responsibility to inspect the product for packaging damage before signing the BOL This warranty does not apply to products which have been subject to abuse misuse acciden...

Отзывы: