


Service Engineering
- 18 -
TECHNICAL SPECIFICATIONS
Model
Electrical
Requeriments
Dry
Sistem
Maximum
load
MKR62GWTWB
220-240V/50 Hz
Electric
10kg
MKR62FWTWB
220-240V/60 Hz
Electric
10kg
XKR72GWTWB
220-240V/50 Hz
Electric
11kg
XKR72FWTWB
220-240V/60 Hz
Electric
11kg
Technical Specification
Operational
Frequency
60Hz
50Hz
Supply
Voltage
220V~
220V~
Nominal
current
24A
24A
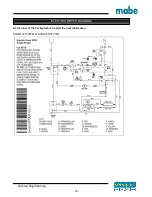
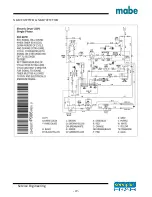
THE DRYER OPERATION
On front view the drum rotates clockwise at 48 to 54 rpm. The air is impulse through the electrical heating
resistance and send it to the clothes absorbing the humidity and lint.
The lint is filtered to outside when the air goes through the drum to the filter grill and blower duct to exhaust in the
vent duct.
The thermostat controls the air temperature according with the load size program selector. The time cycle length
is controlled by the minutes selected on the timer or an automatic control by the timer and the thermostat for the
type of clothes selected (Automatic Drying Cycles).
Exahust duct
Electric Heater
Air Entry
Содержание MKR62GWTWB
Страница 10: ...Service Engineering 10...
Страница 29: ...Service Engineering 29 XKR72GWTWB XKR72FWTWB...


