


19
Enlevez le ruban à masquer. Les zones à
sceller doivent être sèches, et exemptes
de saletés et de graisse.
Calfeutrez les
joints de manière uniforme; appliquez du
calfeutrant sur les rebords horizontaux du
haut des panneaux muraux, sur les joints
verticaux du panneau mural de coin et
sur les surfaces où les panneaux muraux
rejoignent la base. Fig. 21. Calfeutrez
le joint à l'intérieur sur toute la hauteur
où le montant mural (1) rencontre le
panneau mural (13). Fig. 19. Appliquez
soigneusement un cordon de calfeutrant
autour du joint extérieur où la douche et la
base se rencontrent. Fig. 21.
N'appliquez
pas de calfeutrant à l'intérieur de
la douche, entre la base et la porte
de douche
, cela causerait des fuites.
Calfeutrez également le tour de chaque
tuyau. Replacez ou installez les robinets et
la pomme de douche.
Attendez 24 heures avant d’utiliser la
douche.
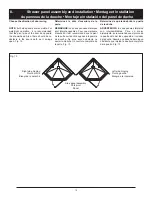
12.
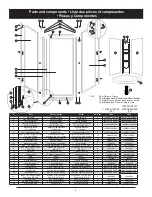
Caulking and sealing the shower • Calfeutrage et scellage la douche
• Selle y aisle la ducha
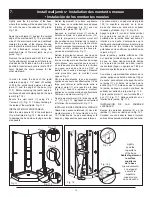
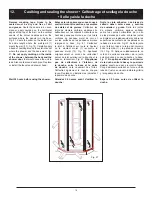
Remove masking tape. Areas to be
sealed must be dry and free of dirt
and grease.
Caulk the seams in an even
manner; apply caulking on the horizontal
edges at the top of the wall, on the vertical
seams of the corner caddies and on the
surfaces where the panels join the base.
Fig. 21. Caulk the seam on the inside over
its entire length where the wall jamb (1)
meets the wall (13). Fig. 19. Carefully apply
a bead of caulking around the exterior seam
where the shower and the base meet. Fig.
21.
Do not apply caulking on the inside
of the shower, between the base and the
shower door
, that would cause the unit to
leak. Also caulk around each pipe. Replace
or install the faucets and shower head.
Wait 24 hours before using the shower.
Quite la cinta adhesiva. Las áreas de
sellado deben estar secas y exentas
de suciedad y grasa.
Selle las juntas
de manera uniforme: aplique sellador
sobre los cantos horizontales de lo alto
de las paredes de ducha, sobre las juntas
verticales de la repisa esquinera y sobre las
superficies de contacto de las paredes con
la base de la ducha. Fig. 21. Selle la junta
por el interior, todo a lo largo del contacto
entre la jamba (1) y la pared de la ducha
(13). Fig. 19. Aplique cuidadosamente un
cordón de sellador alrededor de la junta
exterior donde se unen la ducha y la base.
Fig. 21.
No aplique sellador en el interior
de la ducha, entre la base y la puerta de
ducha,
puesto que eso provocaría fugas.
Ponga asimismo sellador en torno a cada
tubería. Vuelva a colocar o instale la grifería
y la regadera de ducha.
Espere 24 horas antes de utilizar la
ducha.
Fig. 21


