


English
Operating instructions / user’s manual Cooker Hoods
fi100417ATBOR
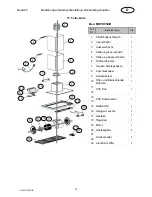
7
GB
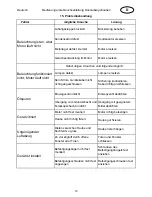
•
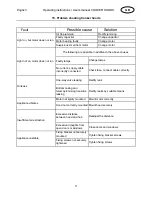
Is the fuse blown or has the circuit breaker
tripped out?
If all the above checks fail to remedy the
fault, it is possible you have a more serious
problem.
In no circumstances try to repair the
electronic/electrical components in the appliance.
Contact your Customer Service.
10. Customer Service
For technical queries concerning your appliance
please contact the customer service office of your
dealer.
The type and rating plate is located inside the
appliance (remove the grease filter)
11. Installation
Before installation of the appliance
please pay regard to:
•
Installation of the appliance only at a convenient
place
•
Check the wall / ceiling on sustainability and
resilience
•
Check the routing of electrical and other
conductions in and on the wall respectively
ceiling, in order to not damage them with the drill
•
Check the condition and resilience of electric
conduction
•
We recommend the installation of the appliance
by a professional
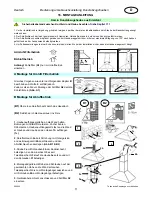
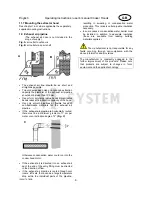
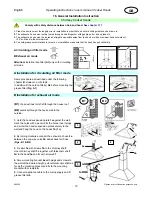
On installation, the minimum distance between the
hob and the hood must be exactly complied with
(see chapter 11.1 “Installation data“) and follow the
numbering of the steps and the additional
instructions. Execution with air exhausted outdoors
(A- see also the installation data). The vapours are
extracted via an air exhaust hose fixed to the
connector ring.
The diameter of the exhaust air hose must conform
to that of the connector ring. If a smoke non-return
valve is used or is planned, check whether it can
open and close freely after the installation of the
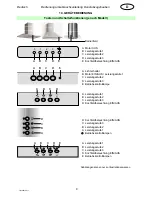
exhaust air hose. The extractor hood can be
equipped with one (top) or two (top and back)
extractor openings.
The hood is normally initially fitted out for use of the
top extractor opening, as an
extractor hood
.
Openings not required are fitted with a plastic cover.
This plastic cover can be easily removed by turning
counterclockwise and optionally fitted to another
opening which is not required.
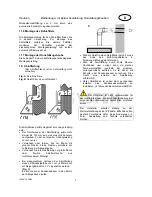
11.1 Installation data
Minimum distance from the lower edge of the hood
body:
to ceramic and cast cooking hobs
65 cm
to gas hob
70 cm
to hobs with coal/oil/wood firing
85 cm.
Only connect the appliance to the power
supply once it is properly installed.
11.2 Using the extractor hood as an exhaust air
hood (with air extracted to outdoors)
If the extractor hood has been fitted at the factory
with a carbon filter, this must be removed.
It is only practicable to use this when operating your
hood in circulation mode.
11.3 Converting the extractor hood to a
circulation hood
If you wish to use an appropriately fitted hood as a
circulation hood, you must mount the active carbon
filter(s) to the fan motor before using the hood.
The active carbon filter(s) is/are included in the
scope of supply with some models.
Otherwise you must obtain the active carbon filter(s)
from the supplier of your extractor hood.
You must also change your hood over to the “Filter
position“ at the device provided (lever or ball
handle).
(see chapter 13)
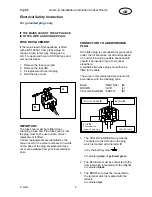
11.5. Electrical connection
Before connecting the extractor hood, check
that the voltage stated on the rating plate (V) agrees
with the supply voltage in your home.
Never install the appliance if the data on the
rating plate does not agree with your supply voltage.
You will find the rating plate inside the appliance,
behind the grease filter.
If the extractor hood is fitted with a standard
connector plug, connect this to an easily accessible
standard socket.
If the appliance is not fitted with a connector
plug, a two-pole switch, conforming to standards
with a minimum open contact gap of 3 mm is to be
installed by an authorized tradesman in an easily
accessible location.
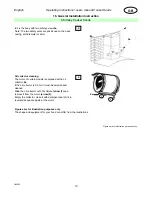
11.6 Mounting the carbon filter
You will find the mounting instructions for the
carbon filter in its packaging. To mount the carbon
filter, remove the grease filter(s), fit the carbon filter
according to its mounting instructions and refit the
grease filter(s).


