background image

English


              Users- & Installation Instruction Cooker Hoods 


fi 100325 

2

GB

Electrical Safety Instruction 


For grounded plugs only 


IF THE MAINS LEAD OF THE APPLIANCE 
IS FITTED WITH A GROUNDED PLUG: 


FUSE REPLACEMENT 


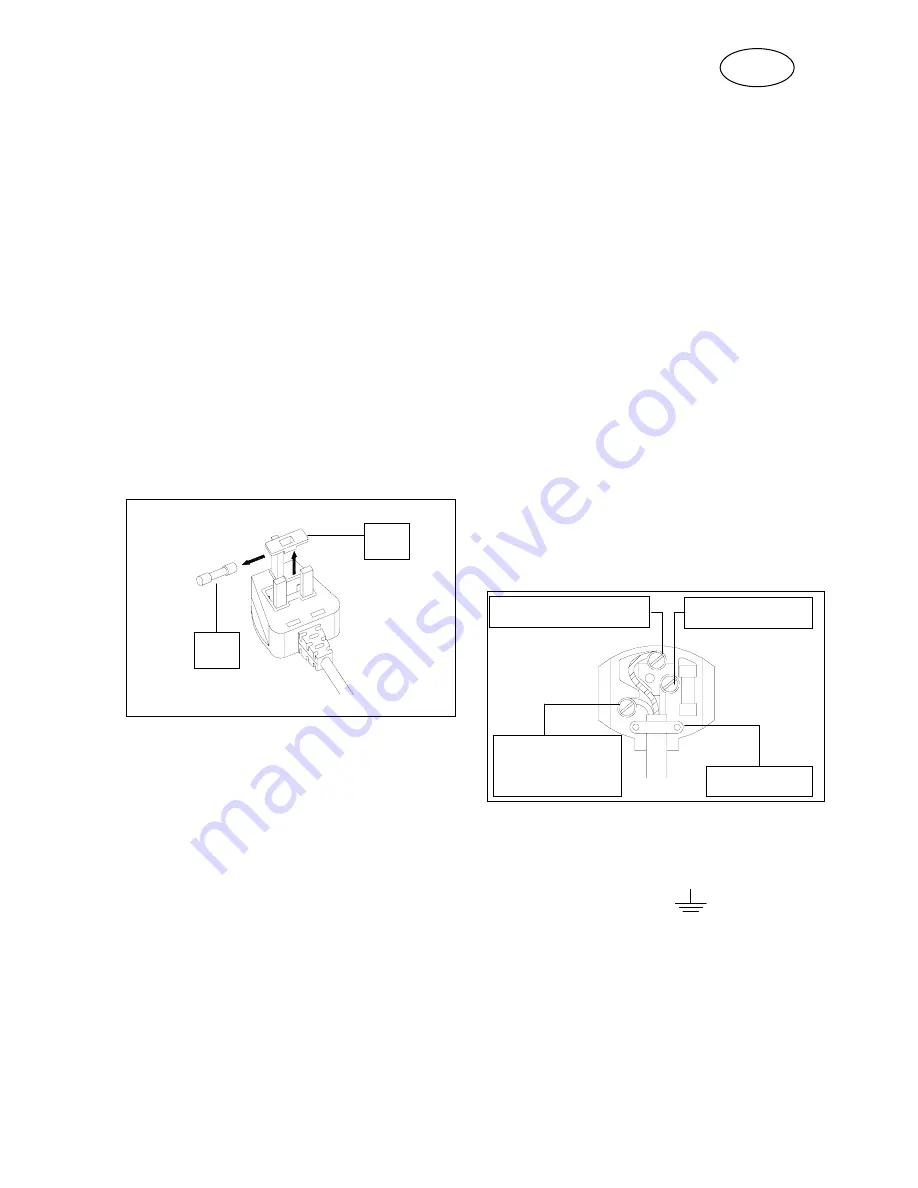
If the mains lead of this appliance is fitted 
with a BS 1363A 13 amp fused plug, to 
change a fuse in this type of plug use a 
A.S.T.A. approved fuse to BS 1362 type and 
proceed as follow: 
 
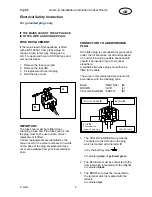
1.  Remove the fuse cover (

A

2.  Remove the fuse (

B

3.  Fit replacement fuse into plug 
4.  Refit the fuse cover 


IMPORTANT: 

The fuse cover mast be refitted when 
changing a fuse and if the fuse cover is lost 
the plug must not be used until a correct 
replacement is fitted. 
Correct replacements are identified by the 
colour insert or the colour embossed in words 
on the base of the plug. Replacement fuse 
cover are available from your local electrical 
store. 


CONNECTION TO A REWIREABLE 
PLUG


If the fitted plug is not suitable for your


socket 

outlet, then it should be cut off and disposed 
of in order to avoid a possible shock hazard 
should it be inserted into a 13A socket 
elsewhere. 
A suitable alternative plug should then be 
fitted to the cable. 
 
The wires in this mains lead are coloured in 
accordance with the following code: 
 
BLUE 

  “NEUTRAL” 


(

N

BROWN 


 “LIVE” 

 (

L

YELLOW & GREEN  “EARTH” 

(

E


1.  The YELLOW & GREEN wire must be 

connected to the terminal in the plug 
which is marked with the letter 

E


or by the Earth symbol 
 
or coloured 

green

 or 

yellow & green 


2.  The BLUE wire must be connected to the 

terminal which is marked with the letter 

N


or coloured 

black


3.  The BROW wire mast be connected to 

the terminal which is marked with the 
letter 

L


or coloured 

red


BLUE


N


Connected to a 
typical 13 amp plug


BROWN


N


YELLOW & GREEN


E


CABLE CLAMP

Содержание MSPK950IX

Страница 1: ...sanleitunganleitung Mod No Dunstabzugshaube Users Installation Instruction Cooker hood Notice d emploi Instructions pour l installation Hotte Gebruikers en installatiehandleiding Afzuigkap fi 100417AT...

Страница 2: ...not contain any toxic substances DECLARATION DE CONFORMITE Par la pr sente le fabricant du des produit s d crit s se rapportant la pr sente d claration d clare sous sa propre responsabilit que ce s p...

Страница 3: ...Ihnen bei sachgerechter Bedienung und Wartung viele Jahre dienen wird Unsere Ger te sind nicht f r die gewerbliche Nutzung bestimmt Sie sind f r den Gebrauch im Haushalt ausgelegt Bei gewerblichem Geb...

Страница 4: ...halten werden I Bei gleichzeitigem Betrieb der Dunstabzugshaube und Ger ten die Gas oder andere Brennstoffe verbrennen ist gr te Vorsicht geboten Ein gefahrloser Betrieb ist m glich wenn der gleichzei...

Страница 5: ...nd optimale Leistung der Dunstabzugshaube f Wird die Dunstabzugshaube zusammen mit anderen nicht durch elektrische Energie versorgten Ger ten betrieben darf der Unterdruck im Raum einen Wert von 4 Pa...

Страница 6: ...tzen Nachlauffunktion Wenn ihr Ger t mit einer Nachlauffunktion ausgestattet ist k nnen Sie diese mit einer zus tzlichen Taste im Bedienfeld Kapitel 14 aktivieren 7 Reinigung und Pflege Vor jeder Inst...

Страница 7: ...n Filter f r 10 Minuten bei 100 C im Backofen trocknen Ob Ihr Kohlefilter wasch und regenerierbar ist steht auf dessen Verpackung Tr gt die Verpackung keinen Hinweis enth lt diese einen herk mmlichen...

Страница 8: ...shaube ist in der Regel f r den Gebrauch der oberen Abzug ffnung zum Einsatz als Ablufthaube vorger stet Die nicht ben tigten Abzug ffnungen sind mit einem Kunststoffdeckel versehen Dieser Kunststoffd...

Страница 9: ...ung der Abzugshaube Verwenden Sie als Abluftleitung nur glatte Rohre oder flexible Abluftschl uche aus nichtbrennbarem Material Bei waagerechtem Verlegen der Abluftleitung muss ein Mindestgef lle von...

Страница 10: ...Montagehaken K Sicherungsschrauben L Grundschacht stabilisierungs B gel M Abluftschlauch 1 Bedienfeld 2 Metallfilter 3 Kochfeldbeleuchtung 4 Typenschild 5 Motor 6 Kohlefilter Deutsch Bedienungs Gebrau...

Страница 11: ...feldbeleuchtung EIN AUS D Kochfeldbeleuchtung EIN AUS C Leistungsstufe 3 B Leistungsstufe 2 A Leistungsstufe 1 Betriebskontrolllampen A Leistungsstufe 1 B Leistungsstufe 2 C Leistungsstufe 3 D Kochfel...

Страница 12: ...om Grundschacht und Teleskopschacht undicht Motor nicht fest montiert Ungen gender Luftabzug Haube nicht richtig fixiert Distanz zwischen Haube und Kochfeld zu gross Zu viel Zugluft durch offene Fenst...

Страница 13: ...schacht durch das Hausdach B2 Seitlich durch die Hausmauer ins Freie 1 Haubenaufh ngeplatte 1a an die Wand halten Bohrungen mit Bleistift markieren L cher bohren D bel setzen Haubenaufh ngeplatte fest...

Страница 14: ...ewolltes Aush ngen sichern Die beiden 6 mm Bohrl cher f r die Sicherheits schrauben befinden sich an der R ckseite des Haubenk rpers 5 5a 6 6a 1 2 Reinigung der lwanne am Motor Der Motor einzelner Mod...

Страница 15: ...Anschlusskabel 1 9 Haubenk rper 1 10 Filter und Bedienblende Rahmen 1 11 14 12 13 15 Bedienfeld 1 16 Halogen Leuchte 2 17 Gebl se 1 18 Fl gelrad 1 19 Motot 1 20 Gebl segitter 2 21 22 23 Aluminium Filt...

Страница 16: ......

Страница 17: ...General installation instructions Chimney Hoods 12 13 17 Parts List 14 Individual installation instructions Island Hoods if applicable see separate booklet We recommend that you read these operating i...

Страница 18: ...se of the plug Replacement fuse cover are available from your local electrical store CONNECTION TO A REWIREABLE PLUG If the fitted plug is not suitable for your socket outlet then it should be cut off...

Страница 19: ...Compliance with the information marked with this symbol will spare you many problems Warning Keep your children from using the cooker hood Your cooker hood is for domestic use only not suitable for b...

Страница 20: ...ing the supply plug or tripping out or removing the fuse b The air extracted from the hood is not to be routed over the exhaust air pipeline of the heater or other non electric operated appliances c N...

Страница 21: ...g to the amount of smoke and odours to be extracted 3 Operate the hood for another ca 5 to 10 minutes after finishing cooking 4 Refit the steam collector where fitted After run function If your applia...

Страница 22: ...must be reactivated This is carried out by drying the cleaned filter in an oven for 10 minutes at 100 C Read the package to see whether your carbon filter is washable and regeneratable If the package...

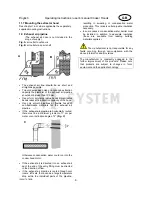
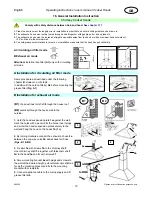
Страница 23: ...easily removed by turning counterclockwise and optionally fitted to another opening which is not required 11 1 Installation data Minimum distance from the lower edge of the hood body to ceramic and ca...

Страница 24: ...ust be a minimum gradient of 1 cm per meter or an inclination angle of 2 Fig C Otherwise condensation water could run into the cooker hood motor If the exhaust air is directed into an exhaust air duct...

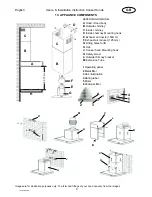
Страница 25: ...fety screw L Outside chimney bracket M Extension Tube 1 Operating panel 2 Metal filter 3 Hob illumination 4 Rating label 5 Motor 6 Charcoal filter Images are for illustration purposes only The form an...

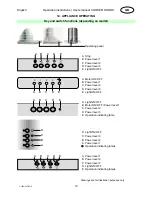
Страница 26: ...tion indicating lamp D Light ON OFF C Power level 3 B Power level 2 A Power level 1 Operation indicating lamps A Power level 1 B Power level 2 C Power level 3 D Light ON OFF E Operation indicating lam...

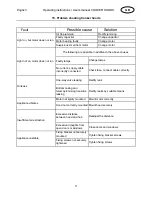
Страница 27: ...nglish Operating instructions Users manual COOKER HOODS 15 Problem shooting Cooker hoods Suspicious smell from motor The following are possible in addition to the above causes Change lamps Check fuse...

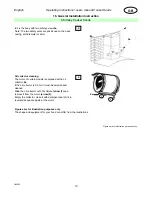
Страница 28: ...elescopic shaft 3d to the hood 3e and fix with screws 3f 4 Screw mounting bracket 4a with plugs and screws to the wall at the desired height pull out telescopic shaft as far as the mounting bracket an...

Страница 29: ...ons 6 Fix the body with two safety screws 5a Note The two safety vents are positioned on the back casing with diameter of 6mm 5 5a 6 6a 1 2 Oil collector cleaning The motor of certain models is equipp...

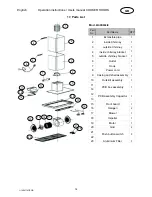
Страница 30: ...Casing and shell assembly 1 10 Outskirt assembly 1 11 14 12 13 15 Front board 1 16 Halogen 2 17 Blower 1 18 Impeller 1 19 Motor 1 20 Grid 2 21 22 23 Aluminium Filter 3 17 Parts List English Operation...

Страница 31: ......

Страница 32: ......

Страница 33: ...ez opt pour un appareil de qualit qui vous rendra service pendant de nombreuses ann es dans la mesure o il est correctement utilis et entretenu Nos appareils ne sont pas destin s un usage professionne...

Страница 34: ...ilez suffisamment la pi ce lorsque vous utilisez l appareil au dessus d une cuisini re gaz Le flexible d vacuation d air de l appareil doit tre pos vers l ext rieur dans une conduite d vacuation d air...

Страница 35: ...utilis e conjointement avec d autres appareils non aliment s par l nergie lectrique la d pression au sein de la pi ce ne doit pas d passer une valeur de 4 Pa 4 x 10 5 bar g Assurez vous que la pi ce e...

Страница 36: ...ntien du fonctionnement Si votre appareil est quip d une fonction de maintien du fonctionnement vous pouvez activer celle ci au moyen de la touche suppl mentaire du panneau de commande chapitre 14 7 N...

Страница 37: ...res charbon lavables et r g n rables absorbent les odeurs de cuisine en cas de nettoyage mensuel pendant un maximum de 3 ans Ensuite le filtre doit tre remplac par un filtre neuf Nettoyez les filtres...

Страница 38: ...pitre 11 1 Indications d installation et respectez l ordre des tapes de travail num rot es et des instructions suppl mentaires Version avec refoulement de l air par le haut A voir galement les indicat...

Страница 39: ...n Vous trouverez la notice de montage du filtre charbon dans son emballage Pour le montage du filtre charbon enlevez le s filtre s graisse montez le filtre charbon conform ment la notice de montage co...

Страница 40: ...l eau de condensation Dans ce cas une isolation de la conduite d vacuation d air est n cessaire Le cas ch ant outre une isolation suffisante une barri re d eau de condensation doit tre install e disp...

Страница 41: ...bilisation du conduit principal M Flexible d vacuation d air 1 Panneau de commande 2 Filtre m tallique 3 clairage des plaques de cuisson 4 Plaque signal tique 5 Moteur 6 Filtre charbon Fran ais Notice...

Страница 42: ...2 D Niveau de puissance 3 E T moin de fonctionnement A Niveau de puissance 1 B Niveau de puissance 2 C Niveau de puissance 3 D MARCHE ARR T clairage des plaques de cuisson D MARCHE ARR T clairage es...

Страница 43: ...it princi pal et le conduit t lescopique Moteur non solidement mont vacuation insuffisante de l air Hotte non correctement fix e Distance entre la hotte et les plaques de cuisson trop importante Trop...

Страница 44: ...nt vers l ext rieur travers le mur de l habitation 1 Tenir la plaque de suspension de hotte 1a contre le mur marquer les trous l aide d un crayon percer les trous introduire les chevilles visser solid...

Страница 45: ...x trous de per age de 6 mm pour les vis de s curit se trouvent l arri re du corps de la hotte 5 5a 6 6a 1 2 Nettoyage du bac r cup rateur d huile sur le moteur Le moteur de certains mod les est quip d...

Страница 46: ...d 1 9 Casing and shell assembly 1 10 Outskirt assembly 1 11 14 12 13 15 Front board 1 16 Halogen 2 17 Blower 1 18 Impeller 1 19 Motor 1 20 Grid 2 21 22 23 Aluminium Filter 3 Fran ais Notice d utilisat...

Страница 47: ......

Страница 48: ......

Страница 49: ...apparaat bij het plaatselijk bevoegde bedrijf voor het inzamelen van afgedankte huishoudelijke apparaten Met een correcte verwerking kunnen waardevolle materialen op intelligente wijze gerecycled word...

Страница 50: ...p verwijderd ongewenste geuren en stoom en zorgt voor een juiste kamer atmosfeer Vet stoom en vochtdeeltjes worden geabsorbeerd door het vetfilter Indien de kap goed wordt gebruikt kan deze zorgen voo...

Страница 51: ...Zorg dat de lucht probleemloos naar buiten afgevoerd kan worden en controleer dat de afvoer niet geblokkeerd is Let er op dat er voldoende toevoer is van lucht wanneer u de afzuigkap gebruikt Indien...

Страница 52: ...de koolstoffilters meer dan 6 maanden niet vervangen Indien dit het geval is dient u deze te vervangen Is er voldoende toever van lucht om de afgevoerde lucht te vervangen De verlichting werkt niet D...

Страница 53: ...jk te zijn Om teveel lawaai en of slechte afzuiging te voorkomen dient de afvoer niet kleiner te zijn dan 150mm in doorsnee Gebruik ruime bochten Krappe bochten verminderen de capaciteit van de afzuig...

Страница 54: ...iligheids schroef L Beugel voor binnenschacht M Afvoer 1 Bediening 2 Vetfilter 3 Verlichting 4 Typeplaatje 5 Motor 6 Koolfilter Nederlands Gebruikers en installatiehandleiding afzuigkap 13 Onderdelen...

Страница 55: ...Motor stand 3 E Indicatielamp D Verlichting AAN UIT C Motor stand 3 B Motor stand 2 A Motor stand 1 Indicatielampen A Motor stand 1 B Motor stand 2 C Motor stand 3 D Verlichting AAN UIT E Indicatielam...

Страница 56: ...ar motor doet niets Verlichting en motor werken beide niet Olie lekkage Afzuigkap is onstabiel hangt niet recht Verminder de afstand Sluit wat ramen en deuren om tocht te voorkomen Controleer de terug...

Страница 57: ...hroef deze vast 3f 4 Schroef de bevestigingsbeugel 4a met pluggen en schroeven aan de muur op de juiste hoogte Schuif de bovenschaacht uit naar de bevestigingsbeugel en schroef deze vast Let op Instal...

Страница 58: ...evestigingshaak 1 8 Snoer 1 9 Motorhuis 1 10 Frame kap 1 11 14 12 13 15 RVS strip 1 16 Halogeen verlichting 2 17 Blower 1 18 Fan 1 19 Motor 1 20 Zijstuk motor 2 21 22 23 Vetfilter 3 Nederlands Gebruik...

Страница 59: ......

Отзывы: