background image

36

Ozonic

接続

 Ozonic

には

多目的

使用

できる

複数

出力端子

装備

されています

2

チャンネルのステレオ

使用時

には

フォルトで

出力

1

/

2

端子

左右

出力端子

として

使用

します

出力

1

/

2

端子

には

それぞれ

左右

のチャンネルにス

ピーカー

ミキサーやその

モニタリングシステム

接続

します

Ozonic

リアパネルのヘッドフォン

端子

には

ヘッドフォンを

接続

できます

モニタリングや

試聴

などに

便利

です

<  

リアパネルにある

入力端子

キーボード

ミキサー

CD

プレーヤー

のラインレベル

信号

受信

します

XLR

端子

1

/

4

端子

にボーカルマイクロフォン

ギター

ベース

接続

インストゥルメントやマイクレベ

ルの

信号

受信

してレコーディングなどに

使用

します

リアパネルのライン

入力

使用

するには

フロントパ

ネルの

Mic/Line

ボタンを

してボタンが

った

状態

にしておく

必要

があります

もう

一度押

してボタンが

状態

では

マイク

/

インストゥルメント

入力

使用

できます

入出力

する

しい

解説

Ozonic

のユーザーマニュアルに

記載

されています

Ozonic

マニュアルは

ドライバ

CD-

ROM

にあります

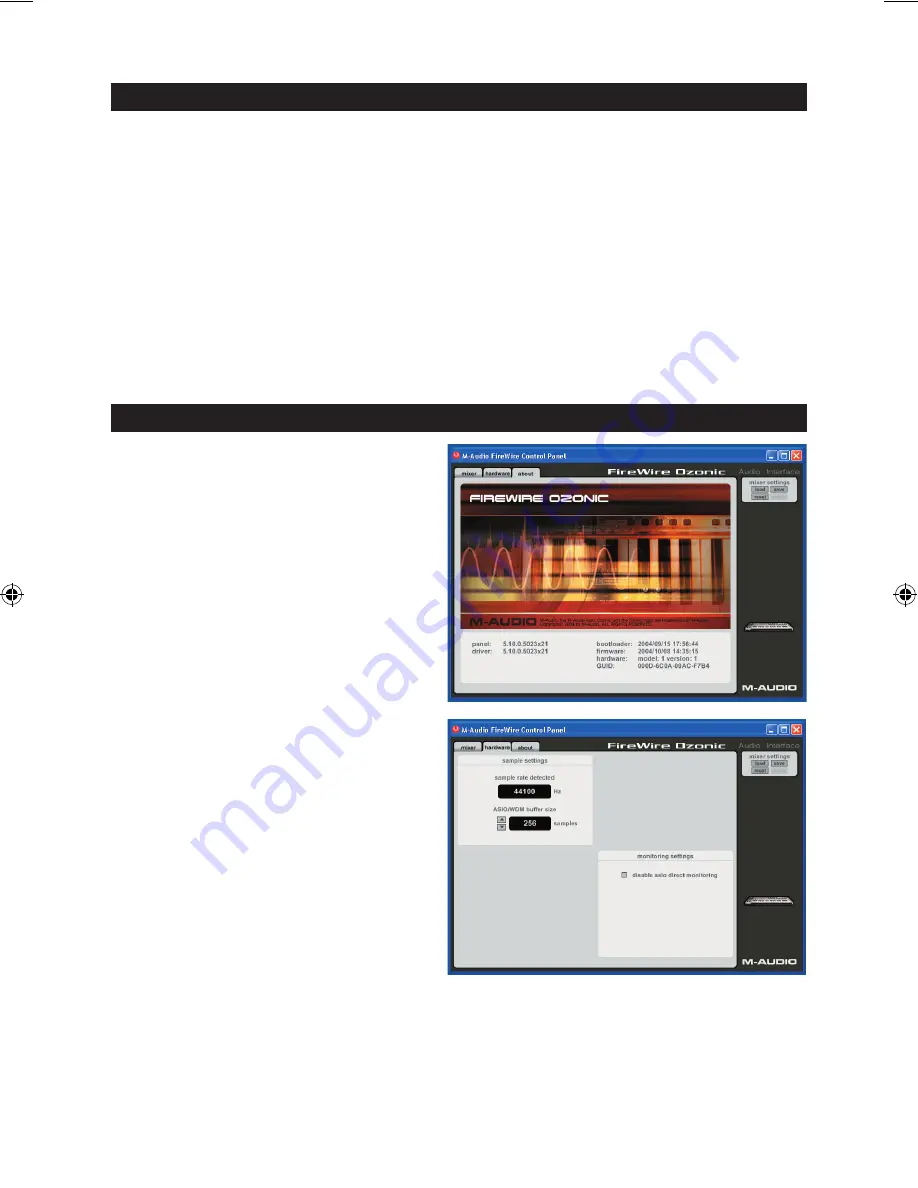
FireWire

コントロールパネル・ソフトウェアの

使用方法


Windows

コンピュータでは

画面右下

のシステム

トレイにある

M

のアイコンをダブルクリックすると

コントロールパネル

ソフトウェアが

起動

します


Mac OS X

をお

使

いの

場合

アップルメニューのシス

テム

環境設定

から

M-Audio

のアイコンをダブルクリッ

クして

さい

コントロールパネル

ソフトウェアのデフォルト

設定

では

オーディオは

Ozonic

出力端子

1

/

2

またはヘッ

ドフォンにルーティングされます

コントロールパ

ネル

ソフトウェアで

必要

じてデフォルトの

出力


ルーティングやトップパネルにあるロータリーエン


コーダー

デフォルトでは

出力音量

調整

します

機能

設定

デジタルの

同期

シンク

方法

などの

選択

などが

可能

です

標準的

使

では

デフォル

設定

変更

する

必要

はありません

ボーカル

ギタートラック

キーボードパートなどの

外部音源

から

録音

する

場合

入力信号

をモニタリング

することもできます

モニタリングで

入力端子

信号

くことができるばかりか

その

信号

コンピュータから

って

出力信号

わせる

こともできます

この

方法

使

って

しいパートを

録音

しながらリアルタイムにモニターでき

同時

のパートが

出力

されることになります

これは

多重

録音

ばれる

録音方法

です

ほとんどの

録音用

のア

プリケーションで

自動的

入力

モニタリングができま

すが

コントロールパネル

ソフトウェアを

使

って

でモニタリングを

有効

にすることもできます


OZONIC_QS_MITSURU3.indd   36

10/19/04   12:18:00 PM

Содержание Ozonic

Страница 1: ...uickly In order to achieve optimal usage of your new Ozonic we recommend that you carefully study the enclosed product manual either after completing the process described in this guide or before Quick Start Guide 37 Key Audio MIDI Interface and Controller ...

Страница 2: ...XP 15 Treiber Installation unter Mac OS X 17 Anschluss Ihres Equipments an das FireWire Interface 18 Das FireWire Control Panel 18 Weitere Infos und Hilfe 19 Español 21 Instrucciones de instalación para Windows XP 21 Instrucciones de instalación para MacOS X 23 Conexión de su equipo a una interfaz de la serie FireWire 24 Uso del Panel de control FireWire 24 Información adicional y soporte 25 Itali...

Страница 3: ...your computer fails to auto launch the installer you may manually start the installer by clicking on Start My Computer FireWire Series 3 Follow the on screen directions to choose your language and product Once you select your product click Install Drivers to begin copying needed files to your system 4 Follow the driver installer s on screen directions 5 At various points in this installation proces...

Страница 4: ...Hardware wizard has finished you will see a message pop up that says Your new hardware is installed and ready to use Installation Instructions for Mac OS X NOTE Please do not connect your Ozonic to your computer until the appropriate driver files have been installed in your system Be sure to leave your FireWire audio device disconnected until instructed to connect it below 1 Insert the FireWire Driv...

Страница 5: ...t Outs 1 2 to the left and right channels respectively of your speakers mixer or other monitoring system You may also connect a pair of headphones to the headphone jack on the back of the unit allowing for monitoring or pre listening in private The inputs on the back of the FireWire interface accept line level signals such as those from keyboards mixers and CD players as well as XLR and jacks whic...

Страница 6: ...on of the front mounted rotary encoder by default the encoder will control the output volume and also select digital sync options For standard use there will be no need to change the default settings When it s time to record an external source such as a vocal guitar track or keyboard part you will want to monitor your input Monitoring will allow you to hear the signal being fed into the inputs whi...

Страница 7: ...e interference by one or more of the following measures Reorient or relocate the receiving antenna Increase the separation between the equipment and receiver Connect the equipment into an outlet on a circuit different from that to which the receiver is connected Consult the dealer or an experienced radio TV technician for help VST is a trademark of Steinberg Soft und Hardware GmbH ASIO is a tradem...

Страница 8: ...8 ...

Страница 9: ...inateur 2 Ce dernier affiche automatiquement l écran d installation interactive illustré ci dessous Si votre ordinateur ne lance pas automatiquement le programme d installation effectuez cette manœuvre manuellement en cliquant sur Démarrer Poste de travail FireWire Series 3 Suivez les instructions à l écran pour sélectionner votre langue et votre produit Une fois votre produit sélectionné cliquez s...

Страница 10: ...issez un port 4 broches il vous faudra brancher le bloc d alimentation fourni pour assurer l alimentation de l unité 8 Allumez l appareil FireWire puis l ordinateur 9 Au démarrage Windows identifiera la nouvelle interface FireWire et affichera un assistant Nouveau matériel détecté tel que celui illustré ci dessous 10 Sélectionnez l option Installer le logiciel automatiquement puis cliquez sur Suivan...

Страница 11: ...ez le CD ROM des pilotes FireWire dans le lecteur de CD ROM de votre ordinateur 2 Double cliquez sur l icône de CD lorsqu elle apparaît sur votre bureau afin de visualiser le contenu du CD 3 Double cliquez sur l icône Mac OS X Start Here pour lancer le sélecteur de pilotes illustré ci dessous 4 Dans la liste de l écran de bienvenue sélectionnez votre produit puis cliquez sur Install Drivers install...

Страница 12: ... position in enfoncée S ils sont en position out relâchée ce sont les entrées micro instrument du panneau avant qui seront utilisées à la place Pour plus d informations et pour en savoir plus sur les entrées et sorties disponibles ainsi que sur les formats numériques veuillez vous référer au Manuel de l utilisateur correspondant à votre produit et figurant sur le CD des pilotes FireWire Utilisation...

Страница 13: ... produit et figurant sur le CD des pilotes FireWire Informations complémentaires et assistance Nous vous recommandons de consulter régulièrement le site Web M Audio afin d obtenir les dernières mises à jour de pilote et des informations complémentaires L adresse Web de ce site est la suivante www m audio fr Vous y trouverez également des liens vers des pilotes des articles une base de connaissances ...

Страница 14: ...14 ...

Страница 15: ...ie die Ozonic Treiber CD in das CD Laufwerk Ihres Computers ein 2 Es erscheint das abgebildete Installer Fenster Falls der Installer nicht automatisch startet öffnen Sie ihn über Start Arbeitsplatz FireWire Series 3 Folgen Sie der Bildschirmführung und wählen Sie die Installationssprache und das zu installierende Produkt aus Klicken Sie anschließend auf Install Drivers um den Installationsvorgang ...

Страница 16: ... benutzen muss das Gerät an die mitgelieferte Stromversorgung angeschlossen werden 8 Schalten Sie das FireWire Gerät und anschließend Ihren Computer ein 9 Sobald er hochgefahren ist erkennt Windows das neue FireWire Interface und öffnet den Hardware Assistenten Abb 10 Wählen Sie die Option Software automatisch installieren und klicken Sie auf Weiter 11 Der Hardware Assistent meldet dass die Instal...

Страница 17: ... den Inhalt der CD anzuzeigen 3 Doppelklicken Sie das Mac OS X Start Here Symbol Es erscheint die Treiberauswahl 4 Wählen Sie Ihr Gerät aus der Liste im Willkommensfenster und klicken Sie auf Install Drivers 5 Der Treiber Installer wird gestartet Folgen Sie der Bildschirmführung 6 Fahren Sie nach erfolgreicher Treiberinstallation Ihren Computer herunter und schalten Sie ihn aus 7 Schließen Sie Ihr...

Страница 18: ...n Sie bitte dem Handbuch für Ihr Produkt auf der FireWire Treiber CD Das FireWire Control Panel Unter Windows öffnen Sie das FireWire Control Panel einfach per Doppelklick auf das M Audio Symbol in der Task Leiste Mac Nutzer finden das Control Panel in den Systempräferenzen Ab Werk wird das FireWire Control Panel so konfiguriert dass normale Audiowiedergabe an Ausgänge 1 und 2 Ihres FireWire Gerätes...

Страница 19: ...ere Website für weiterführende Informationen und Treiber Updates Homepage http www m audio de Von dort geht es zu den Treiberseiten News FAQ Infos zu neuen Produkten und zur technischen Unterstützung Ozonic Tested to comply with FCC standards FOR HOME OR STUDIO USE Elektrostatische Entladungen und Spannungsspitzen können das Gerät kurzzeitig ausfallen lassen Schalten Sie das Gerät aus und wieder e...

Страница 20: ...20 ...

Страница 21: ...dad de CD ROM 2 La computadora mostrará automáticamente la pantalla de instalación interactiva que se muestra a continuación Si su computadora no ejecuta automáticamente el instalador inícielo manualmente pulsando Inicio Mi PC FireWire Series 3 Siga las instrucciones que aparecerán en pantalla para seleccionar su idioma y producto Una vez haya seleccionado su producto pulse Instalar controladores ...

Страница 22: ... fuente de alimentación para proporcionar corriente a la unidad 8 Ponga en marcha el dispositivo FireWire y a continuación la computadora 9 Al iniciar Windows el sistema identificará la nueva interfaz FireWire y mostrará un asistente para Nuevo hardware encontrado como el que se muestra a continuación 10 Seleccione la opción predeterminada Instalar automáticamente el software recomendado y a contin...

Страница 23: ... ROM de controladores FireWire en la unidad de CD ROM 2 Para explorar el contenido del CD haga doble clic sobre el icono del CD que aparecerá en su escritorio 3 Haga doble clic en el icono Mac OS X Start Here para iniciar el selector de controladores mostrado a continuación 4 Seleccione su producto de la lista de la pantalla de bienvenida y a continuación pulse Install Drivers 5 Se ejecutará el in...

Страница 24: ...tes como un micrófono de voz una guitarra o un bajo por ejemplo Si desea utilizar las entradas de línea posteriores asegúrese de que los botones Mic Line de la parte frontal del dispositivo FireWire están pulsados Si no están pulsados es decir si están en la posición hacia fuera podrá utilizar en su lugar las entradas frontales de micro instrumento Si desea una información detallada y una explicac...

Страница 25: ...el de control Para una explicación más detallada acerca del direccionamiento y de las funciones del Panel de control consulte el Manual de usuario de su producto que encontrará en el CD de controladores FireWire Información adicional y soporte Le recomendamos visitar regularmente la página de M Audio para obtener actualizaciones de controladores e información adicional La dirección de la página we...

Страница 26: ...26 ...

Страница 27: ...OM del computer 2 Il computer visualizzerà automaticamente la schermata di installazione interattiva illustrata di seguito Se ciò non accade occorre avviare manualmente il programma di installazione facendo clic su Start Risorse del computer FireWire Series 3 Seguire le istruzioni sullo schermo per scegliere la propria lingua e il prodotto Una volta selezionato il prodotto fare clic su Installa dr...

Страница 28: ...ponibile Se si utilizza la porta a 4 pin è necessario l alimentatore incluso per alimentare l unità 8 Accendere prima il dispositivo FireWire quindi il computer 9 All avvio di Windows viene identificata la nuova interfaccia FireWire e visualizzata l Installazione guidata nuovo hardware simile a quella riportata di seguito 10 Scegliere l opzione Installa il software automaticamente e fare clic su Av...

Страница 29: ...la scrivania per visualizzare il contenuto del CD 3 Fare doppio clic sull icona Mac OS X Start Here per avviare il selettore del driver illustrato qui di seguito 4 Selezionare il prodotto dall elenco sulla finestra di benvenuto quindi fare clic su Install Drivers 5 Viene avviata l installazione del driver Seguire le istruzioni sullo schermo 6 Alla fine dell installazione spegnere il computer 7 A com...

Страница 30: ...eWire Utilizzo del Pannello di controllo FireWire In Windows è possibile aprire il pannello di FireWire facendo doppio clic sull icona M Audio nella barra delle applicazioni Per gli utenti Mac OS X il pannello di controllo può essere avviato dall icona che si trova nel pannello Preferenze di sistema Le impostazioni predefinite del pannello di controllo di FireWire assicurano che la riproduzione aud...

Страница 31: ...e regolarmente il sito di M Audio per gli aggiornamenti dei driver e informazioni supplementari L indirizzo web del sito è www m audio com Sono presenti collegamenti ai driver novità domande frequenti e assistenza tecnica Ozonic Tested to comply with FCC standards FOR HOME OR STUDIO USE ESD e transienti rapidi possono causare temporanei malfunzionamenti dell unità Spegnerla e riaccenderla nuovamen...

Страница 32: ...32 ...

Страница 33: ...の接続が外してあることを確認してから 以下の手順でインストールを終了 し その後Ozonicを接続して下さい 1 コンピュータのCD ROMドライブにOzonicのドライバCD ROMを挿入します 2 コンピュータには自動的に以下の画面が表示されます インストーラーが作動せず以下の画面が表示されない 場合は スタート マイコンピュータ FireWire Seriesからインストーラーを起動させて下さい 3 画面の指示に従い 言語を選択し 続いて製品名を選択します ドライバのインストール をクリックする と コンピュータに必要なファイルがコピーされます 4 画面の指示に従ってドライバのインストールを進めます 日本語 ...

Страница 34: ...re端子に接続してOzonicの電源を入れま す コンピュータのFireWire端子が4ピンの場合には 付属の電源アダプタを使用してOzonicに電源供給を行う 必要があります 8 Ozonicの電源をONにした後で コンピュータの電源をONにします 9 Windowsが起動すると 新しいFireWireインターフェイス Ozonic が認識され 下図の通り 新しいハード ウェアの検出ウィザード が表示されます 10 ソフトウェアを自動的にインストールする を選択し 次へ をクリックします 11 ウィザードが終了したら 完了 をクリックします 12 新しいハードウェアの検出ウィザード が終了すると 新しいハードウェアがインストールされ 使用準 備ができました というメッセージがシステムトレイからポップアップします ...

Страница 35: ...ュータのCD ROMドライブにドライバCD ROMを挿入します 2 画面にCDのアイコンが表示されたらダブルクリックしてCDの内容を確認します 3 Mac OS X Start Here のアイコンをクリックすると下図の通り 製品名に対応するドライバのリストが表示 されます 4 リストからOzonicを選択して 次に ドライバのインストール をクリックします 5 ドライバのインストーラーが起動します 画面の表示に従ってドライバのインストールを進めます 6 インストールが完了したら コンピュータを終了して電源を切ります 7 コンピュータの電源がOFFの状態で Ozonicをコンピュータに接続しOzonicの電源を入れます 8 コンピュータの電源を入れます コンピュータが起動するとOzonicは使用可能な状態になります ...

Страница 36: ...ライバCD ROMの中にあります FireWireコントロールパネル ソフトウェアの使用方法 Windowsコンピュータでは 画面右下のシステム トレイにあるMのアイコンをダブルクリックすると コントロールパネル ソフトウェアが起動します Mac OS Xをお使いの場合は アップルメニューのシス テム環境設定からM Audioのアイコンをダブルクリッ クして下さい コントロールパネル ソフトウェアのデフォルト設定 では オーディオはOzonicの出力端子1 2またはヘッ ドフォンにルーティングされます コントロールパ ネル ソフトウェアで必要に応じてデフォルトの出力 ルーティングやトップパネルにあるロータリーエン コーダー デフォルトでは出力音量を調整します の 機能の設定 デジタルの同期 シンク の方法などの 選択などが可能です 標準的な使い方では デフォル ト設定を変更する必要はありま...

Страница 37: ...関連情報 M Audioのウェブサイトを定期的にご覧になってドライバアップデート等のサポート関連情報をご確認下さい M Audioのウェブサイトのアドレスは www m audio comです ドライバ情報 ニュース FAQやテクニカルサポート 等の情報が満載です Ozonic Tested to comply with FCC standards FOR HOME OR STUDIO USE 静電気放電 ESD や電磁波 Fast Transient は製品に一時的な誤作動を引き起こす可能性があり ます 正常に動作するまで電源スイッチON OFFの切り換えを繰り返して下さい ...

Страница 38: ...38 ...

Страница 39: ...39 ...

Страница 40: ...041019_OZONIC_QS_01 ...

Отзывы: