background image

User Guide

25

DCP-300


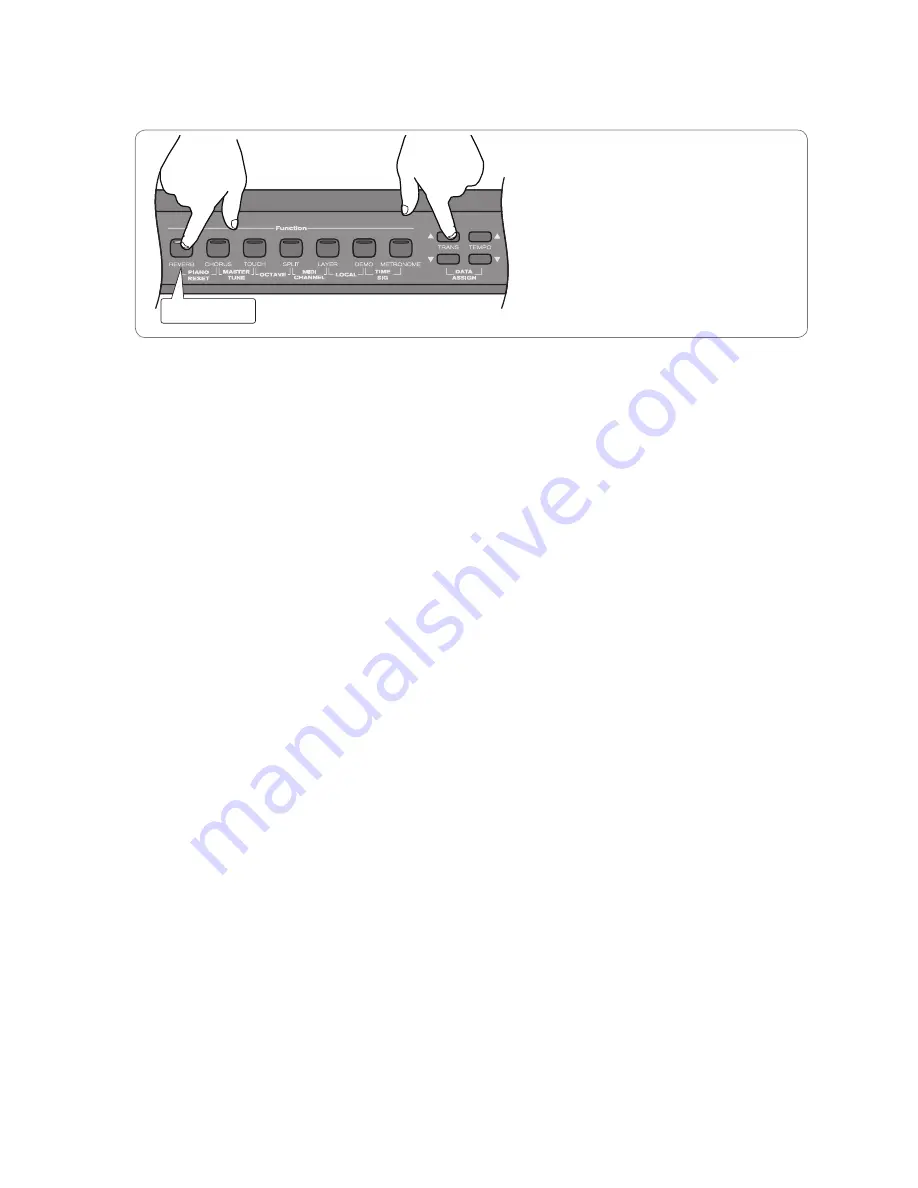
To change the Reverb Type:


 While holding the Reverb button, 

use the Transpose buttons to select a 

Reverb Type. The LCD will show the 

current Reverb Depth and Type.


 Once you have selected the desired 

Reverb Type, let go of the Reverb 

button, and resume playing DCP-300.

The following Reverb Types are available:


•  Room 1


•  Room 2


•  Room 3


•  Hall 1


•  Hall 2

  •  Plate
 

•  Delay


•  Pan Delay

Each of the 16 voices of DCP-300 will remember its individual Reverb on/off status, Type and Depth 

setting, even after turning the Power switch off and on. 


Function

REVERB

Содержание DCP-300

Страница 1: ...User Guide ...

Страница 2: ...tronome 15 Metronome Volume 16 Tempo 16 Time Signature 17 Using the Song Recorder Song Record Mode 18 Song Playback 20 Punch In 22 Using the Reverb Effect 24 Using the Chorus Effect 26 Split Mode 28 Layer Mode 31 Using Split and Layer Modes Together 34 Transpose Buttons 38 Octave Function 39 Master Tune 40 Touch Select Mode 41 7 Resetting DCP 300 What to do if you need to Start Over 43 Method 1 Pi...

Страница 3: ... Control Assign 54 10 Care and Maintenance 55 1 1 Troubleshooting 55 12 Appendices 56 Appendix A Defaults 56 Default Settings 56 Reverb and Chorus Defaults 57 Piano Reset 57 Appendix B MIDI Implementation 58 Appendix C Data Control Assignments and MIDI CC List 59 13 Warranty 61 ...

Страница 4: ...miliarize you with the many features of DCP 300 so that you can get the most from your new piano 1 Computer and software setup instructions can be found in the section titled Using Your Digital Console Piano with a Computer 2 Features Graded Hammer action 64 Note Polyphony maximum Master Volume Control Treble and Bass Controls Built in Reverb and Chorus effects 4 Touch Sensitivity Modes Low Normal...

Страница 5: ...User Guide 5 DCP 300 4 Controls and Connectors Right Panel 1 Power On Off Switch Pressing this button turns DCP 300 on or off Control Panel Power Button Connections Panel 1 ...

Страница 6: ...Used to transpose the pitch of the DCP 300 keyboard and also may be used in combination with the Function buttons to enter data during certain editing functions 7 Tempo Buttons Used to adjust the Metronome tempo and also may be used in combination with the Function buttons to enter data during certain editing functions 8 LCD Liquid Crystal Display The LCD shows information about the current parame...

Страница 7: ...t Buttons 10 Bank Button 11 LCD Liquid Crystal Display 8 Data Control Knob 9 Voice Select Sequencer Controls Sequencer Control Buttons 12 Master Volume 2 Bass Control 3 Function Buttons 5 Treble Control 4 Transpose Buttons 6 Tempo Buttons 7 Function ...

Страница 8: ...ting to a computer s USB port 16 Aux Line In These RCA connectors allow you to mix an external sound source such as a CD player or computer output with the piano s internal sounds for playback through the piano s built in speakers or headphone outputs 17 Line Out These RCA connectors can be used to connect the output of the piano to a stereo sound system keyboard amplifier mixing console or audio ...

Страница 9: ...dal Board Connect the Pedal Board cable to the Pedal connector on the DCP 300 rear panel Connect the Power Cable Make sure that the Power On Off Switch is in the Off up position Connect the included AC cable to the Power Socket on the DCP 300 rear panel and plug the other end into an active AC outlet 1 AC100 240V 50 60HZ PEDAL CAUTION AC100 240V 50 60HZ PEDAL CAUTION 2 ...

Страница 10: ...he Power On Turn the Master Volume all the way down Press the Power On Off switch to turn DCP 300 on The LCD will show Grand Piano Grand Piano is the sound or voice that is automatically selected each time you turn on DCP 300 1 2 ...

Страница 11: ...our right hand use your left hand to adjust the Master Volume control to a comfortable level Move the slider left to decrease the volume level and right to increase the volume level Once you have set a comfortable volume level you may make adjustments to the bass and treble although many users will be satisfied with the 12 o clock neutral position 1 2 ...

Страница 12: ...eople wearing headphones In this case the speakers will still remain off since headphones are also plugged into Headphone Output 1 Using the Pedals The pedal board has three pedals Soft Pedal Left Pedal When this pedal is pressed notes will sound slightly softer than they normally would if played with the same force without pressing the pedal Sostenuto Pedal Middle Pedal The Sostenuto pedal acts a...

Страница 13: ...tton s blue LED will light up and Strings will appear on the LCD Play the keyboard to hear the Strings voice Notice that the Bank button is not lit Press the Bank button The Bank button s blue LED will light up and Choir will appear on the LCD Play the keyboard to hear the Choir voice Of course although the Strings and Choir voices were chosen for the example the procedure is the same for all 16 a...

Страница 14: ...ding Grand Piano E Piano 1 Vibes etc If you want to hear demo songs featuring the Bank B voices the bottom row of voices including Bright Piano E Piano 2 FM EP etc press the Bank button It will light up While in Demo Mode as long as the Bank button is lit pressing a Voice Select button will cause the demo song featuring that button s Bank B voice to play 1 2 3 DEMO Function Voice Select Voice Sele...

Страница 15: ...to a set tempo and is also helpful when recording tracks into the Song Recorder The metronome will sound a high tone on the first beat of a bar and a lower tone on the remaining beats of the bar The Metronome button s LED will also flash in time To start the Metronome Press the Metronome button The Metronome will sound and the LED in the button will flash in time with the beats in the bar To stop ...

Страница 16: ...nt Metronome Volume level This can be adjusted between zero minimum and 127 maximum When you have set a comfortable level let go of the Metronome button Tempo The Metronome can be programmed for any tempo between 20 beats per minute bpm and 280 bpm To change the Metronome s tempo Use the Tempo Up Down buttons Up button increases tempo Down button decreases tempo METRONOME NOTE Pressing both Tempo ...

Страница 17: ...anspose Up Down buttons to change the Time Signature To reset the Time Signature to its default value of 4 4 While in Time Signature Edit Mode press the Transpose Up and Down buttons at the same time 1 2 NOTE Time signature and Tempo cannot be changed while recording a song The time signature or tempo must be selected before starting to record NOTE After pressing the Demo and Metronome buttons in ...

Страница 18: ...n to record on Track 2 The Metronome will begin counting but recording will not start yet This is called Record Wait Mode Start playing the keyboard Recording starts as soon as you play the first note When you are finished playing press the Record button again to stop recording 1 2 3 Sequencer Controls RECORD TRACK 1 NOTE When Record Wait Mode is active you can also start recording by pressing the...

Страница 19: ... simultaneously Note that the button for any track onto which material has been recorded will light Press the Track button for the track you wish to erase 1 2 TRACK 1 Sequencer Controls NOTE Once the Clear function has been used to erase a track this action cannot be undone The track will be permanently erased ...

Страница 20: ...in playback Note that pressing the Play button again during playback will stop playback Also note that during playback either or both Track buttons can be pressed at any time to make the corresponding track audible or inaudible Playback will continue until the end of the recording even if neither Track button is lit To play a previously recorded track while recording a second track Press the Track...

Страница 21: ... When Record Wait Mode is active you can also start recording by pressing the Play button In that case the Song Recorder will record silence until you start playing the keyboard Note If you have already recorded a performance on Track 1 and would like to record an independent performance on Track 2 without hearing Track 1 as you record you can make sure the Track 1 button is not lit pressing it if...

Страница 22: ...ly recorded track Press the Track button s for the track s you would like to hear so that the button s are illuminated If the Track button for the track you wish to hear is already lit you can skip the above step and proceed to Step 2 Press the Play button When the song reaches the point at which you would like to punch in press the Record button and the Track button for the track you want to reco...

Страница 23: ...the Record button again 4 5 RECORD Sequencer Controls Note Once you have punched in the old data on the selected track will be cleared from the punch in point to the end of the track even if Record Mode is stopped before the end of the original recording and even if no new notes have been played ...

Страница 24: ...button will go dark to indicate that Reverb is off To adjust the Reverb Depth Reverb amount While holding the Reverb button turn the Data Control knob to adjust the Reverb Depth setting The LCD will show the current Reverb Depth setting The minimum setting is 0 and the maximum setting is 127 Once you have reached the desired amount of Reverb let go of the Reverb button and resume playing DCP 300 F...

Страница 25: ...nd Type Once you have selected the desired Reverb Type let go of the Reverb button and resume playing DCP 300 The following Reverb Types are available Room 1 Room 2 Room 3 Hall 1 Hall 2 Plate Delay Pan Delay Each of the 16 voices of DCP 300 will remember its individual Reverb on off status Type and Depth setting even after turning the Power switch off and on Function REVERB ...

Страница 26: ...th Chorus amount While holding the Chorus button turn the Data Control knob to adjust the Chorus Depth setting The LCD will show the current Chorus Depth and Type Once you have the desired amount of Chorus let go of the Chorus button and resume playing DCP 300 Function CHORUS Function CHORUS Note If you prefer you may use the Tempo Up Down buttons instead of the Data Control knob to change the Cho...

Страница 27: ...rus 3 Chorus 4 FB Chorus Flanger Short Delay FB Delay Each of the 16 voices of DCP 300 will remember its individual Chorus on off status Type and Depth setting even after turning the Power switch off and on TIME OUT As you use DCP 300 you may notice there is no Enter button That is because whenever you press the appropriate Function button s to edit a setting such as Time Signature Octave Master T...

Страница 28: ... show the Split Voice and the Split Voice volume setting Grand Piano Eb3 Up Bass Vol 127 To change the Split left hand Voice Press and hold the Split button while selecting a Voice Select button Function SPLIT NOTE In most cases the number in the lower right corner of the LCD represents the current value of the Data Control knob While in Split Mode the Data Control knob defaults to controlling the...

Страница 29: ...on while pressing the highest note to be included in the Split zone i e the highest note to be played with the left hand voice To change the volume of the Split Voice Turn the Data Control knob to select a volume setting between 0 and 127 As long as you are in Split Mode the Data Control knob controls the volume of the Split Voice left hand voice Function SPLIT Voice Select ...

Страница 30: ...To turn off Split Mode Press the Split button again The default values for Split Mode are Default Split Point Eb3 Default Split Voice Upright Bass 1 2 3 Function SPLIT Note to MIDI users The Main Voice right hand voice will transmit on the selected Main MIDI Transmit Channel The Split Voice left hand voice will transmit on the Main MIDI Transmit Channel 1 For information on setting the Main MIDI T...

Страница 31: ...Mode the Data Control knob defaults to controlling the Layer Voice Volume However if you have assigned the Data Control knob to control a different function the value for your custom setting will be displayed instead of the Layer Voice Volume For information on how to assign the Data Control knob to control different functions see the Data Control Assign section in Chapter 9 MIDI Functions Please ...

Страница 32: ...00 To change the Layer Voice Press and hold the Layer Mode button while pressing a new Voice Select button To adjust the volume of the Layer Voice Use the Data Control knob to adjust the volume Voice Select Function Layer ...

Страница 33: ... turn off Layer Mode Press the Layer button The Layer button s LED will go dark 1 2 3 Function LAYER Function LAYER Note to MIDI users The Main Voice will be transmitted on the selected Main MIDI Transmit Channel The Layer Voice will be played on the selected Main MIDI Transmit Channel 2 For information on setting the Main MIDI Transmit Channel please see the MIDI Channel section in Chapter 9 MIDI...

Страница 34: ...rmation and the Data Control knob value which is the Layer Voice volume by default Main Voice Layer Voice Split Voice Layer Voice Volume For example the image on the left shows a setup with Grand Piano as the Main Voice Strings as the Layer Voice and Upright Bass as the Split Voice Note that the following instructions regarding using Layer Mode and Split Mode together are actually the same as if y...

Страница 35: ...Split button while choosing a Voice Select button To Change the Main Voice Press a Voice Select button without pressing the Layer or Split buttons To change the Layer Voice Volume Turn the Data Control knob to adjust the volume Function Voice Select SPLIT Voice Select ...

Страница 36: ...hold the Split button while turning the Data Control knob to adjust the volume To change the Main Voice Volume Press the Layer button to temporarily exit Layer Mode Press the Split button to temporarily exit Split Mode 1 2 Function SPLIT Function LAYER Function SPLIT ...

Страница 37: ...37 DCP 300 Use the Data Control knob to adjust the Main Voice volume Press the Split button again to reactivate Split Mode Press the Layer button again to reactivate Layer Mode 4 5 Function SPLIT Function LAYER 3 ...

Страница 38: ...pose Down button is used to lower the pitch in semi tone increments Once you have changed the Transpose setting the LCD will show a positive or negative value to the right of the voice name Grand Piano 05 Tem 120 Vol 127 Transpose Value To reset the Transpose setting back to its default value of zero Press the Transpose Up and Transpose Down buttons at the same time Note Changes to the Transpose s...

Страница 39: ...of the LCD will show OctaveShift 0 Use the Data Control knob or the Transpose Up Down buttons to raise or lower the Octave Shift setting To reset the Octave Shift function back to its default value of zero With Octave Shift Edit Mode enabled press the Transpose Up and Down buttons at the same time 2 1 Function SPLIT Note Changes to the Octave Shift setting are not remembered after a power cycle Th...

Страница 40: ...une 0 Use the Data Control knob or the Transpose Up Down buttons to raise or lower the Master Tune setting To reset the Master Tune value to its default value of zero Press the Chorus and Touch buttons at the same time to enable the Master Tune function Press the Transpose up and down buttons at the same time 1 1 2 2 Note Changes to the Master Tune value are remembered after a power cycle Also not...

Страница 41: ...ing more loudly even if you tend to strike the keys with less force Fixed is essentially the off setting effective when when the Touch button is not lit The same velocity value is sent regardless of how hard or how softly you strike the keys The default Fixed velocity value is 100 on a scale of 0 127 and can be adjusted see next page To select a Touch Sensitivity setting Normal Low or High With th...

Страница 42: ...turned off Touch button is not lit press and hold the Touch button While continuing to hold down the Touch button use the Data Control knob or the Transpose or Tempo Up Down buttons to select the desired Fixed velocity setting As you turn the Data Control knob you will see the value for the Fixed Level changing in the upper right corner of the LCD Fixed Level 100 1 2 Function TOUCH ...

Страница 43: ... memory and restore all functions to their factory defaults just like they were when you used DCP 300 for the first time Please note that anything you have recorded into the Song Recorder will be erased by this procedure To do a Factory Reset Hold down the Reverb and Chorus buttons while powering on DCP 300 The LCD window will light all pixels and all LEDs on the device will light while these butt...

Страница 44: ...er System Requirements Most recently manufactured home computers should meet the following requirements for use with DCP 300 and the included Sibelius First software Windows XP SP2 Vista 512 MB RAM 600 MB hard disk space CD ROM drive Available USB port Mac OS X 10 4 or later 512 MB RAM 600MB hard disk space CD ROM drive Available USB port Note It is not necessary to install the Sibelius First soft...

Страница 45: ...equired Connecting the USB cable With your computer on and all programs applications closed connect one end of the included USB cable to an open USB port on your computer Connect the other end of the included USB cable to the USB jack on the front of the DCP 300 Connections Panel Make sure DCP 300 is powered on That s it Now MIDI Musical Instrument Digital Interface data can be sent between DCP 30...

Страница 46: ...king with music software To connect your computer s audio output to the DCP 300 Auxiliary Input Set a comfortable volume level for DCP 300 according to the Set a Comfortable Volume Level instructions in the Using DCP 300 for the First Time section at the beginning of this User Guide Turn the Input Level knob all the way down Connect the 1 8 end of the included 1 8 TRS to stereo RCA audio cable to ...

Страница 47: ...ough the DCP 300 speakers at a comfortable listening level You may wish to play the piano along with the music as this can help you set a more balanced mix between the piano s built in sounds and the external audio source 5 6 4 Headphones Aux In Line Out MIDI Out 1 2 Input Level USB Headphones Aux In Line Out MIDI Out 1 2 Input Level USB Note Of course if you prefer to listen to your computer thro...

Страница 48: ...t CD ROM into your computer s CD ROM drive On Windows computers click Install Sibelius First on the window that will automatically launch On Mac double click on the Sibelius CD ROM icon on the desktop then double click on the Install Sibelius First icon in the window that opens 1 ...

Страница 49: ...is powered on Launch Sibelius First On Windows computers double click the Sibelius 5 First icon on your desktop On Mac double click your hard disk icon navigate to the Applications folder then double click the Sibelius 5 First program icon When you see the Try Sibelius First window click the Enter Serial Number button 2 3 Note You can also find more detailed installation instructions in the Sibeli...

Страница 50: ...uide 50 DCP 300 Enter the serial number found inside the front cover of the included Sibelius First Installation Guide booklet and then click OK Follow the on screen instructions to register the software 4 5 ...

Страница 51: ... Other select the score called Quick tour and then click Open A single page excerpt from a composition by Scott Joplin called Something Doing will open Click the Play button You will hear the score played back using a piano sound that is built into Sibelius either through your computer speakers or through the DCP 300 speakers if you have connected the Aux In as explained in the Connecting the DCP ...

Страница 52: ... Off Turning the Local On Off function to Off will disconnect the keyboard from the internal sound engine of DCP 300 This means you can use DCP 300 as a MIDI controller to control other MIDI devices or virtual instrument software running on your computer without playing the internal sounds of DCP 300 You may also find other occasions such as when you are using MIDI sequencing software on your comp...

Страница 53: ...ta Control knob or the Transpose Up or Down buttons to change the Main MIDI Transmit Channel The new Main MIDI Transmit Channel will be selected and shown in the display For example if Channel 12 is selected the display will show Midi Chan 012 If the keyboard is being played at the time of the MIDI Channel change all new notes played will be sent on the new MIDI Channel All held notes will play th...

Страница 54: ...buttons at the same time Turn the Data Control knob to scroll through the possible assignments until you see the desired assignment on the LCD After approximately three seconds the keyboard will go back into Performance Mode with your new Data Control knob assignment Please note that the default assignment for the Data Control knob is 007 VolumC Adjusting Split and Layer Voice Volume when Data Con...

Страница 55: ...cted voice s volume may be turned down In either case a Piano Reset will fix the problem To do a Piano reset press the Reverb button and Chorus button at the same time for one second Solution 2 If the Master Volume knob is turned up but you do not hear sound from the piano s built in speakers make sure nothing is plugged into Headphone Output 1 Problem When I turn on the piano the LCD does not lig...

Страница 56: ...ty Curve Selected NORMAL Yes Voice Volume 127 Yes Metronome Volume 127 Yes Master Tune 0 Yes Tempo 120 Yes Reverb On Off Reverb On Yes store for each sound Reverb Depth Defaults for each sound Yes store for each sound Reverb Type Defaults for each sound Yes store for each sound Chorus On Off Chorus Off Yes store for each sound Chorus Depth Defaults for each sound Yes store for each sound Chorus Ty...

Страница 57: ...lowing functions 1 Turn Local On 2 Send All Notes Off Command on MIDI Channel 1 external and to the internal sound engine 3 Send Reset All Controllers Command on MIDI channel 1 external and to the internal sound engine 4 Assign Data Control to MIDI Controller 7 Volume 5 Set Volume levels for Main Voice Split Voice and Layer Voice to defaults 6 Set Pan to 64 for Main Voice Split Voice and Layer Voi...

Страница 58: ...0 81 91 93 100 101 121 Program Change True 0 127 0 15 16 sounds only PGM 0 15 System Exclusive 0 0 The controller will recognize and respond to GM Device Inquiry Master Tune supported Master Volume supported System Exclusive Song Position Pointer Song Sel Tune Request X X X X X X Tune Request X X System Clock X X Real Time Commands X X Aux All Sounds Off 0 0 Messages Reset All Controllers 0 0 Loca...

Страница 59: ...FootPC CC 0 5 5 Portamento Time coarse 005 PortaC CC 0 6 6 Data Entry coarse 006 DataEC CC 0 7 7 Volume coarse 007 VolumC Vol 127 8 8 Balance coarse 008 BalanC CC 0 9 9 CC 0 10 10 Pan position coarse 010 Pan C Pan 64 11 11 Expression coarse 011 Expr C Exp 127 12 12 Effect Control 1 coarse 012 Eff1 C CC 0 13 13 Effect Control 2 coarse 013 Eff2 C CC 0 14 14 CC 0 15 15 CC 0 16 16 General Purpose Slid...

Страница 60: ... on off 082 GenBt3 CC 0 83 83 General Purpose Button 4 on off 083 GenBt4 CC 0 84 90 084 085 086 090 CC 0 91 91 Effects Level 091 FXLevl CC 35 92 92 Tremolo Level 092 Tremel CC 0 93 93 Chorus Level 093 Chorus CC 0 94 94 Celeste Level 094 Celest CC 0 95 95 Phaser Level 095 Phaser CC 0 96 96 Data Button increment 096 DatInc CC 0 97 97 Data Button decrement 097 DatDec CC 0 98 98 Non registered Paramet...

Страница 61: ...win M Audio giveaways Documentation Feedback At M Audio we re always looking for ways to improve our documentation If you have comments corrections or suggestions regarding our documentation email us at publications m audio com 2009 Avid Technology Inc All rights reserved Product features specifications system requirements and availability are subject to change without notice Avid M Audio and DCP ...

Страница 62: ...rges Pompidou 92300 Levallois Perret France Renseignements Commerciaux email info m audio fr tel 0 810 001 105 Assistance Technique e mail PC support m audio fr email Mac mac m audio fr PC 0 820 000 731 Mac 0 820 391 191 fax 33 0 1 72 72 90 52 M Audio Germany Avid Technology M Audio www m audio de Zeppelinstr 1 D 85399 Hallbergmoos Germany Technical Support email support m audio de tel 49 0 7941 9...

Отзывы: