background image


20 


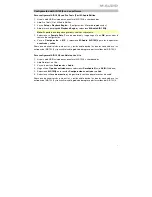
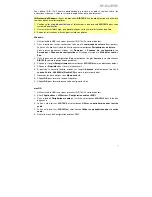
Configuration de l'AIR 192|4 pour votre logiciel 


Pour configurer l'AIR 192|4 pour Pro Tools | First M-Audio Edition 

1.


Utilisez le câble USB fourni pour brancher l'AIR 192|4 à votre ordinateur.  

2.


Lancez le logiciel Pro Tools | First M-Audio Edition. 

3.


Ouvrez le menu 

Setup > Playback Engine…

4.


Ouvrez le menu déroulant 

Playback Engine

 et sélectionnez 

M-Audio AIR 192|4

Remarque :

 Il se peut que vous ayez à sauvegarder et à relancer votre projet. 

5.


Sélectionnez la 

fréquence d'échantillonnage

, puis cliquez sur 

OK

 pour fermer la fenêtre 

Setup. 

6.


Accédez au menu 

Setup >


I/O

 et sélectionnez 

M-Audio AIR 192|4

 pour les périphériques 

d'

entrée

 et de 

sortie

Vous pouvez maintenant ajouter des pistes et recevoir un signal audio des sources branchées 
aux entrées de l'AIR 192|4 et transmettre en continu des fichiers par le biais des sorties de 
l'AIR 192|4.  


Pour configurer l'AIR 192|4 pour Ableton Live Lite


1.


Utilisez le câble USB fourni pour brancher l'AIR 192|4 à un ordinateur.  

2.


Lancez Ableton Live Lite. 

3.


Cliquez sur l’onglet 

Preferences > Audio

4.


Cliquez sur 

Driver Type

 pour sélectionner 

CoreAudio 

(Mac) ou 

ASIO

 (Windows).  

5.


Sélectionnez 

AIR 192|4 

dans les sections de configuration des 

entrées 

et


des

 sorties

.  

6.


Sélectionnez la 

fréquence d’échantillonnage

, puis fermez la fenêtre des préférences 

audio.  

Vous pouvez maintenant ajouter des pistes et recevoir un signal audio des sources branchées 
aux entrées de l'AIR 192|4 et transmettre en continu des fichiers par le biais des sorties de 
l'AIR 192|4. 
 

Содержание AIR 192|4 Vocal Studio Pro

Страница 1: ...User Guide English 3 8 Gu a del usuario Espa ol 10 16 Guide d utilisation Fran ais 17 23 Guida per l uso Italiano 24 30 Benutzerhandbuch Deutsch 31 37 Appendix English 38 39...

Страница 2: ...2...

Страница 3: ...92 4 on m audio com and follow the Pro Tools First M Audio Edition install instructions in your User Account Also visit ableton com to check for any available software updates Virtual Instruments Foll...

Страница 4: ...indows users Before connecting AIR 192 4 to your computer install the driver 1 Go to m audio com drivers and download the latest AIR 192 4 driver for your operating system 2 Open the file you download...

Страница 5: ...Control Panel in Classic View Hardware and Sound Sound 3 In the Windows Sound control panel select the Playback tab and select AIR 192 4 as the default device 4 Click the Recording tab and select AIR...

Страница 6: ...nput and Output devices You can now add tracks to send and receive audio from sources connected to AIR 192 4 inputs and stream recorded audio back through the AIR 192 4 outputs Setting Up AIR 192 4 wi...

Страница 7: ...vent these audio glitches you will need to use a higher buffer setting and this may result in latency If you are experiencing latency when recording adjust the knob towards the Direct position to incr...

Страница 8: ...level of these outputs is controlled by the Monitor Level knob 4 Kensington Lock Slot You can use this Kensington lock slot to secure AIR 192 4 to a table or other surface Front Panel 1 Headphone Outp...

Страница 9: ...de of the microphone is the live side Care of Your Microphone Never subject the NOVA Black microphone to physical shock Always use a mic stand and use the included shock mount when securing it to a st...

Страница 10: ...m y siga las instrucciones de instalaci n en su Cuenta de usuario Visite tambi n ableton com para comprobar si hay actualizaciones de software disponibles Instrumentos virtuales Siga las instrucciones...

Страница 11: ...192 4 a su ordenador instale el controlador 1 Vaya a m audio com drivers y descargue el controlador AIR 192 4 m s reciente correspondiente a su sistema operativo 2 Abra el archivo y haga doble clic en...

Страница 12: ...layback Reproducci n y seleccione AIR 192 4 como dispositivo predeterminado 4 Haga clic en la pesta a Recording Grabaci n y seleccione AIR 192 4 como dispositivo predeterminado 5 Haga clic en Properti...

Страница 13: ...os de entrada y salida Ahora puede a adir pistas para enviar y recibir audio desde las fuentes conectadas a las entradas del AIR 192 4 y transmitir el audio grabado de regreso por las salidas del AIR...

Страница 14: ...rdenador y causar defectos en el audio Para prevenir estos defectos deber utilizar un ajuste mayor del b fer y esto podr a crear latencia como resultado Si est experimentando latencia al grabar ajuste...

Страница 15: ...de bloqueo Kensington a fin de sujetar el AIR 192 4 a una mesa u otra superficie Panel frontal 1 Salida para auriculares Conecte auriculares est reo de 6 35 mm 1 4 pulg a esta salida La mezcla que es...

Страница 16: ...lado vivo Cuidado del micr fono No exponga nunca el micr fono a impactos f sicos Utilice siempre un soporte de micr fono y emplee el montaje a prueba de golpes cuando lo fije a un soporte Presione los...

Страница 17: ...de la bo te Veuillez enregistrer l AIR 192 4 sur le site m audio com et suivre les instructions d installation partir de votre compte utilisateur Veuillez galement visiter le site ableton com afin de...

Страница 18: ...audio Utilisateurs Windows Avant de brancher l AIR 192 4 votre ordinateur pour la premi re fois vous devez installer le pilote 1 Veuillez visiter m audio com drivers et t l charger la derni re versio...

Страница 19: ...ration en Affichage classique Mat riel et audio Son 3 Dans le panneau de configuration Son s lectionnez l onglet Lecture puis s lectionnez AIR 192 4 comme le p riph rique par d faut 4 Cliquez sur l on...

Страница 20: ...us pouvez maintenant ajouter des pistes et recevoir un signal audio des sources branch es aux entr es de l AIR 192 4 et transmettre en continu des fichiers par le biais des sorties de l AIR 192 4 Pour...

Страница 21: ...es du processeur et causer des probl mes audio Pour viter ces probl mes audio vous devrez utiliser une taille de m moire tampon plus lev e et cela pourrait produire de la latence Si vous prouvez des d...

Страница 22: ...liser un verrou Kinsington pour s curiser l AIR 192 4 sur une table ou autre surface Panneau avant 1 Sortie casque Cette sortie permet de brancher un casque d coute TRS 6 35 mm 1 4 po Le mix que vous...

Страница 23: ...est le c t r cepteur Entretien du microphone Ne soumettez jamais le microphone NOVA Black des chocs physiques Veillez toujours utiliser un support pour microphone et la suspension antichoc fournie afi...

Страница 24: ...e Registrare l AIR 192 4 su m audio com e seguire le istruzioni di installazione nel proprio Account utente Inoltre recarsi alla pagina ableton com per verificare l eventuale presenza di aggiornamenti...

Страница 25: ...di collegare l AIR 192 4 al computer installare il driver 1 Recarsi alla pagina m audio com drivers e scaricare il driver di AIR 192 4 pi recente per il proprio sistema operativo 2 Aprire il file scar...

Страница 26: ...io di Windows selezionare la scheda Riproduzione e selezionare l AIR 192 4 come dispositivo predefinito 4 Cliccare sulla scheda Registrazione e selezionare l AIR 192 4 come periferica predefinita 5 Cl...

Страница 27: ...a ora possibile aggiungere tracce per inviare e ricevere audio dalle fonti collegate agli ingressi dell AIR 192 4 e inviare lo streaming dell audio registrato attraverso le uscite dell AIR 192 4 Per c...

Страница 28: ...rovocare problemi di audio Per impedire questi problemi audio bisogna utilizzare un impostazione pi elevata del buffer e questo pu portare a una latenza In caso di latenza durante la registrazione reg...

Страница 29: ...etto Kensington per fissare l AIR 192 4 a un tavolo o ad altre superfici Pannello anteriore 1 Uscita cuffie collegare cuffie TRS da 6 35 mm 1 4 a questa uscita Il mix che si sente in questa uscita sar...

Страница 30: ...rofono NOVA Black Servirsi sempre di un asta per microfono e del dispositivo di montaggio antiurto in dotazione al momento di fissarlo all asta stessa Premere le clip metalliche ai lati del dispositiv...

Страница 31: ...ieren Sie Ihren AIR 192 4 zuerst auf m audio com und folgen den Installationsanweisungen in Ihrem Benutzerkonto Besuchen Sie au erdem ableton com um festzustellen ob Software Updates verf gbar sind Vi...

Страница 32: ...Treiber bevor Sie AIR 192 4 mit Ihrem Computer verbinden 1 Besuchen Sie m audio com drivers und laden Sie die neuesten AIR 192 4 Treiber f r Ihr Betriebssystem herunter 2 ffnen Sie die heruntergelade...

Страница 33: ...d 3 In der Windows Systemsteuerung f r Sound w hlen Sie die Registerkarte Wiedergabe und w hlen AIR 192 4 als Standard Ger t aus 4 Klicken Sie auf die Registerkarte Aufnahme und w hlen Sie AIR 192 4 a...

Страница 34: ...um Senden und Empfangen von Audio von Quellen hinzuf gen die an die AIR 192 4 Eing nge angeschlossen sind und die aufgenommenen Audiosignale ber die AIR 192 4 Ausg nge wiedergeben So richten Sie den A...

Страница 35: ...ark in Anspruch nehmen und Tonst rungen verursachen Um diese Tonst rungen zu vermeiden m ssen Sie eine h here Puffereinstellung verwenden Diese kann zu Latenz f hren Wenn es beim Aufnehmen zu Latenzze...

Страница 36: ...2 4 an einem Tisch oder einer anderen Oberfl che zu befestigen Vorderseite 1 Kopfh rerausgang Verbinden Sie 6 35 mm 1 4 TRS Kopfh rer mit diesem Ausgang Der Mix den Sie aus diesen Ausg ngen h ren werd...

Страница 37: ...Seite Pflege Setzen Sie das Mikrofon niemals mechanischen St en aus Verwenden Sie immer einen Mikrofonst nder und verwenden Sie die mitgelieferte Schwinghalterung wenn Sie das Mikrofon an einem St nde...

Страница 38: ...TRS Frequency Response 20 Hz 20 kHz 0 05 dB Signal to Noise Ratio 101 dB 1 kHz 4 dBu A weighted THD N 0 003 Max Input Level 16 dBu Gain Range 55 dB Inst Input 2 unbalanced 1 4 6 35 mm TS Frequency Re...

Страница 39: ...15 Hz 22 kHz Sensitivity 95 dB 3 dB Rated Impedance 32 Earpad Leatherette Cable Length 9 8 ft 3 m Trademarks and Licenses M Audio and AIR Music Tech are trademarks of inMusic Brands Inc registered in...

Страница 40: ...Manual Version 1 1...

Отзывы: