background image

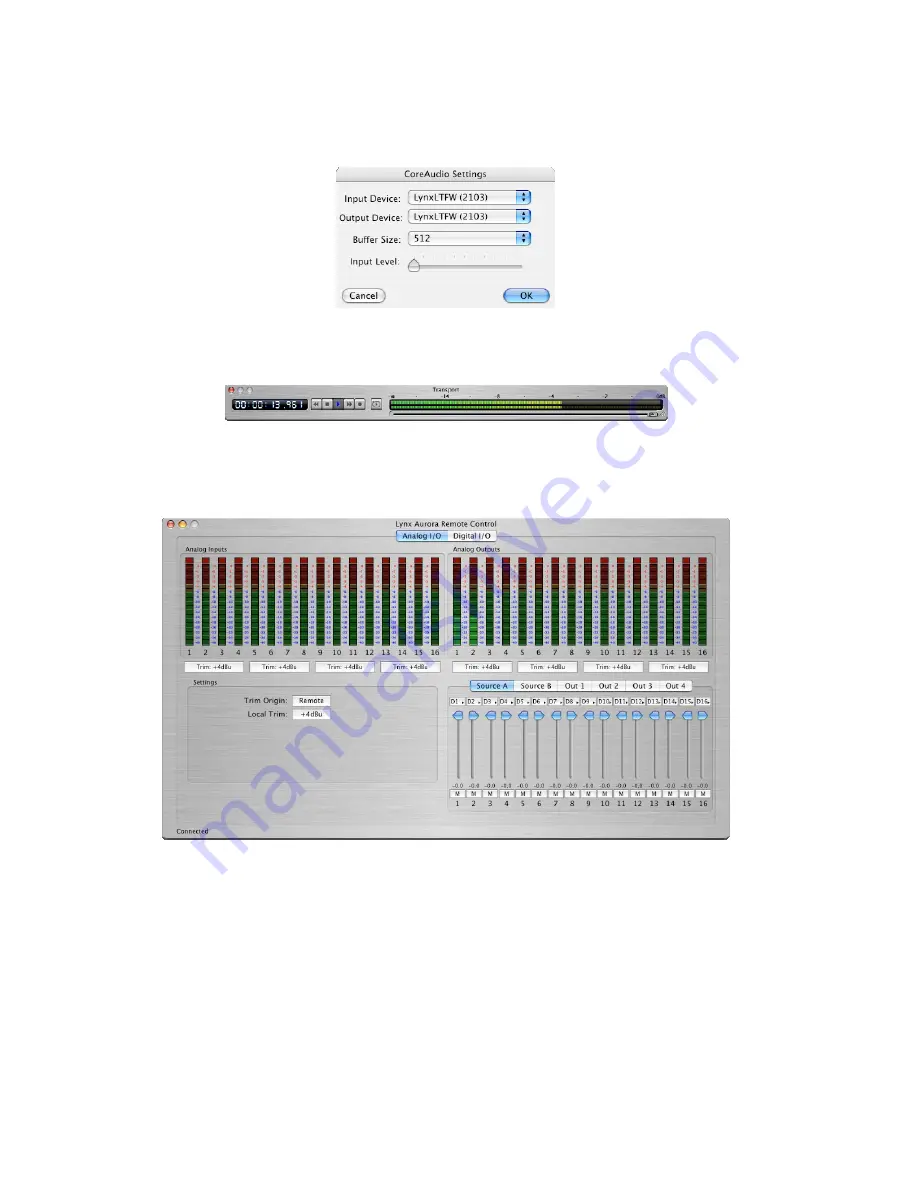
7.  Click “Hardware Settings…” from the Audio menu. Verify that the LynxLTFW appears 

as the Output device. Click “OK”. 


8.  Click “Play” from the Peak transport. You should see meter activity and the counter 

progressing. 


9.  Open the Lynx Aurora Remote Control application. Click the Analog I/O tab. Check for 

meter activity for Analog Outputs 1&2. If you have speakers or headphones connected to 
your destination device, you should be hearing audio as well. 


If the test did not operate as described or you received any errors, please refer to Section 0, 


Troubleshooting. 
 

Page 18 of 42 

Содержание LT-FW

Страница 1: ...anual Lynx Studio Technology Inc www lynxstudio com support lynxstudio com Page 1 of 42 interstage Phistersvej 31 2900 Hellerup Danmark Telefon 3946 0000 fax 3946 0040 www interstage dk pro audio with a smile ...

Страница 2: ...1 Windows Quick Audio Test 15 6 2 Macintosh Quick Audio Test 17 7 Aurora Remote Control Application Reference 19 7 1 Starting the Aurora Remote Control Application within Windows 19 7 2 Starting the Aurora Remote Control Application within OS X 19 7 3 General Operation 19 8 Using the LT FW 28 8 1 Channel Modes 28 8 2 Application Setup 30 9 Troubleshooting 37 10 Support 40 10 1 Lynx Website Support...

Страница 3: ...outputs at sampling rates up to 192 kHz The included remote control application provides zero latency monitoring accurate metering adapter configuration and flexible routing capabilities With support for WDM and ASIO on Windows computers and Core Audio with OS X Macintosh computers virtually all professional audio applications can work with the LT FW The LT FW features two industry standard IEEE 1...

Страница 4: ...fore you begin We recommend that you read through the entire manual to acquire an overview of the installation procedure and use of the LT FW This manual will presume a working knowledge of the Aurora converter For additional information please refer to the Aurora User Manual It is also highly recommended that you have a good working knowledge of Windows and or Macintosh operating system basics an...

Страница 5: ...audio applications place significant demands on your computer s resources and it is therefore recommended that you meet or exceed the recommended system requirements for your Digital Audio Workstation software which will likely be greater than those listed for the LT FW Please refer to your audio software s documentation for more information 2 2 1 FireWire Chipsets The Aurora LT FW can be used wit...

Страница 6: ...dated Updating the Aurora firmware to version 18 may require a Lynx AES16 PCI audio interface If your Aurora has firmware version 13 it can also be updated by an Apple Macintosh running OS X via MIDI or by a PC running Windows via MIDI or IrDA The Aurora firmware updater program and instructions for use are available for download from the Lynx website at Support Latest Driver Download If your unit...

Страница 7: ... the greater than symbol to indicate multiple menu options or mouse selections within a software control context 4 Warranty Registration Lynx is committed to providing you with the best service possible To help us serve you better please be sure to register your LT FW using one of the following methods Fill out and mail the Warranty Registration Card included with your LT FW Register on the web at...

Страница 8: ...n the Aurora that corrects the current draw for an Aurora with an LT FW If you are updating a Rev A Aurora remove jumper W3 from the JP6 header on the Aurora main board If you are updating a Rev B Aurora slide switch 4 labeled W4 on PCB of SW1 to the OFF position towards back panel 3 Remove the LSlot Expansion Port cover above the AES I O Ports by removing the two mounting screws Set these two scr...

Страница 9: ...ent to the JP1 connector and the white serial number barcode label Set the screw aside for reuse 5 Install the standoff post included with the LT FW in this same hole 6 Grounding yourself to earth ground remove the LT FW from its protective static bag Page 9 of 42 ...

Страница 10: ...nto place In some cases the board may need to be gently flexed for the LSlot connector pins to line up correctly with JP1 on the Aurora main board Use caution to insure that the pins line up as shown Incorrect installation could damage the unit 8 Secure the LT FW with three screws one on the standoff and two from the back panel of Aurora Keep screws loose until the LT FW is properly aligned then t...

Страница 11: ...ormation about correct clocking of the Aurora within a digital audio system When used with an LT FW the SYNC SOURCE must be selected from within the Aurora Remote Control application The Aurora front panel controls are locked out when used with a FireWire system 5 2 1 Using the Internal Clock We recommend using Internal as the SYNC SOURCE for the best clock performance When the Windows MME or Dire...

Страница 12: ... can fall outside of SynchroLock s usable range and the Aurora sound quality will be adversely affected 5 3 Installing the Driver and Aurora Remote Control Application The Lynx Installation CD contains all driver files and utilities mentioned in the subsequent installation steps as well as the LT FW manual driver release notes and test files If you do not have a CD ROM drive or need a more recent ...

Страница 13: ...5 Click Next on the welcome screen 6 Accept the default destination folder for the driver files 7 Click Next from the driver setup screen to start the installation process Page 13 of 42 ...

Страница 14: ...ormation see Section 7 Aurora Remote Control Application Reference 5 3 2 OS X 1 The LT FW uses the built in FireWire audio driver in OSX No additional driver installation is required Power on the Aurora From the front panel set the TO ANALOG OUT and TO DIGITAL OUT parameters to LSLOT 2 Simply connect the appropriate FireWire cable from the Aurora to the computer s FireWire port The Aurora driver d...

Страница 15: ...nal equipment you may be using the Lynx CBL AOUT85 or a third party equivalent Verify that Analog Outs 1 2 of the Aurora are connected to your external equipment These are the outputs used for this test 2 For this test we will set the Aurora on Internal as the clock source To do so launch the Aurora Remote Control application Click the Digital I O and Settings tab Make sure that the SYNC SOURCE is...

Страница 16: ...m left to right 8 Launch the Aurora Remote Control application Click the Analog I O tab Check for meter activity for Analog Outputs 1 2 If you have speakers or headphones connected to your destination device you should be hearing audio as well If the test did not operate as described or you received any errors please refer to Section 0 Troubleshooting Page 16 of 42 ...

Страница 17: ...nitoring equipment capable of delivering an audio signal for listening via headphones or speakers Depending on your external equipment you may be using the Lynx CBL AOUT85 or a third party equivalent Verify that Analog Outs 1 2 from the Aurora are connected to your external equipment These are the outputs used for this test 4 For this test we will set the Aurora to Internal as the clock source To ...

Страница 18: ...d the counter progressing 9 Open the Lynx Aurora Remote Control application Click the Analog I O tab Check for meter activity for Analog Outputs 1 2 If you have speakers or headphones connected to your destination device you should be hearing audio as well If the test did not operate as described or you received any errors please refer to Section 0 Troubleshooting Page 18 of 42 ...

Страница 19: ...ora is connected to the computer by a FireWire cable From Finder click Applications Aurora 7 3 General Operation The Aurora Remote Control Application allows the user to control output levels route inputs to outputs establish and save parameters and view accurate meters for inputs and outputs on a connected Aurora Parameter changes will be reflected both on the Aurora front panel and within the so...

Страница 20: ...nchroLock may be disabled from the Aurora Remote Control application r TO ANALOG OUT This button will not be active For operation with the LT FW either LSLOT IN or Remote Routing mode with LSLOT sources assigned should be selected with the ARC application LSLOT In routes play streams from the computer via the FireWire port to the Aurora s Analog outputs If any custom routing is initiated from with...

Страница 21: ...for the Analog inputs and outputs from within the Aurora Remote Control application If the trim value for any analog I O is altered from within the software both the 4 dBu and 10 dBV LEDs will be illuminated indicating that this parameter is being controlled remotely When the METER select is set to Digital this control allows configuration of the AES EBU digital I O In Lock Out mode the button wil...

Страница 22: ...nalog Outputs when Remote Routing is utilized The Aurora can be set for global routing i e AES In routes to Analog Out or Remote Routing With Remote Routing up to two sources Source A and Source B can be established for each output Analog Outputs 1 4 have 16 additional monitor sources Sources C R which can be accessed from the Output 1 4 tabs For these custom monitor sources to be active the TO AN...

Страница 23: ...is page is viewable by clicking the Digital I O Settings Tab in the top left corner of the Aurora Remote Control application o These indicators will illuminate when three consecutive full scale samples are detected on the Aurora Digital Inputs and Outputs or when a summing overrun occurs on the Aurora Digital Outputs The indicator will remain illuminated for 250ms a These meters display the instan...

Страница 24: ...This drop down menu allows for selection of the clock source that drives the Aurora sample clock generator from the following options INT Clock derived from the on board crystal oscillator EXT Clock signal from WORD CLOCK input EXT 2 Clock signal from WORD CLOCK input running at half the desired sample rate Typically used with dual wire AES EBU devices AES A Clock signal from the AES I O Port A Di...

Страница 25: ... FW since its driver allows the Aurora I O to be selected from within the host computer 2 This drop down menu determines whether the Aurora front panel meters display activity for the digital or analog inputs and outputs 2 This checkbox activates dual wire mode for the AES inputs See the Aurora User Manual for information 2 This checkbox activates dual wire mode for the AES outputs See the Aurora ...

Страница 26: ...o controls for configuring the LT FW adapter including buffer size channel modes etc Windows OS X In both the OS X and Windows versions of ARC the LT FW channel modes can be selected from this menu Six modes are available in Windows and four modes for OS X These modes determine the number and type of I O that will be available to your computer from the Aurora For the Aurora 16 there are 8 16 and 3...

Страница 27: ... LT FW and provides a counter to display if any samples were dropped during ASIO operation This is a helpful diagnostic tool to determine if an appropriate ASIO buffer size has been selected For more information about buffer settings please see Section 8 2 1 1 Controlling Latency by Changing the Buffer Size Page 27 of 42 ...

Страница 28: ...cess to both the analog and digital channels The fewer channels that are used then the lower the CPU usage will be This in turn can be beneficial in terms of latency or number of audio plug ins processes that can be used in a project Since changing Channel Modes will potentially alter the type and quantity of Aurora devices available and cause a reset of the FireWire bus all audio applications sho...

Страница 29: ... Analog Out 3 4 3 Aurora Analog In 5 6 Aurora Analog Out 5 6 1S 4 Aurora Analog In 7 8 Aurora Analog Out 7 8 1 Aurora Analog In 1 8 Aurora Analog Out 1 8 2 2 Aurora Digital In 1 8 Aurora Digital Out 1 8 1 Aurora Analog In 1 8 Aurora Analog Out 1 8 3M 2 Aurora Analog In 9 16 Aurora Analog Out 9 16 1 Aurora Analog In 1 2 Aurora Analog Out 1 2 2 Aurora Analog In 3 4 Aurora Analog Out 3 4 3 Aurora Ana...

Страница 30: ...ed by Steinberg and was designed to address the low latency and high channel count needs of Pro Audio and Music Production ASIO is an option for Audio Production applications such as Cubase Nuendo Sonar Samplitude Sequoia Audition etc These applications may also support MME or DirectSound but when the option exists we recommend using ASIO for the best performance 8 2 1 1 Controlling Latency by Cha...

Страница 31: ... 2 1 5 ASIO Applications 8 2 1 2 Multimedia Applications The Aurora LT FW can be used as a playback device for most popular multimedia home theater and consumer audio applications Some such applications allow selection of specific playback devices In these cases an Aurora output device can be selected from the appropriate device selection menu When output device selection is not an option it can b...

Страница 32: ...ght N A 8 8 2 1 4 System Default Audio Device Some applications do not allow selection of a specific audio playback device Instead they utilize whichever audio device has been defined as the system default play device To use the desired Aurora output as the system default With Windows XP navigate to Start Control Panel Sounds and Audio Devices Audio Sound Playback Default Device Lynx Aurora XX Wit...

Страница 33: ... X Core Audio is the dominant audio driver model for OS X and is used for media playback applications as well as Pro Audio applications 8 2 2 1 Controlling Latency by Changing the Buffer Size Latency in an audio interface can be defined as the time required to process a sample requested from an application to the interface s audio output A number of factors determine the achievable latency perform...

Страница 34: ...ished using the Aurora Remote Control software or on Windows PCs with software that supports ASIO Direct Monitoring These methods avoid delays caused by monitoring through software applications Global routing i e Analog Ins routed to Digital Outs can be established from the Aurora Remote Control software on the Digital I O Settings Page The default routing when an LT FW is used is LSLOT as the sig...

Страница 35: ...ignals to the outputs 1 and 2 equally If the intention is to pan these sources within a stereo field that can be achieved by attenuating appropriate input sources For instance if input 1 should be panned hard left and input 2 panned hard right just mute analog input 1 from the Output 2 tab and mute analog input 2 from the Output 1 tab If you wish to pan input 3 75 degrees to the left attenuate ana...

Страница 36: ...ono source is assigned to both channels of an output pair i e Output 1 and Output 2 When a mono signal is panned from within the host application the level sliders under each monitor source will move accordingly As an example If Analog In 1 Left is being monitored on Analog Out 1 and Analog Out 2 when you pan the input signal to the left the Monitor Source Volume for Analog Out 1 increases and the...

Страница 37: ...or by turning the Aurora off for 5 seconds then turning it back on The Aurora shows up in the Operating System as a usable device but will not pass audio 1 Make sure that the Aurora has been assigned as the active device in the application being tested Many audio applications allow a specific audio device to be selected from a configuration menu Other applications will use whatever the operating s...

Страница 38: ... to the Aurora on the same computer as the LT FW FireWire connection than the ARC will not function correctly Disconnect the AES16 from the Aurora and re launch the ARC 2 If the Aurora MIDI Ports are connected to a MIDI interface on the host computer disconnect the MIDI cables in the back of the Aurora and re launch the ARC 3 What is the connection medium described from the About Aurora Remote Con...

Страница 39: ...d If the Aurora is operating on an Internal External or AES input SYNC SOURCE you must manually select the rate of the audio material to be played from the ARC before initiating playback With external clocking you must also set the sample rate to the desired rate on the clock master device Otherwise the playback streams may be sample rate converted by the operating system compromising playback qua...

Страница 40: ... of current firmware and driver files is available for download and installation Check back regularly to insure that your Aurora and LT FW are up to date Lynx Support Forum An online Lynx users support forum provides a venue for customers to post questions and issues and receive responses from other users as well as Lynx technical administrators Searching previous posts is often an excellent way t...

Страница 41: ...serial number is located on a label attached to the back of the card and on the shipping carton 11 License Agreement This legal document is an agreement between you and Lynx Studio Technology Inc By opening the sealed board package or written materials you are agreeing to become bound by the terms of the agreement which includes this License and Limited Warranty collectively the Agreement This Agr...

Страница 42: ...r authorized or repair of products damaged by these modifications Incidental or consequential damages result from the product damage to property damage based on inconvenience or on loss of use of the product and to the extent permitted by law damages for personal injury Some states do not allow the exclusion or limitation of incidental or consequential damages so the above limitation or exclusion ...

Отзывы: