Lynx FinishLynx Platinum Скачать руководство пользователя страница 4

FinishLynx P

LATINUM

 Package Quick Start Guide - For Vision Cameras 


Step 5:  

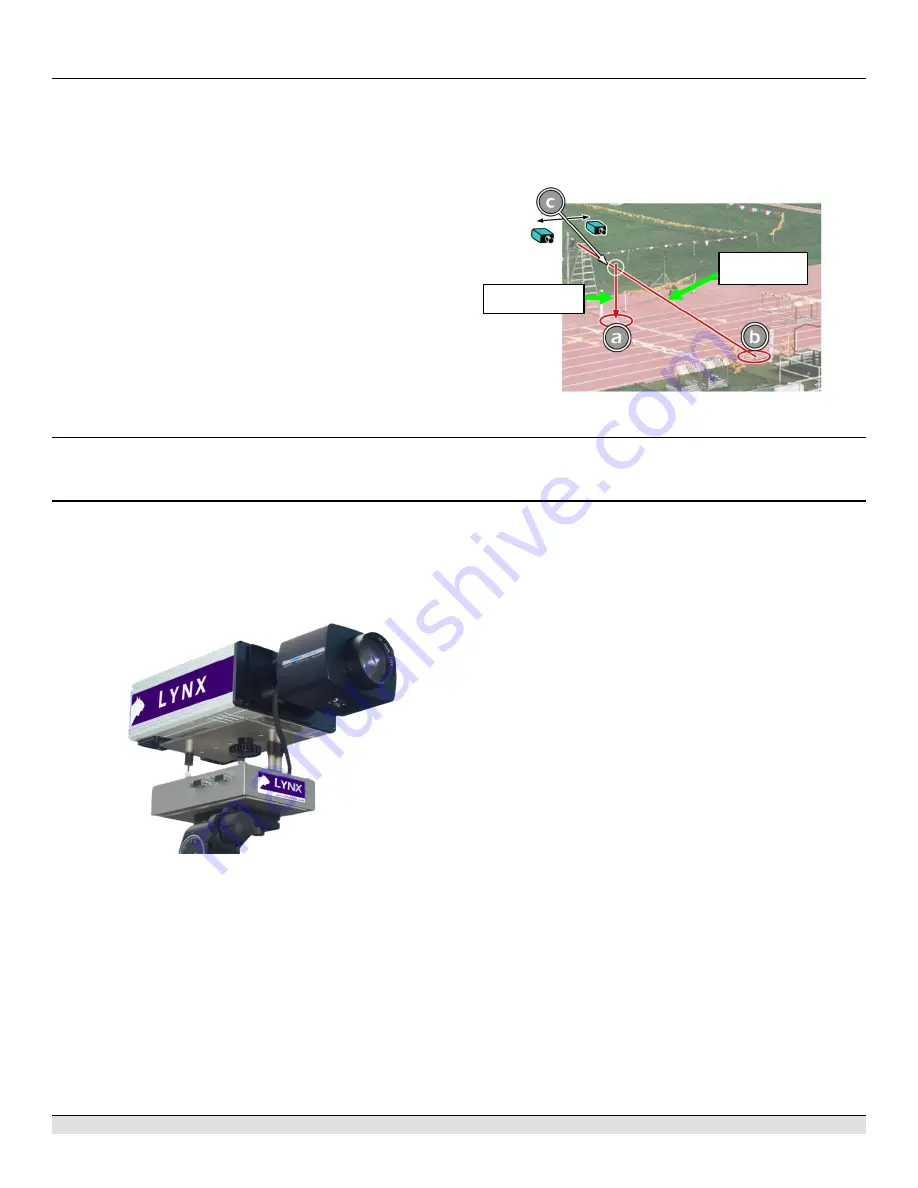
Set up the Primary Camera and Tripod 

Set  up  the  tripod  in  line  with  the  finish  line,  preferably  on  the 
infield and approximately 

15 feet back

.  

NOTE

: Minimum recommended camera distance from track is 12 

feet (at this distance you may not be able to see the feet of the 
athlete in Lane 1. Being able to see the feet is not a requirement 
for accurate timing on the torso of the athlete). If you need to be 
closer  than  this,  you  may  have  to  use  the  optional  2.8-10mm 
lens  supplied  with  your  Platinum  Package.  (See  last  page  of  
QSG for these lens instructions) 

1.  Extend the tripod legs so the geared head is approximately 

7 ft high. 

2.  On the near side of the finish line, hold a plumb bob so that 

it is suspended directly above the middle of the finish line. 
This is the 

plumb line

, shown as 

in the image below. 

3.  Tie string to the screw on the top of the tripod head. Have 

your assistant take the other end of the string to the far side 

of the finish line and hold the string taught. This is the 

sight 

line

, shown as 

b

 in the image below. 

4.  Move the tripod to the left or right until the plumb line and 

sight line touch at position 

C


in the image below. The tripod 

is now in the plane of the finish line. 


Step 6:  

Set up the Reverse 

Angle

 Camera and Tripod 

1.  Repeat instructions above for Secondary Camera on the opposite side of the track  

Step 7:  

Attach the cameras 

to

 the tripods 

NOTE:  Primary  camera  is  marked  TIMING  ENABLED  on 
camera ID plate on base of camera. 

1.  Secure  the  remote  positioner  to  the  camera  bottom  by 

turning  the  black  handled  thumbscrew.  Make  sure  the 
FinishLynx  label  faces  in  the same  direction  as the  camera 
lens will face. 


Note: Cables omitted for clarity and actual lens may vary from model shown 

2.  Connect the cable that comes with the remote positioner to 

the  port  on  the  positioner  and  the  port  on  the  back  of  the 
camera labeled 

Remote

.


3.  Connect the cable on the remote lens to the remaining serial 

port on the remote positioner. 

4.  Secure the geared head to the top of the tripod. 

5.  Note  how  the  mounting  plate  is  attached  to  the  top  of  the 

geared  head.  Then  pull  back  on  the  lever  at  the  top  of  the 
geared head to release the mounting plate. 

6.  Tighten  the  mounting  plate  to  the  bottom  of  the  remote 

positioner  by  turning  the  screw  with  a  flathead  screwdriver. 
Make  sure  the 

Lens


marking  on  the  bottom  of  the  plate  is 

facing  the  front  of  the  remote  positioner  (where  the  Lynx 
label is affixed). 

7.  Attach the camera with the remote positioner and mounting 

plate  to  the  tripod  by  clicking  the  mounting  plate  into  place 
on the geared head. 

8.  With the camera lens lined up with and facing the finish line, 

make  minor  adjustments  to  the  tripod  legs  so  both  bubbles 
on the tripod are centered. 

9.  Turn the black knob on the geared head that controls the 

tilt


of the camera so that it is at about a 30 degree angle to the 
ground. 

10.  Repeat  this  process  for  the  second  EtherLynx  Vision 

camera.


Sight Line 

Plumb Line 

Содержание FinishLynx Platinum

Страница 1: ...FinishLynx PLATINUM Package Quick Start Guide For Vision Cameras 1 FinishLynx Platinum package Quick Start Guide For EtherLynx Vision Cameras ...

Страница 2: ... switch PoE Switch Super Head Clamp x2 BG2909 Connection box C Box Capture button and USB Serial adapter 1A205U RadioLynx Transmitter and Receiver includes RadioLynx start sensor red case 3L900 2 x Carrying case 1A207 Button splitter B SPL Wired SeriaLynx 8L108 Sonic Wind Gauge with Tripod and 50m cable WG Lynx Lynx 84x168 Pixel LED Display KLXLED084 x168 2x CS Mount 2 8 10mm P Iris lens CS2810P C...

Страница 3: ... Capture Mode ACM plug ins When prompted enter the serial numbers from your flash drive 1 Start FinishLynx by clicking the Windows Start button and selecting All Programs FinishLynx 2 Verify that you have correctly installed the RL NCP and ACM plug ins by clicking Help from the Menu bar and selecting About When the About FinishLynx window appears the NCP ACM and RL plug ins are listed with the ser...

Страница 4: ... track Step 7 Attach the cameras to the tripods NOTE Primary camera is marked TIMING ENABLED on camera ID plate on base of camera 1 Secure the remote positioner to the camera bottom by turning the black handled thumbscrew Make sure the FinishLynx label faces in the same direction as the camera lens will face Note Cables omitted for clarity and actual lens may vary from model shown 2 Connect the ca...

Страница 5: ...reen status bar to complete its cycle Align Camera in EasyAlign 2 D Video Mode 1 Activate EasyAlign by clicking on the 2 D Align Icon in the top left hand corner of the FinishLynx Hardware Control screen 2 The icon turns green and the 2 D video viewer appears within the software The 2 D viewer makes it easy to see how your camera is aligned on the finish The goal is to align the green vertical lin...

Страница 6: ...owing information will help to set up the ACM feature for stopping or pausing the running time with each race 1 In Camera Settings navigate to the Inputs tab and set Photo Eye to Internal 2 Click OK to close the Camera Settings 3 Go to Scoreboard Options and set the Offset to 0 03 C Manually Control ACM 1 Click File New to create a new blank event or click the Create New Blank Event button in the ...

Страница 7: ...a portion of the FinishLynx image by right clicking on the image and drawing a box around the portion you want to appear in your printout For example the first place finisher or a close finish between two competitors Click Ok and then select the printer from the Print dialog to send the image with results to the printer 8 Click File Close Window and then click Yes to save changes you made to the F...

Страница 8: ...ss light in 5 Have your assistant run through the finish line and watch where they appear on the computer monitor The goal is for the runner s torso to be fully visible in both the inside and outside lanes Now have your assistant run through the inner most and outer most lanes Adjust the tilt of the camera until they are clearly visible on both ends of the finish line Note It may be necessary to m...

Отзывы: