background image


Getting 

Started   


AES16 User Manual 

34

4.  Getting Started 


4.1 

Windows Quick Audio Test 


The installation of your AES16 can be tested using the LynxTWO Mixer and the Lynx Demo 
application included on the Lynx Installation CD. This is a quick way of verifying that the AES16 
card is installed correctly and properly connected to your external equipment.


• 

Download the Demo32.exe application from 

www.lynxstudio.com/drivers

, or locate this file on 

the Lynx Installation CD that came with your AES16. 


• 

Download the “Dialtone.zip” file from 

www.lynxstudio.com/drivers

, or locate “Dialtone.wav” 

on the Lynx Installation CD included with your AES16. Please note that the ZIP version found 
on the web site is a compressed file, and will require an extraction program such as WinZip to 
decompress the file (Windows XP can decompress .zip files without any additional application). 
Unzip the file Dialtone.wav to your computer’s desktop. 


• 

Connect the outputs of the AES16 to a digital destination (digital mixer, DA converters, etc.) 
capable of delivering an audio signal for listening via headphones or speakers. Depending on 
your external equipment, you may be using the CBL-AES1603, CBL-AES1604 or CBL-AES1605 
cables – please check section three of this manual for details on the proper connection of these 
cables to your equipment. Verify that Digital Out 1 of the AES16 is connected to your external 
equipment. This is the output used for this test. 


• 

Before testing playback, the clock relationship between the AES16 card and your external device 
must be established. For this test, the AES16 acts as the clock master, while your external device 
is the clock slave. Consult the manual for your connected equipment to determine how to set it 
to receive sample clock from a digital input. Most digital devices offer several choices for sample 
clock status, with “Internal” generally being the default. If your device does not have the ability 
to receive its sample clock from a digital input, please consult the studio diagrams section of this 
manual for information on creating an alternate clock relationship with the AES16. Keep in 
mind that the sample clock source of the AES16 is set to “Internal” primarily to confirm the 
validity of your connections and installation – ultimately you should create clock relationships 
that make the most sense for your specific situation. 


• 

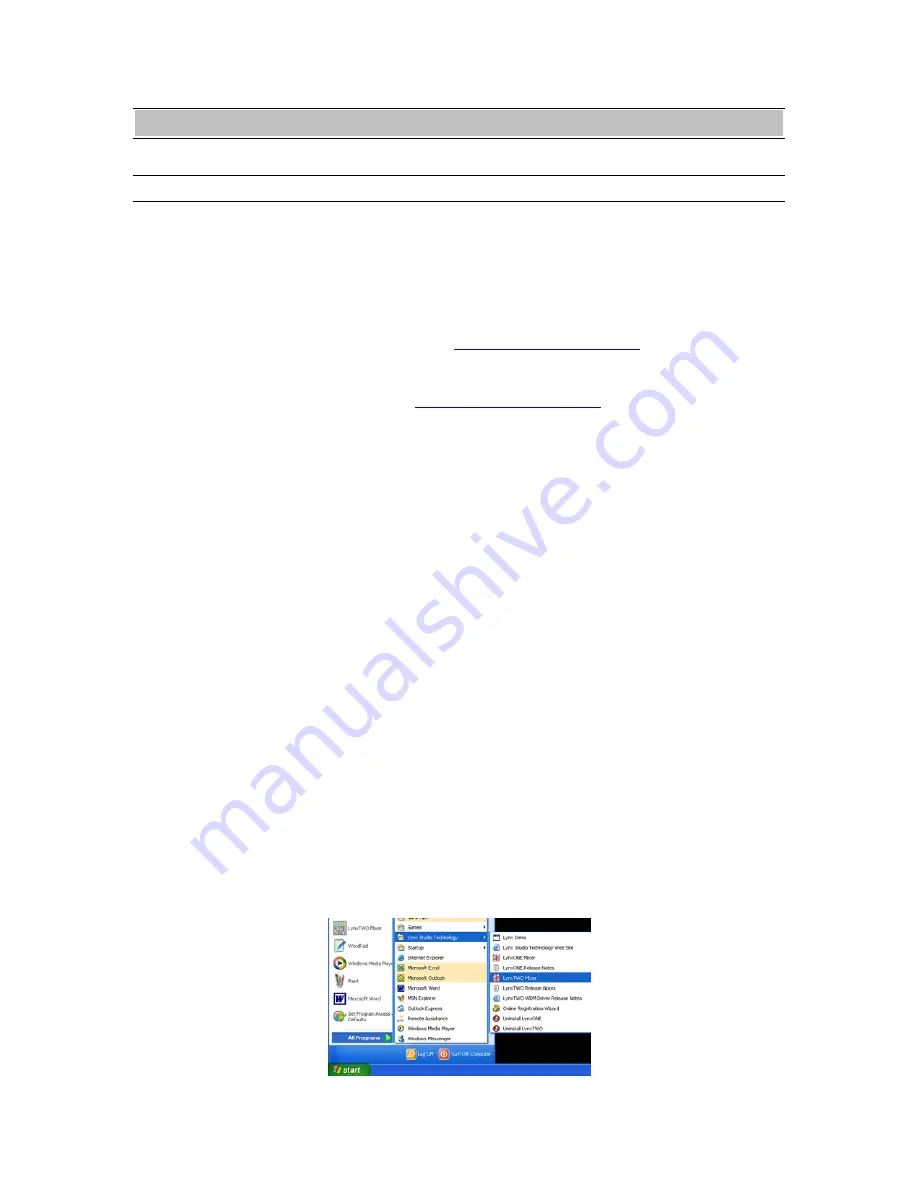
Open the LynxTWO Mixer, which will be in the Lynx Studio Technology program directory 
(Start > All Programs > Lynx Studio Technology > LynxTWO Mixer.) 


Содержание AES16

Страница 1: ...User Manual Lynx Studio Technology Inc www lynxstudio com support lynxstudio com...

Страница 2: ......

Страница 3: ...Table of Contents...

Страница 4: ...ing flexibility With support for Windows and Macintosh computers the AES16 can store and recall an unlimited number of routing configurations and mixer scenes providing you with a virtual digital patc...

Страница 5: ...9 and CoreAudio for OSX Direct connect cabling available for digital mixers recorders and converters from Yamaha Sony Tascam Mackie Wheatstone Apogee Benchmark Media and other manufacturers Designed a...

Страница 6: ...equirements for your Digital Audio Workstation software which will likely be greater than those listed for the AES16 Please refer to your audio software s documentation for more information Windows Mi...

Страница 7: ...cific connectors First Character Upper Case Text indicates Lynx mixer control names or menu options Phrases such as Start Programs Lynx Studio Technology use the greater than symbol to indicate multip...

Страница 8: ...You should refer to your computer system documentation for any special instructions on installing expansion cards and peripheral equipment Unscrew and remove the slot cover from your selected PCI slo...

Страница 9: ...Installation CD contains all driver files mentioned in the subsequent installation steps as well as the AES16 manual driver release notes and test files If you do not have a CDROM drive or need a mor...

Страница 10: ...click Have Disk then type in the drive letter of your CD ROM drive i e D then click OK Select the AES16 or AES16 SRC from the list of choices and click Next Windows will begin to search for the approp...

Страница 11: ...al 11 The driver installation will continue After several moments the new hardware wizard will indicate that it has completed the installation Click Finish Reboot the computer The AES16 Card and Lynx...

Страница 12: ...ual 12 Uninstalling the AES16 WDM Device Driver and Mixer From the start menu click on Control Panel NOTE In Windows 2000 click on Settings Control Panel Click System to launch System Properties Choos...

Страница 13: ...Sound video and game controllers section of device manager be clicking its sign Right click on Lynx AES16 and choose Uninstall Confirm device removal by clicking OK NOTE In Windows 2000 click Yes whe...

Страница 14: ...d NT4 driver you will need to uninstall the NT4 driver before you can load the WDM driver From the start menu click on Lynx Studio Technology and then click Uninstall LynxTWO Choose Uninstall from the...

Страница 15: ...html Scroll to the WDM driver section and click on the appropriate file to download Double click the downloaded file to decompress and accept the default destination folder of C Lynx Click Yes to All...

Страница 16: ...on Procedures AES16 User Manual 16 Click System to launch System Properties Choose Device Manager from the Hardware tab Expand the Sound video and game controllers section of device manager be clickin...

Страница 17: ...Hardware Update Wizard box appears choose Install from a list or specific location Advanced and click Next NOTE In Windows 2000 click Next on the Hardware Upgrade Wizard welcome screen From the next w...

Страница 18: ...installation disk into the drive selected the default is A type C Lynx in the text box and click OK You will be prompted to select the device driver you are installing Lynx AES16 will be your only ch...

Страница 19: ...indows 2000 click Yes to continue installation The driver installation will continue After several moments the Hardware Update Wizard will indicate that it has completed the installation Click Finish...

Страница 20: ...s AES16 User Manual 20 Double click on the C Hard Drive and look for the Lynx Folder Double Click the folder to open it Right Click on the LynxApps file and click Install The new Lynx driver and mixer...

Страница 21: ...re Locate the file L2update_OSXsit on the AES16 Installation CD and drag the file onto the computer desktop or download the latest OSX firmware file from www lynxstudio com download html to the comput...

Страница 22: ...at the Firmware Version and New Firmware Versions are NOT the same Select Update and click OK when prompted to confirm the Update While the firmware updater is programming the on board flash memory it...

Страница 23: ...does not launch the Stuffit Expander you may need to launch Stuffit Expander manually and then open the LynxTWO_OSX sit file using the Open command in the File menu Drag the LynxTWO_OSX pkg file to th...

Страница 24: ...n Procedures AES16 User Manual 24 Click Install on the next dialog box that appears Enter your password in the Authenticate dialog box and click OK Click Continue Installation in the next dialog box t...

Страница 25: ...to use a third party uninstaller like DesInstaller which you can get from http www macfixit com library osxu shtml Follow the uninstaller s instructions to remove the LynxTWO_OSX pkg Updating the Lynx...

Страница 26: ...p Expand the firmware updater to the desktop using Aladdin Expander 5 0 or higher An L2Update program icon should now be on your desktop Make sure that no applications are open before running the firm...

Страница 27: ...rom http www lynxstudio com download html to the computer desktop Expand the driver file to the desktop using Aladdin Expander 5 0 or higher A LynxTWO Mac ASIO Driver folder should now be on your desk...

Страница 28: ...he driver simply remove the LynxTWO file from the ASIO drivers folder of your audio application Updating the LynxTWO Device Driver and Mixer To update the LynxTWO driver with a newer version replace t...

Страница 29: ...labeled I O Port A and I O Port B as shown in the figure below To accommodate a wide range of studio equipment the signal routing on each of these ports can be configured using the I O Configuration j...

Страница 30: ...e used for IN 1 through IN 4 and OUT 1 through OUT 4 The CBL AES1604 connected to I O Port B will be used for IN 5 through IN 8 and OUT 5 through OUT 8 You can also obtain the following optional cable...

Страница 31: ...input to the clock output of an external device and select External as the Sample Clock Source in the Lynx mixer Adjust the Sample Clock Reference to match the incoming clock type The BNC connector l...

Страница 32: ...and select Header as the clock source in the Lynx mixer Adjust the clock Reference to match the incoming clock type The signal on the CLOCK OUT header is a word clock that tracks the sample rate of th...

Страница 33: ...S16 User Manual 33 Digital Mixer Need an illustraation of a digital mixer eg 01V96 connected to all 16 channels of the AES16 using 2 CBL AES1605 cables Combined Use of XLR and DB25 Cable sets Need an...

Страница 34: ...the CBL AES1603 CBL AES1604 or CBL AES1605 cables please check section three of this manual for details on the proper connection of these cables to your equipment Verify that Digital Out 1 of the AES1...

Страница 35: ...tput levels are at maximum and that no channels are muted Launch the Lynx Demo application by double clicking the demo32 exe file The Lynx Demo program should appear in the upper left corner of your s...

Страница 36: ...x Output mixer and confirm meter activity for Digital Out 1L and Digital Out 1R If you have speakers or headphones connected to your destination device you should hear audio as well as seeing meter ac...

Страница 37: ...that Digital Out 1 of the AES16 is connected to your external equipment This is the output used for this test Before testing playback the clock relationship between the AES16 card and your external de...

Страница 38: ...you to open an audio file choose dialtone wav on the desktop and click Open In Peak click Audio Out from the Audio menu Verify that there is a check next to CoreAudio Click Hardware Settings from the...

Страница 39: ...outputs of the AES16 to a digital destination digital mixer DA converters etc capable of delivering an audio signal for listening via headphones or speakers Depending on your external gear you may be...

Страница 40: ...aunch the Peak Demo application by clicking the Peak icon in the OS9 Applications Folder Peak will prompt you to open an audio file choose dialtone wav on the desktop and click Open In Peak click Soun...

Страница 41: ...ed any errors please refer to the Troubleshooting section of this manual 4 3 General Lynx Mixer Operation With the AES16 and its drivers properly installed in your computer you can begin to use its ca...

Страница 42: ...Output Bus 1 2 Output Bus 16 signals Play Bus 16 Channels Monitor Select Monitor Select Monitor Select Monitor Select Maste r Fader SUM Dither Peak Level Meter AES 3 XMIT OUT 1 LStream Header Port Out...

Страница 43: ...y of the 16 Record Bus channels After the selector the signal passes through a mute switch and then through the dither block which offers three popular dither algorithms and bit depth control The outp...

Страница 44: ...he submixers use 40 bit accumulators to maintain signal accuracy The output of the submixers are dithered to 24 bits using triangular PDF dither and then measured for peak level metering in the Lynx M...

Страница 45: ...to a bank of eight LStream channels Output Bus signals 1 8 can be routed to LStream channels 9 16 if desired This control is available in the Settings menu of the Lynx mixer Bob not currently in the S...

Страница 46: ...ter clock This technology is especially useful for combating noise induced on cables in complex studio installations SynchroLock provides clock synchronization while insuring bit perfect digital trans...

Страница 47: ...ce other than Internal When the clock source is set to External Header or Lstream the Reference must be set to Word SynchroLock can be disabled in the settings menu of the mixer by clicking on Setting...

Страница 48: ...Studio Technology LynxTWO Mixer Mac After installation the Lynx Mixer can be launched by clicking the LynxTWO Mixer icon in the OSX sidebar or by clicking the LynxTWO Mixer in the Applications folder...

Страница 49: ...gle card MUST have identical sample rates Sample rates cannot be changed while AES16 is playing or recording Source Internal Clock derived from the on board crystal oscillator External Clock signal fr...

Страница 50: ...show the current state of the SynchroLock system as described below Prior to achieving lock the four green LED s give an indication of the completion of various lock stages For more information on Sy...

Страница 51: ...alid AES EBU source When the unlocked indicator is shown all of the fields to the right will be blank Validity Valid Green Indicates Validity of the incoming AES EBU signal Invalid Red The transmittin...

Страница 52: ...reen Curve of preemphasis J17 Green CCITTJ 17 Emphasis detected Unknown Green Emphasis is detected but format cannot be ascertained Rate Indicates the encoded channel status sample rate being sent by...

Страница 53: ...rned on for this output to indicate valid audio data is being transmitted Non PCM When checked the Non PCM Bit is turned on for this output to indicate that a Non PCM datastream such as Dolby AC3 or D...

Страница 54: ...Port B and 16 through the LStream port Pop up input menu Clicking on any of the input buttons above the channel meters allows you to select from all available input options In this example the AES16...

Страница 55: ...uts during recording 11 Sample Format Indicates 32 24 16 or 8 bit depth setting Bit depth is set within the audio application for each record device and is indicated here for reference only 12 Record...

Страница 56: ...put channels Each output is derived from the sum of the four sources associated with each button Options include any Digital inputs LStream inputs or Play 1 8 L or R channels from Record Play screen 1...

Страница 57: ...igital attenuation on audio signals in the digital domain The attenuation is applied to the digitized signals just prior to the D A converters As with any digital signal processing function the digita...

Страница 58: ...NOTE When the computer is shut down the current mixer state is saved and when the computer is restarted the mixer state is restored This function is independent of the Mixer Scene memory Restore To re...

Страница 59: ...ed Adapter Name Displays the name of the Lynx audio adapter installed Up to four Lynx audio adapters may be shown Serial Number Displays the serial number of the Lynx audio adapter installed PCB Revis...

Страница 60: ...e display on the Digital In portion of the Adapter window will show the clock rate to one decimal point 1 10th of a kHz When checked this measurement is shown to three decimal places 1 1000th of a kHz...

Страница 61: ...Rectangular This type of dither decreases the signal to noise ratio by 3 dB less than triangular but is less desirable because of its noise modulation effects 32 Advanced Provides access to several ad...

Страница 62: ...ting inputs to tracks and record devices within software applications As described in Section 5 and shown below the digital mixer has 16 input blocks each with an Input Patch Select switch The Input B...

Страница 63: ...er 1 of 16 Record Bus from Inputs 16 signals Play Bus from Play devices 16 signals Manual setup using Lynx Mixer The Outputs page of the Lynx Mixer provides access to the submixer connected to each ph...

Страница 64: ...h blah blah blah blah blah blah blah blah blah Mono Recording and Playback Operation When recording a file in mono the AES16 will provide an audio signal from the left channel only The audio signal fr...

Страница 65: ...ah blah blah blah blah blah blah blah blah blah blah blah blah blah blah blah blah blah blah blah blah blah blah blah blah blah blah blah blah blah blah blah blah blah blah blah blah blah blah blah bl...

Страница 66: ...blah 7 7 5 1 and Other Surround Protocols Blah blah blah blah blah blah blah blah blah blah blah blah blah blah blah blah blah blah blah blah blah blah blah blah blah blah blah blah blah blah blah bla...

Страница 67: ...device selection menus or windows Refer to the documentation included with your application to determine how to select audio devices With the AES16 properly installed in your computer the digital aud...

Страница 68: ...6 operate completely independent in terms of whether they are in recording or playback modes and their associated audio files This implies that the devices can operate simultaneously and support the s...

Страница 69: ...OS assigns the adapter IDs from the lowest slot number to the highest slot number The procedure is as follows Connect at least OUT1 of each AES16 to your external mixing console or other equipment tha...

Страница 70: ...iple AES16 s in a system each device name will contain the adapter ID For example the first play device on adapter 2 would be listed as AES16 2 Play 1 9 3 Cable connections Starting with the master AE...

Страница 71: ...6 Select the master AES16 Adapter page from the Window pull down menu Select a desired Sample Clock Source Select a desired Sample Clock Reference For each slave AES16 Select the slave AES16 Adapter p...

Страница 72: ...arly when running multiple tracks and or a number of DSP plug ins This can result in clicks and pops in your audio playback Try increasing the buffer size and see if your playback performance improves...

Страница 73: ...ide a response in a timely manner Telephone support is available by calling 949 515 8265 from 9AM to 5PM Pacific Time Monday through Friday excluding Holidays Please be sure to have the above informat...

Страница 74: ...number The serial number is located on a label attached to the back of the card and on the shipping carton You can also determine the serial number of your card by selecting About Mixer in the Mixer...

Страница 75: ...mpatible with the AES16 breakout cable being used Header LStream Port Header CLOCK IN Port Header CLOCK OUT Port AES1 6 I O PORT A I O PORT B LSTREAM I O Port A I O Port B For connections to equipment...

Страница 76: ...position on JP5 and JP6 as shown below In this position I O Port A provides eight AES EBU inputs and I O Port B provides eight AES EBU outputs This is the required position for CBL AES1603 In either I...

Страница 77: ...jitter attenuation Wide mode tracks off frequency clocks narrow mode generates ultra low jitter output for standard frequencies ON BOARD DIGITAL MIXER Type Hardware based low latency Routing Ability...

Страница 78: ...CBL AES1603 26 pin high density male D sub to 25 pin male D sub Supports either 8 channels of input or output Compatible with Apogee AD16 and DA16 Twelve foot 110 ohm shielded twisted pair cabling CBL...

Страница 79: ...or television reception which can be determined by turning the equipment off and on the user is encouraged to try to correct the interference by one or more of the following measures Reorient or relo...

Страница 80: ...ticular installation If the unit does cause harmful interference to radio or television reception please refer to your user s manual for instructions on correcting the problem I the undersigned hereby...

Страница 81: ...und by the terms of the agreement which includes this License and Limited Warranty collectively the Agreement This Agreement constitutes the complete agreement between you and Lynx Studio Technology I...

Страница 82: ...mal use that are due to defects in material or workmanship in the product ANY IMPLIED WARRANTIES INCLUDING IMPLIED WARRANTIES OF MERCHANTABILITY AND FITNESS FOR A PARTICULAR PURPOSE ARE LIMITED IN DUR...

Отзывы: