background image

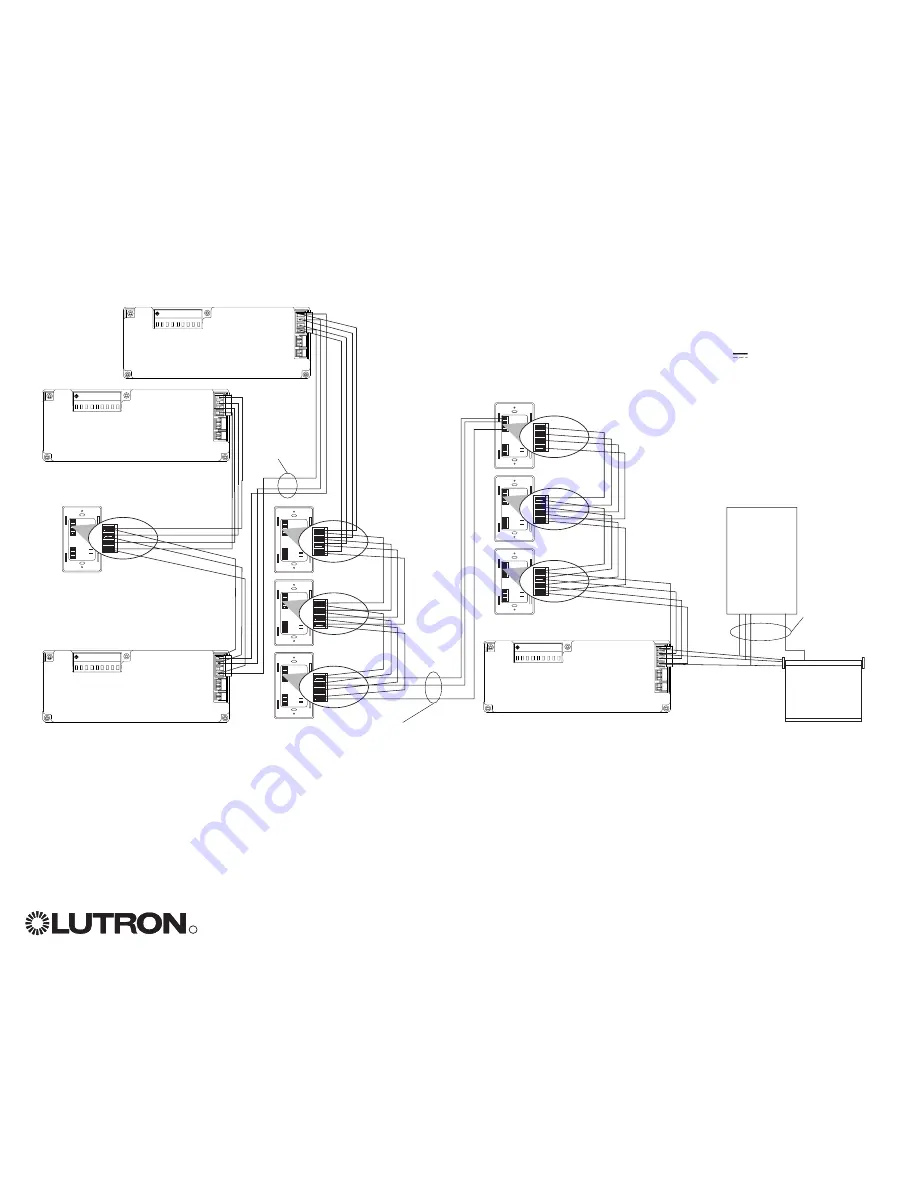
QS System Low-Voltage Terminal Connections

R

GRAFIK Eye

®

QS System Installation and Operation Guide   6

4

3

2

1

4

3

2

1

4

3

2

1

4

3

2

1

4

3

2

1

4

3

2

1

4

3

2

1

1234

12

ABC

1

2

3

4

5

6

H

N

1234

12

ABC

1

2

3

4

5

6

H

N

1234

12

ABC

1

2

3

4

5

6

H

N

1234

12

ABC

1

2

3

4

5

6

H

N

A1

2

3

4

1

A2

A3

A1 powers wallstation 1 only; terminal
2 terminates at wallstation 1

A2 and A3
have their
own power
supply; no
terminal 2
connection

A3 powers
wallstations 2,
3, and 4

A4

P1

S1

A4 powers wallstations
5, 6, and 7

P1 powers
shade S1
only

Sivoia

QS

shade

QS smart

power supply

panel 

Control units shown in rear view

5

6

7

• Connect the terminal 1, 3, and 4

connections to all control units,
wallstations, and control interfaces.

• Each control unit has its own power

supply. Terminate the terminal 2
connection (24 V

power) so that each

control unit supplies power to a
maximum of three wallstations. Each
wallstation should receive power from
only one control unit.

No terminal 2
connection between
wallstations 4 and 5;
they are powered by
different control units

Содержание GRAFIK Eye QSG-3PCE

Страница 1: ...isplays for Lighting Levels 18 Adjusting Window Treatment Settings 19 Timeclock Operation 23 Set Save Mode 28 Set Up Occupant Sensor 29 Activate System Accessories 30 Faceplate Removal 30 Troubleshoot...

Страница 2: ...maximum of 3 columns Space for future shade columns Zone numbers Zone raise lower buttons Zone LEDs display current lighting zone levels Timeclock status button Displays current timeclock info OK but...

Страница 3: ...e line voltage mains cables to the control unit 1 Strip 8 mm 5 16 in of insulation off the line voltage mains cables in the wallbox 2 Connect the line voltage mains ground and load wires to the approp...

Страница 4: ...ng the GRAFIK Eye QS System Class 2 PELV USA Cable IR Wiring From external IR connection by others Common and power terminals 1 and 2 Two 1 0 mm2 18 AWG each terminal 1 0 mm2 18 AWG each terminal 2 5...

Страница 5: ...Two 1 0 mm2 18 AWG conductors for control power One twisted shielded pair of 1 0 mm2 22 AWG for data link Cable is available from Lutron GRX CBL S 500 non plenum GRX CBLP S 500 plenum rated Check comp...

Страница 6: ...l 2 connection A3 powers wallstations 2 3 and 4 A4 P1 S1 A4 powers wallstations 5 6 and 7 P1 powers shade S1 only Sivoia QS shade QS smart power supply panel Control units shown in rear view 5 6 7 Con...

Страница 7: ...screws provided Note Follow all local and national electrical codes when installing Class 2 PELV wiring with line voltage mains wiring 3 Apply the protective overlay to the control unit See page 14 fo...

Страница 8: ...used with an interface must be rated for reverse phase control dimming Before installing an ELV light source verify with the manufacturer that their transformer can be dimmed When dimming an ELV inter...

Страница 9: ...mum and minimum output of a dimming zone Trim levels are set automatically when the load type is programmed Change the high or low end trim for a zone only if the default setting needs to be adjusted...

Страница 10: ...tory Default Non Dim Loads Scene 1 All lights On Scene 2 All lights On Scene 3 All lights On Scene 4 All lights On Scene OFF All lights Off Shade Column Button Preprogramming Factory Default Sivoia QS...

Страница 11: ...me displays the location and the sunrise sunset times R GRAFIK Eye QS System Installation and Operation Guide 11 OK Info screen see example screens below Timeclock button displays the current time and...

Страница 12: ...info screen OK Button The OK button chooses the current highlighted menu choice This will either take you to the next menu or accept a setting you have selected Timeclock Button The timeclock button f...

Страница 13: ...wer all lights in a zone release to stop Press raise or lower to stop a zone that is fading Raising lights from off to full on or lowering from full on to off takes 5 seconds Press raise and lower sim...

Страница 14: ...the default e g Zone 1 6 Use the master buttons to scroll through the characters lowercase and uppercase letters plus numbers 0 9 The character you are currently changing will be underlined on the scr...

Страница 15: ...set all lights to the desired levels Press the OK button 3 To set the fade time for this scene press the OK button then use the master buttons to set the desired fade time Press the OK button to save...

Страница 16: ...are at the desired level press the OK button to accept 5 Use the master buttons to set the fade time for this scene Press the OK button to accept 6 Press the button on a shade column that will take t...

Страница 17: ...e the master buttons to scroll through the characters lowercase and uppercase letters plus numbers 0 9 The character you are currently changing will be underlined on the screen Press OK to select the...

Страница 18: ...Dimmable Lights Non Dim Lights Off 1 17 18 34 35 51 52 68 69 85 86 99 On 100 Unaffected lights are not affected by scene button or master raise lower R GRAFIK Eye QS System Installation and Operation...

Страница 19: ...and close in an 203 2 mm 8 in range to indicate it is selected Press the top button until the EDU for the window treatment you wish to adjust moves You can also use the bottom button which moves throu...

Страница 20: ...urrently selected EDU to the shade column using the raise and lower buttons The lower button assigns the selected EDU The raise button unassigns the selected EDU 3 Check window treatment assignments E...

Страница 21: ...om buttons The LEDs next to the buttons will flash EDUs electronic drive units for the assigned window treatments will move to their closed limits and EDUs for unassigned window treatments will move t...

Страница 22: ...ectronic drive unit for a window treatment to its factory defaults will erase any previous programming or assignments you have made for that EDU Note Entering this mode may cause window treatments to...

Страница 23: ...ept 5 Use the master buttons to select the current hour and press the OK button to accept Repeat for the current minutes 6 Use the master buttons to highlight the current year and press the OK button...

Страница 24: ...Guide 24 Timeclock Operation Set Location 1 Enter programming mode see page 12 2 Use the master buttons to highlight Timeclock and press the OK button to accept 3 Use the master buttons to highlight...

Страница 25: ...time event use the master buttons and the OK button to set the hour then the minutes relative to sunrise or sunset maximum of 1 hour 59 minutes before or after sunrise or sunset 7 Use the master butto...

Страница 26: ...timeclock button to go back 7 The info screen will display a confirmation screen that your event has been deleted 8 Exit programming mode see page 12 OK Master buttons OK button Timeclock button Main...

Страница 27: ...te 6 The info screen will display a confirmation screen that your holiday has been set 7 Exit programming mode see page 12 OK Master buttons OK button Timeclock Delete schedule Holiday Add event Delet...

Страница 28: ...save changes made to to lighting levels or fade time master raise lower changes are temporary Save by OK Zone adjustments are temporary unless the OK button precedes them Save never Do not save any te...

Страница 29: ...t the scene you wish to activate when the room is unoccupied For an occupant sensor setting involving only shades scroll through the scenes to find the group of shades and the action 1 2 or 3 open pre...

Страница 30: ...ntrol unit Faceplate Removal The faceplates may need to be removed to change the color or to write in zone labels To remove either faceplate open it fully flush to the wall and pull up for the top fac...

Страница 31: ...ed triac Miswire Miswire or loose connection on low voltage link Wallstation programming is incorrect Normal operation Remedy Switch breaker MCB on Set fade time to 0 seconds Reprogram scenes to a hig...

Страница 32: ...nt sensor is set too long Timeclock is disabled Time is not set correctly Date is not set correctly Location is not set correctly Holiday schedule is in effect Remedy Change to correct save mode Check...

Страница 33: ...fabric is caught on something Open and close limits have been reversed No power is going to keypad All presets are set to the same height Communications link is not wired to the EDU EDU has been unas...

Страница 34: ...abel See page 14 Shade labels See page 22 IR Enabled Enable control of the GRAFIK Eye by IR remote control palm pilot wired IR device etc Disabled Disable control of the GRAFIK Eye by IR remote contro...

Страница 35: ...DED BY LUTRON IT DOES NOT FORM A PART OF THE BASIS OF ANY BARGAIN BETWEEN LUTRON AND CUSTOMER AND WILL NOT IN ANY WAY BE ENFORCEABLE BY CUSTOMER IN NO EVENT WILL LUTRON OR ANY OTHER PARTY BE LIABLE FO...

Страница 36: ...elona Spain TEL 34 93 496 57 42 FAX 34 93 496 57 01 FREEPHONE 0900 948 944 Spain Madrid Lutron CC S R L Calle Orense 85 28020 Madrid Spain TEL 34 91 567 84 79 FAX 34 91 567 84 78 FREEPHONE 0900 948 94...

Отзывы: