LTO CONTROL60 Скачать руководство пользователя страница 8

With the dial knob the parameter values can be changed (no confirmation needed). To get back to the main
menu select RET and press

. These two are system parameters and do not belong to any preset.

ENTER

4.3.2 EDIT EQ

Press

key, the related LED on, this screen will present:

EDIT

Use

to select an item; filter number, Gain, Freq, Bandwidth.

UP/DOWN/LEFT/RIGHT

If the selected item is filter number, then with the dial knob it's possible to change it between 1 and 60 PEQ
or GEQ if EQ type is Mono, otherwise 30 PEQ or GEQ per channel. Filter frequency will be shown by a
vertical segment crossing the frequency axis.

If the selected item is Gain, Freq or Bandwidth, then with the dial it's possible to change the value of the
selected parameter. The filter characteristics are varied in real time and immediately audible (no confirmation
needed), while the graphics is updated after a small delay. While the system is calculating the new curve
an asterisk is shown in the upper right corner of the window.

If the EQ type is graphic it will be possible to select only Gain and filter number.

When into this menu, using the

key sets all the gains to 0dB (Edit LED ON).

FLAT

10

4.3.3 HP/LP

Press

key (the associated LED is ON). This screen will present:

HP/LP

This function allows the loading of one of the 99 available presets, where the first 36 presets (6 for each EQ
type) are factory presets, and the presets from

configurable presets and all not initialized

37 to 99 are the user's

(empty) when CONTROL60 is shipped.

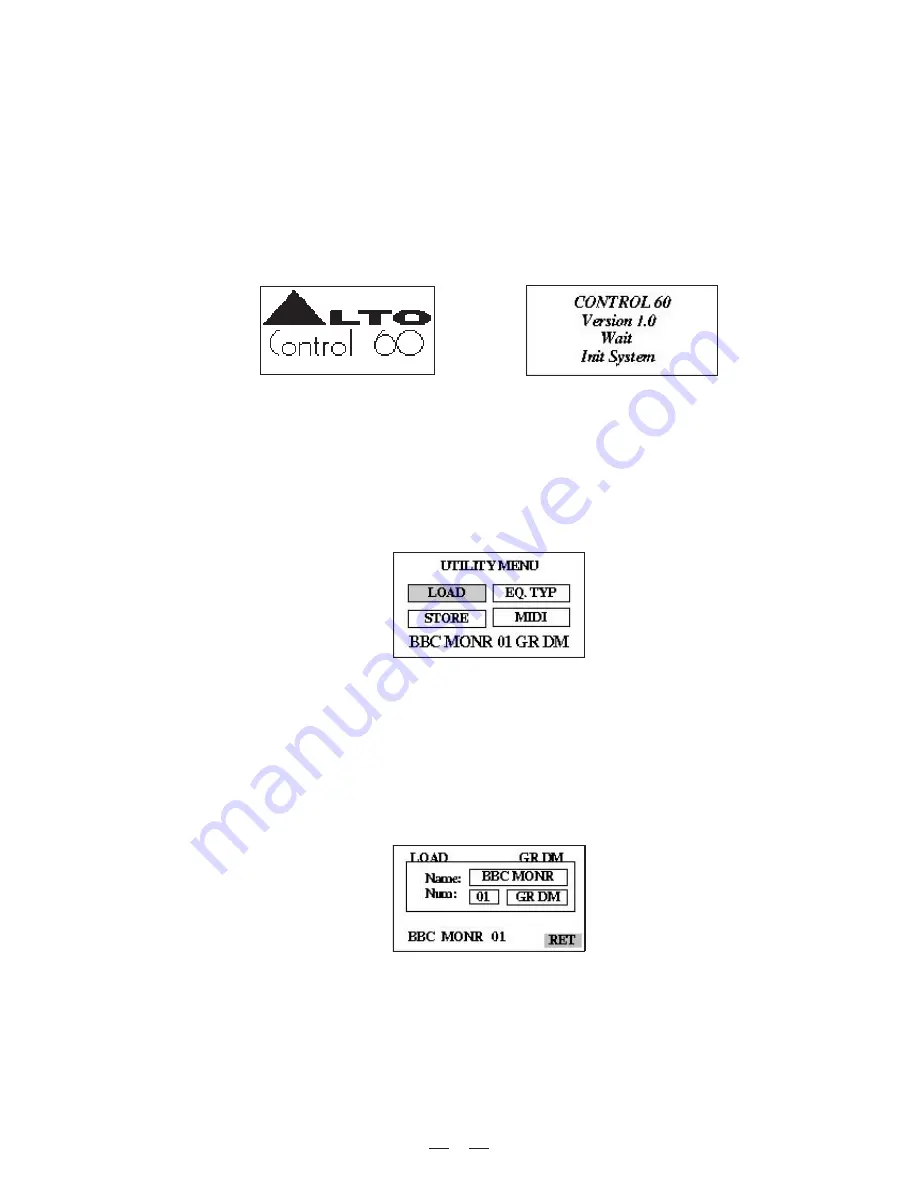
4.3.Operational Overview

Switching ON the CONTROL60, at system startup these screens will appear:

This phase lasts some seconds, then, the system loads the last used preset and proceed to the utility menu,
the related LED on, if the system was not bypass when switched on.

4.3.1 UTILITY KEY

To access the UTILITY menu it's necessary to push the

key. When pressing the utility key

LED

UTILITY

(utility

on), this screen will appear:

To load a preset:

The starting screen is this:

7

a. Load Preset

Here can be found the name, number, type of the current preset. Pressing enter when on the RET item
causes the system to return to the main menu.

Move into the screen with

keys; the user can select the preset field, the selected items

UP/DOWN

are

reversed to underline them. To load a preset it is necessary to select the preset item, choose the desired
preset with the dial knob and at last press enter.

source (instrument or mic) into the CONTROL60 before the mixer's channel input. Usually, insert connections
require a special, stereo-splitting Y-cord to be connected, known as TRS connector. This connector has a stereo
jack which plugs into mixer's channel insert socket, and a couple of mono jacks (input and output) which will plug
into CONTROL60 via jack-XLR adapters. Fitting this kind of cabling will virtually insert into one mixer's channel
the EQ process. Take good care in adjusting CONTROL60 input and output levels, in order to satisfy the dynamics
needs of both the processed channels. Do not use for the CONTROL60 the effects send/return connections found
on most mixers for effect modules, as they could lead to heavy frequency response alterations.

Improper level setting when using a digital processor is the most common cause of noise and distortion problems.

Содержание CONTROL60

Страница 1: ...CONTROL60 30 30 Band Digital Equalizer User s Manual LTO R www altoproaudio com Version 2 3 September 2005 English...

Страница 2: ...away from naked flames Read these instructions Follow all instructions Keep these instructions Do not discard Heed all warnings Only use attachments accessories specified by the manufacturer Do not t...

Страница 3: ...ying attention to your suggestions and your comments Following this idea we create our products and we will create the new ones From our side we guarantee you and we will guarantee you also in future...

Страница 4: ...N 5 4 1 Power Up and Audio Connections 4 2 Installation 4 3 Operational Overview 5 MIDI STANDARD CONTROL 12 a Audio Connections b Power Up Setting a Standard Use b Application Examples 3 4 3 1 UTILITY...

Страница 5: ...ound color improving the over sound quality without all introducing any loss or distortion 4 2 FEATURE LIST Robust and Compact Design Digital Stereo Equalizer with 24 32 bit High Speed DSP Processor V...

Страница 6: ...capacitance shielded cables with a flexible internal conductor Connect the cables to the CONTROL60 properly by observing the following precautions Do not bundle audio cables with AC power cords Do no...

Страница 7: ...urce and two other audio cables from the Output1 and Output2 of the CONTROL60 to a stereo amplification system or two mixer inputs This connection scheme is suitable also for processing Hi Fi stereo s...

Страница 8: ...en with keys the user can select the preset field the selected items UP DOWN are reversed to underline them To load a preset it is necessary to select the preset item choose the desired preset with th...

Страница 9: ...item RET and press ENTER With this function the user can store a preset into one of the cations available to the user This is 63 lo the access screen In this window the user can find the position in w...

Страница 10: ...ion the user can set the MIDI configuration This is the starting screen With Up Down the user can select the MIDI channel and or the output enable The selection is shown reversing the item d MIDI Setu...

Страница 11: ...hannel Filter frequency will be shown by a vertical segment crossing the frequency axis If the selected item is Gain Freq or Bandwidth then with the dial it s possible to change the value of the selec...

Страница 12: ...ser presses again the key BYPASS restoring the system to normal operation Bypass key Using this key is possible to bypass the process sending to the CONTROL60 outputs exactly the input signals this is...

Страница 13: ...0 1 2 channel Left 3 4 5 channel Right Output Volume 7 0 48 0 channel L 3 channel R 12 12 dB Input Gain 83 0 48 0 channel L 3 channel R 12 12 dB Delay Line Adj Delay Line Fine 82 82 0 127 0 95 0 chann...

Страница 14: ...950 1000 1062 70 1125 1187 1250 1337 1425 1512 1600 1700 1800 1900 80 2000 2125 2250 2375 2500 2662 2825 2987 3150 3362 90 3575 3787 4000 4250 4500 4750 5000 5325 5650 5975 100 6300 6725 7150 7575 80...

Страница 15: ...6 5dB 07 0dB 07 5dB 40 08 0dB 08 5dB 09 0dB 09 5dB 10 0dB 10 5dB 11 0dB 11 5dB 12 0dB Input Gain Output Volume 12dB 12dB step 0 5dB value d u Bandwidth 0 05 oct 3 oct step 0 05 oct value d u d u 0 1 2...

Страница 16: ...Signal to Noise Ratio THD N 46 875 KHz 12dBv Memory Factory preset 36 6 for each EQ type User preset 63 MIDI Section Connections Input output thru Sockets 5 poles DIN female mode Photocoupled Power S...

Страница 17: ...O of 1 year from the purchase date if you have completed the Warranty Registration Card in time 3 3 During the warranty service may repair or replace this product at its own option at no charge to you...

Страница 18: ...737 email alto altoproaudio com Fax 886 4 22346757 c All rights reserved to ALTO All features and content might be changed without prior notice Any photocopy translation or reproduction of part of thi...

Отзывы: