background image

Zooming the image

You can zoom the image by:

using the zoom (+ or -) buttons

using the +/- keys

The zoom level is shown on the bottom left side of the image.

SpotlightScan setup

Calibrating the heading sensor to the trolling motor

You must calibrate the heading sensor with the trolling motor foot
pedal.

1.

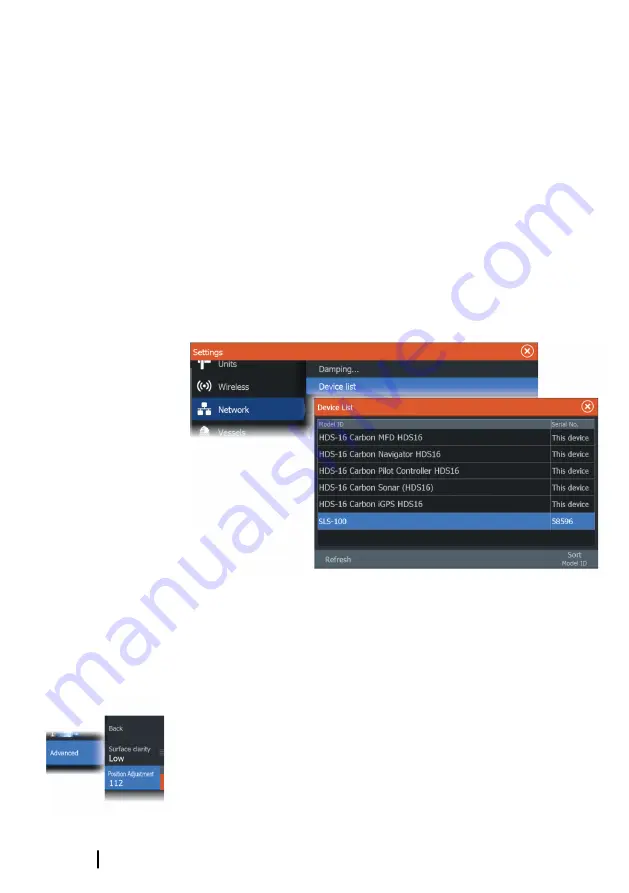
In the device list dialog, select the heading sensor (SLS-100)

2.

Select Calibrate on the device information dialog

3.

Select your trolling motor foot pedal

4.

Select Calibrate

5.

Select OK on the confirmation dialog.

Aligning the SpotlightScan image

You must align the SpotlightScan image with the direction the
trolling motor is pointing. If the image is not correctly aligned with
the trolling motor, the orientation of the image does not match the
underwater environment around your boat.

1.

Position your trolling motor so it is pointing straight ahead

2.

Select the position adjustment menu option

94

SpotlightScan

| HDS Live Operator Manual

Содержание HDS Live

Страница 1: ...ENGLISH HDSLive Operator Manual www lowrance com ...

Страница 2: ......

Страница 3: ...iliates reserve the right to make changes to specifications without notice Governing language This statement any instruction manuals user guides and other information relating to the product Documentation may be translated to or has been translated from another language Translation In the event of any conflict between any Translation of the Documentation the English language version of the Documen...

Страница 4: ...rk of Yamaha Navico product references This manual refers to the following Navico products Active Imaging Active Imaging Broadband Radar Broadband Radar Broadband 3G Broadband 3G Radar Broadband 4G Broadband 4G Radar Broadband Sounder Broadband Sounder DownScan Imaging DownScan DownScan Overlay Overlay FishReveal FishReveal GoFree GoFree Genesis Genesis Halo Pulse Compression Radar Halo Radar Live...

Страница 5: ... IS Iceland IE Ireland IT Italy LV Latvia LI Liechtenstein LT Lithuania LU Luxembourg MT Malta NL Netherlands NO Norway PL Poland PT Portugal RO Romania SK Slovak Republic SI Slovenia ES Spain SE Sweden CH Switzerland TR Turkey UK United Kingdom United States of America Navico declare under our sole responsibility that the product conforms with the requirements of Part 15 of the FCC Rules Operatio...

Страница 6: ...enced technician for help Industry Canada This device complies with Industry Canada s license exempt RSSs Operation is subject to the following two conditions 1 This device may not cause interference and 2 This device must accept any interference including interference that may cause undesired operation of the device Le présent appareil est conforme aux CNR d Industrie Canada applicables aux appar...

Страница 7: ...ndards 2014 Internet usage Some features in this product use an internet connection to perform data downloads and uploads Internet usage via a connected mobile cell phone internet connection or a pay per MB type internet connection may require large data usage Your service provider may charge you based on the amount of data you transfer If you are unsure contact your service provider to confirm ra...

Страница 8: ...e manual version can be downloaded from the product s support section at the following website www lowrance com Viewing the manual on the screen The PDF viewer included in the unit makes it possible to read the manuals and other PDF files on the screen Manuals can be downloaded from the product s support section at the following website www lowrance com The manuals can be read from a storage devic...

Страница 9: ... panels 25 Menus 25 Man Overboard waypoint 26 Locking the touchscreen 26 Screen capture 27 Customizing your system 27 Customizing the Home page wallpaper 27 Adjusting the split on multiple panel pages 28 Data overlay 28 Favorite pages 29 Configuring the quick access keys 30 Enabling or disabling features 31 Charts 31 The Chart panel 31 Chart data 32 Selecting chart source 32 Vessel symbol 32 Zoomi...

Страница 10: ...outes 57 About trails 60 Navigating 60 About navigating 60 Steer panel 61 Navigate to cursor position 61 Navigate a route 62 Navigating with the autopilot 63 Navigation settings 65 Sonar 65 The image 66 Multiple sources 66 Zooming the image 66 Using the cursor on the image 67 Viewing history 67 Recording log data 70 Setting up the image 72 Advanced options 73 More options 76 Sonar settings 79 Side...

Страница 11: ...the DownScan image 85 Advanced options 85 More options 87 3D Sonar 87 About 3D Sonar 87 The 3D panel 88 Zooming the image 88 Using the cursor on a 3D image 88 Saving waypoints 89 3D mode options 89 Fish renderings 90 Viewing image history 90 Setting up the image 91 Advanced options 92 More options 93 SpotlightScan 93 The SpotlightScan image 94 Zooming the image 94 SpotlightScan setup 95 Setting up...

Страница 12: ...h the autopilot 105 Selecting active autopilot 106 The autopilot controller for trolling motor 106 Engaging and disengaging the autopilot 107 Autopilot indication 107 Autopilot modes 111 Trolling motor speed control 111 Recording and saving a trail 112 Autopilot settings 114 Outboard autopilot 114 Safe operation with the autopilot 114 Selecting active autopilot 115 The autopilot controller for out...

Страница 13: ... 135 Radar view options 141 EBL VRM markers 142 Setting a guard zone around your vessel 143 MARPA targets 145 Recording radar data 146 Radar settings 148 Audio 148 About the audio function 148 The audio controller 149 Setting up the audio system 149 Selecting audio source 150 Using an AM FM radio 150 Sirius radio 151 Viewing DVD video 153 AIS 153 About AIS 153 Selecting an AIS target 153 Searching...

Страница 14: ...7 Smartphones and tablets 169 LR 1 Remote control 171 Using your phone with the MFD 171 About phone integration 171 Connecting and pairing a phone 172 Phone notifications 173 Phone troubleshooting 175 Managing Bluetooth devices 176 Tools and settings 176 The toolbar 177 Settings 182 Alarms 182 About the alarm system 182 Type of messages 182 Alarm indication 183 Acknowledging a message 183 Alarm se...

Страница 15: ...188 Service report 189 Backing up your system data 192 Integration of 3rd party devices 192 SmartCraft VesselView integration 192 Suzuki engine integration 193 Yamaha engine integration 193 Evinrude engine integration 194 FUSION Link integration 194 BEP CZone integration 194 Power Pole anchors Contents HDS Live Operator Manual 15 ...

Страница 16: ...16 Contents HDS Live Operator Manual ...

Страница 17: ... on page 29 B Waypoint key Press to open the new waypoint dialog Press twice to save a waypoint Press and hold to access the find dialog C Arrow keys Press arrows to move through menu items to adjust a value and to move the cursor on a panel D Exit X key Press to exit a dialog to return to previous menu level to remove the cursor from the panel or to restore the cursor on the panel 1 Introduction ...

Страница 18: ...press once to display the System Controls dialog Repeat short presses to cycle the backlight brightness I Quick access keys HDS 12 Live and HDS 16 Live units only Configurable keys Refer to Configuringthequickaccesskeys on page 29 Card reader A memory card can be used for Chart data Software updates Transfer of user data System backup Ú Note Do not download transfer or copy files to a chart card D...

Страница 19: ...n the unit the feature is available for use Ú Note The feature unlock option is only available if your unit supports a locked feature Device registration You are prompted to register your device during startup You can also register by selecting the register option in the System settings dialog Registration can be done From the device if it is connected to the internet From a smart device with inte...

Страница 20: ...el Press and hold a button to display pre defined quick split pages for the application C Close button Select to exit the Home page and return to the previous active page D Favorites Select a button to display the panel combination Press and hold a favorite button to enter edit mode for the Favorites panel E Toolbar Select a button to access dialogs used for carrying out a task or for browsing sto...

Страница 21: ... to Adjustingthesplitonmultiplepanelpages on page 27 In a multiple panel page only one panel can be active at a time The active panel is outlined with a border You can only access the page menu of an active panel To activate a panel Press the panel key to toggle between panels Tap the panel you want to activate 2panelspage 3panelspage Application pages A Control bar The user interface HDS Live Ope...

Страница 22: ... preconfigured favorite pages The preconfigured pages can be modified and you can add your own favorite pages Refer to Addingnewfavoritepages on page 28 The unit display size determines the number of application panels that can be included on a favorite page System controls dialog The System Controls dialog provides quick access to basic system settings The icons displayed on the dialog vary with ...

Страница 23: ... pressing the power key The user interface HDS Live Operator Manual 23 ...

Страница 24: ...r change settings using the system settings dialogs Standby mode In Standby mode the Sonar and the backlight for screen and keys are turned off to save power The system continues to run in the background You select Standby mode from the System Controls dialog Switch from Standby mode to normal operation by a short press on the Power key Display illumination Brightness You can cycle the preset back...

Страница 25: ...e menu of an active panel To active a panel in a multiple panel page Tap the panel Press the Panel key Menus To display a panel menu Select the menu button Press the menu key To return to previous menu level Select the back menu option Press the exit key To hide a panel menu Swipe the menu to the right On menu level one press the exit key Man Overboard waypoint If an emergency situation should occ...

Страница 26: ...manually Delete a MOB A MOB waypoint can be deleted from the menu when the MOB is activated Stop navigating to MOB The system continues to display navigational information towards the MOB waypoint until you cancel the navigation from the menu Locking the touchscreen You can temporarily lock a touch screen to prevent accidental operation of the system You lock the touch screen from the system contr...

Страница 27: ...he files browser When a picture is chosen as the wallpaper it is automatically copied to the Wallpaper folder Adjusting the split on multiple panel pages 1 Open the multiple panel page 2 Open the System Controls dialog 3 Select the adjust splits option The adjustment icon appears on the multiple panel page 4 Select the adjustment icon and move the split to the desired position 5 Use menu options t...

Страница 28: ...overlay button on the system controls dialog to edit the overlay data When in edit mode select the data overlay to be edited then use the menu option to change or configure the data drag the overlay data box to reposition the overlay Favorite pages Adding new favorite pages 1 Select the New icon in the favorite panel on the Home page to open the page editor dialog 2 Drag and drop page icons to set...

Страница 29: ...on to remove the page Select the tool icon on a favorite icon to display the page editor dialog 2 Add or remove panels in the page editor dialog 3 Save or discard your changes to leave the favorite edit mode Configuring the quick access keys The key presses for the quick access keys and the home key can be configured Ú Note The number of configurable keys depends on the size of your unit Customizi...

Страница 30: ...nabling or disabling features A compatible device connected to the NMEA 2000 network should automatically be identified by the system If not enable the feature from the advanced settings dialog Features can also be disabled using this dialog 30 Customizing your system HDS Live Operator Manual ...

Страница 31: ...livered with preloaded cartography For a full selection of supported charts visit the product web site Ú Note Chart menu options vary depending on the chart you are using Charts on chart cards are shared over the Ethernet network so only one chart card per vessel is required Ú Note The system does not automatically switch to preloaded cartography if the chart card is removed A low resolution chart...

Страница 32: ...tem has a valid GPS position lock the vessel symbol indicates vessel position If no GPS position is available the vessel symbol includes a question mark Ú Note Without a heading sensor on the network the vessel icon orientates itself using COG Course over Ground Zooming the chart The chart range scale and range rings interval when turned on are shown on the chart panel You change the scale by zoom...

Страница 33: ...up The chart direction is depending on if navigating or not When navigating the desired course line B is oriented up When not navigating the direction the vessel is actually traveling COG is oriented up Look ahead Moves the vessel icon on the panel to maximize your view ahead of the vessel Displaying information about chart items When you select a chart item a waypoint a route or a target basic in...

Страница 34: ... When the cursor is active the chart does not pan or rotate to follow the vessel Press the exit key or select the clear cursor menu option to remove the cursor and the cursor window from the panel This also centers the chart to the vessel position Select the restore cursor menu option to display the cursor at its previous location The clear cursor and restore cursor options are useful features for...

Страница 35: ...nction from the menu The measuring icons appear with a line drawn from the vessel center to the cursor position and the distance is listed in the cursor information window 2 The measuring points can be repositioned by dragging either icon while the measuring function is active Ú Note The bearing is always measured from the grey icon to the blue icon The start measuring function can also be started...

Страница 36: ...hical view of land and sea contours Ú Note All chart types work in 3D mode but without 3D cartography for the appropriate area the chart appears flat When the 3D chart option is selected the rotate A and the pan B icons appear on the chart panel Controlling the view angle You can control the view angle by selecting the rotate icon and then panning the chart panel To change the direction you are vi...

Страница 37: ...map overlay feature shows a history of water temperature coloring on the chart A water temperature source is needed to provide the temperature data for the overlay The color range is adjusted automatically based on the minimum and maximum temperatures recorded Transparency Adjusts the transparency of the overlay With a minimum transparency setting the panel details are almost hidden by the overlay...

Страница 38: ...the unit with the memory card Genesis live maps are not shared over the network Ú Note Genesis Live data is not adjusted for tidal offset Genesis live log files can be uploaded to your Genesis account Refer to www genesismaps com Genesis live menu options Transparency Adjusts the transparency of the overlay Contour interval Defines the density of live depth contours shown Depth palette Controls th...

Страница 39: ...er to Radar on page 126 Selecting radar overlay source on chart panels To select the radar source of the radar overlay displayed on the chart panel use source menu option This option is available under Radar options when radar is selected as the overlay For chart pages with more than one chart with radar overlay it is possible to set up different radars sources for each chart panel Activate one of...

Страница 40: ...or that location are displayed Dynamic current data can be viewed by zooming inside a 1 nautical mile zoom range At that range the Current icon changes to an animated dynamic icon that shows the speed and direction of the current Dynamic icons are colored in black greater than 6 knots red greater than 2 knots and less than or equal to 6 knots yellow greater than 1 knot and less than or equal to 2 ...

Страница 41: ... regions and cartography versions You can view photo overlays in either 2D or 3D modes NoPhotooverlay Photooverlay landonly FullPhotooverlay Photo transparency The Photo transparency sets the opaqueness of the photo overlay With minimum transparency settings the chart details are almost hidden by the photo Minimumtransparency Transparencyat80 Raster charts Changes the view to that of a traditional...

Страница 42: ...can turn on off individually depending on which information you want to see The categories listed in the dialog are dependent on the charts used Shaded relief Shades seabed terrain No contours Removes contour lines from the chart Depth palette Controls the Depth palette used on the map Depth filter Filters out depth values shallower than the selected depth filter limit Safety depth Charts use diff...

Страница 43: ...ggeration Graphical settings that are available in 3D mode only Exaggeration is a multiplier applied to the drawn height of hills on land and troughs in water to make them look taller or deeper Ú Note This option is grayed out if the data is not available in the map card inserted Genesis Layer The Genesis Layer displays high resolution contours contributed by Genesis users that have passed a quali...

Страница 44: ...act Navionics Navionics specific chart options Orientation Look ahead 3D and change Chart source previously described in this section are common for all chart types Photo overlay Photo overlay enables you to view satellite photo images of an area as an overlay on the chart The availability of such photos is limited to certain regions and cartography versions You can view photo overlays in either 2...

Страница 45: ...ange of depths for fishing purposes The range is only as accurate as the underlying chart data meaning that if the chart only contains 5 meter intervals for contour lines the shading is rounded to the nearest available contour line NoDepthhighlightrange Depthhighlightrange 6m 12m Shallow water highlight This highlights areas of shallow water between 0 and the selected depth up to 10 meters 30 feet...

Страница 46: ...y by users and made available in Navionics charts For more information refer to Navionics information included with your chart or to Navionics website www navionics com SonarChart The system supports the Navionics SonarChart feature SonarChart displays a bathymetry map showing high resolution contour detail and standard navigational data For more information refer to www navionics com SonarChart L...

Страница 47: ... SonarChart Live menu option changes to SCL History Select to display previously recorded data on the chart overlay SC Density Controls the density of the SonarChart and SonarChart Live contours Colored seabed areas Used for displaying different depth areas in different shades of blue Navionics Dynamic tides and current icons Shows tides and currents with a gauge and an arrow instead of the diamon...

Страница 48: ... identification on the chart beneath a given depth This helps you to declutter charts in areas where there are many rocks located at depths well below your vessel s draught Contours depth Determines which contours you see on the chart down to the selected safety depth value Presentation type Displays marine charting information such as symbols colors of the navigation chart and wording for either ...

Страница 49: ...xtension Select to show or hide the heading and course extension lines for your vessel Extension length Sets the lengths of the heading and course extension lines for your vessel For setting extension line lengths on other vessels shown as AIS targets refer to AIS Courseextension on page 158 A Heading B Course Over Ground COG The lengths of the extension lines are either set as a fixed distance or...

Страница 50: ...hart with the position shown on the other chart when a 2D and a 3D chart are shown side by side Pop up information Determines whether basic information for panel items is displayed when you select the item Grid lines Turns on off viewing of longitude and latitude grid lines on the panel Waypoints Turns on off displaying waypoints on charts Routes Turns on off displaying routes on charts Trails Tur...

Страница 51: ...n exact position with latitude and longitude coordinates A waypoint positioned on the Sonar image has a depth value in addition to position information A waypoint is used to mark a position you later may want to return to Two or more waypoints can also be combined to create a route Saving waypoints A waypoint is saved at the cursor position if active or at the vessel s position if the cursor is no...

Страница 52: ...s New Waypoint dialog This selection becomes the persistent mode the next time you create a new waypoint the New Waypoint dialog is displayed Moving a waypoint 1 Select the waypoint you want to move The waypoint icon expands to indicate that it is active 2 Activate the menu and select the waypoint in the menu 3 Select the move option 4 Select the new waypoint position 5 Select the finish moving me...

Страница 53: ...alarm when your vessel comes within the defined radius For more information refer to Alarm dialogs on page 184 Routes A route consists of a series of routepoints entered in the order that you want to navigate them When you select a route on the chart panel it turns green and the route name is displayed The system includes support for Navionics Autorouting and C MAP Easy Routing This feature automa...

Страница 54: ...ave the route by selecting the save option in the menu Ú Note The menu changes depending on the selected edit option All edits are confirmed or cancelled from the menu Delete a route You can delete a route by selecting the Delete menu option when the route is activated You can also delete routes from the edit routes dialog Refer to The editroutedialog on page 56 Creating routes using existing wayp...

Страница 55: ...vailable the Dock to dock Autorouting or Easy Routing menu option is not available Compatible cartography includes C MAP MAX N Navionics and Navionics Platinum For a full selection of available charts visit www gofreemarine com www c map com or www navionics com 1 Position at least two routepoints on a new route or open an existing route for editing 2 Select the Dock to dock Autorouting menu optio...

Страница 56: ...tem to automatically position routepoints for other parts of the route 7 Select the save option to complete the automatic routing and save the route Dock to dock Autorouting and Easy Routing examples Entire route option used when first and last route points are selected Firstandlastroutepoint Resultafterautomaticrouting Selection option used for autorouting part of a route Tworoutepointsselected R...

Страница 57: ...tomatically track and draw the vessel s movement on the chart panel The system continues to record the trails until the length reaches the maximum points and then automatically begins overwriting the oldest points The automatic trail function can be turned off from the trails dialog Creating a new trail You can start a new trail from the Trails dialog The dialog is activated by using the Waypoints...

Страница 58: ...d based on what source data and the high low limits you set Specify the source data type to be colored To turn off coloring select source None Select the high and low options to set high and low values after you specify the source A colored trail represents only one source at a time If you switch from one source to another then the colors represent the newly selected source The colors can be shade...

Страница 59: ...art does not change the other charts Displaying source data in the cursor position window Selecting a point in a trail displays the cursor position window If recorded source data exists for the point selected the value is shown in the window in addition to the other cursor information The system records data according to your settings in the edit Trail dialog Source data points are recorded when t...

Страница 60: ...ncluded in your system the autopilot can be set to automatically navigate the vessel For information about positioning waypoints and creating routes refer to Waypoints routes andtrails on page 51 Steer panel The Steer panel can be used to display information when you are navigating A Data fields B Vessel heading C Bearing to waypoint D Destination point 7 60 Navigating HDS Live Operator Manual ...

Страница 61: ...te to cursor position You can start navigating to a cursor position on any chart radar or sonar panel Position the cursor at the selected destination on the panel and then select the go to cursor menu option Ú Note The go to cursor menu option is not available if you are already navigating Navigate a route You can start navigating a route from the chart panel steer panel or from the Route dialog W...

Страница 62: ...cting the route details option from the menu Navigating with the autopilot When you start navigation on a system with autopilot functionality you are prompted to set the autopilot to navigation mode If you choose not to engage the autopilot the autopilot can be set to navigation mode from the Autopilot Controller later on For more information about autopilot functionality depending on the autopilo...

Страница 63: ... is activated XTE alarm Cross track error Turns on off the XTE alarm Trails Opens the Trails dialog where trails settings can be adjusted and trails can be converted into routes for navigation Refer to Abouttrails on page 57 Logging type You can select to record trail points based on time distance or by letting the unit position a point automatically when a course change is registered Specify one ...

Страница 64: ...ter the time you want to record Phantom Loran Enables use of Phantom Loran positioning system Loran settings Defines Loran chains GRI and preferred station for waypoint entry cursor position and position panel The graphic example shows a cursor position window with Loran position information For more information refer to your Loran system documentation 64 Navigating HDS Live Operator Manual ...

Страница 65: ...ure of the bottom The image A Fish arches B History preview C Temperature graph D Depth at cursor E Amplitude scope F Zoom range buttons G Water depth and Water temperature at cursor location H Range scale I Bottom Optional items that you can turn on off individually Refer to More options on page 73 8 Sonar HDS Live Operator Manual 65 ...

Страница 66: ... is not able to find the bottom when zooming If the cursor is active the system zooms in where the cursor is positioned Zoom bar The zoom bar is displayed when you zoom the image Drag the zoom bar vertically to view different parts of the water column Using the cursor on the image When you position the cursor on the image the screen pauses the depth at the cursor position is shown and the informat...

Страница 67: ...e preview feature to pan history refer to Preview on page 75 To resume normal scrolling select Clear cursor or press the exit key Recording log data Start recording log data You can start recording log data and save the file internally in the unit or save it onto a storage device connected to the unit The Log sonar dialog is activated from the System Controls dialog or from the Sonar Settings dial...

Страница 68: ...how many bytes per sounding that are to be used when saving the log file More bytes yield better resolution but cause the record file to increase in size compared to using lower byte settings Create StructureMap If StructureScan is available on the network you can convert the sl2 or sl3 logs to StructureMap format smf when recording completes If a StructureScan transducer is connected to the unit ...

Страница 69: ...dialog to fully stop the recording of all sonar log data Ú Note If you have selected the Upload to C MAP Genesis option and are connected to a wireless hotspot your recorded files are transmitted to C MAP Genesis when you select Stop Viewing recorded data Both internally and externally stored sounder records may be reviewed when the view sonar log option is selected in the sonar settings dialog Re...

Страница 70: ...e background Fresh Water 400 ft White background Deep Water 5 000 ft Deep Blue Slow Trolling 400 ft White background Fast Trolling 400 ft White background Clear Water 400 ft White background Ice Fishing 400 ft White background Range The range setting determines which water depth that is visible on the screen Ú Note Setting a deep range in shallow water may cause the system to lose track of the dep...

Страница 71: ...Increasing sensitivity shows more detail on the screen Decreasing sensitivity displays less Too much detail clutters the screen Conversely desired targets may not be displayed if sensitivity is set too low Ú Note Auto Sensitivity is the preferred mode for most conditions Auto sensitivity Auto sensitivity automatically adjusts the sonar return to the optimal levels Auto sensitivity can be adjusted ...

Страница 72: ...engine vibration and air bubbles can clutter the image The noise rejection option filters the signal interference and reduces the on screen clutter Surface clarity Wave action boat wakes and temperature inversion can cause onscreen clutter near the surface The surface clarity option reduces surface clutter by decreasing the sensitivity of the receiver near the surface Scroll speed You can select t...

Страница 73: ...ly processes sonar signals in the selected range This allows the display to continue smooth scrolling if the bottom depth is out of transducer range When the unit is in manual mode you might not receive any depth readings or you might receive incorrect depth information More options Stop Sonar When selected stops the sonar from pinging Use the option anytime you want to disable the sonar but not p...

Страница 74: ...m lock mode is useful when you want to view targets close to the bottom In this mode the left side of the panel shows an image where the bottom is flattened The range scale is changed to measure from the seabed 0 and upwards The bottom and the zero line are always shown on the left image independent of the range scale The scaling factor for the image on the left side of the panel is adjusted as de...

Страница 75: ...h the bottom from fish and structures Amplitude scope The Amplitude scope is a display of real time targets as they appear on the panel The strength of the actual targets is indicated by both width and color intensity Preview You can have all available sonar history shown at the top of the sonar screen The Preview bar is a snapshot of available sonar history You can scroll through sonar history by...

Страница 76: ...nu When de activated the internal sonar will not be listed as a sonar source for any unit on the network De activate this option on units which do not have a transducer connected Network Sonar Select to share transducers from this unit with other units connected on the Ethernet network In addition the setting must be selected in order to see other enabled sonar devices on the network 76 Sonar HDS ...

Страница 77: ...e is displayed as a paused image and you control the scrolling and display from the menu You can use the cursor on the image measure distance and set view options as on a live Sonar image If more than one channel was recorded in the selected Sonar file you can select which channel to display You exit the view function by selecting the X in the upper right corner or by pressing the X key Structure ...

Страница 78: ...set equal to the vertical distance between the transducer and the water surface B positive value For depth below transducer set the offset to 0 Use depth and temp data from Selects from which source the depth and temperature data is shared on the NMEA 2000 network Installation Used for installation and setup See the separate Installation manual Restore sonar defaults Restore sonar settings to the ...

Страница 79: ... image Use the range icons or change the range menu setting to specify the distance out to the left and right of the center displayed in the image A change in the range causes a zoom in or out of the image Using the cursor on the panel When you position the cursor on the panel the image pauses and the cursor information window is activated The left right distance from the vessel to the cursor are ...

Страница 80: ...n the cursor is active some options in the menu are replaced with cursor mode features Select the clear cursor option to return to the normal menu Source Ú Note Available only if multiple sources with the same capability are available Used to specify the source for the image in the active panel You can display different sources simultaneously using a multi panel page configuration Menu options for...

Страница 81: ...hile 455 kHz can be used in deeper waters or for expanded range capabilities Contrast Determines the brightness ratio between light and dark areas of the screen Ú Note We recommend that you use the auto contrast option Palettes Used for selecting the image s color palette Advanced options Surface clarity Wave action boat wakes and temperature inversions can cause onscreen clutter near the surface ...

Страница 82: ...disable the sonar but not power off the unit View Specifies if the SideScan page displays the left side of the image only right side only or left and right side at the same time Range Lines Range lines can be added to the image to make it easier to estimate distance 82 SideScan HDS Live Operator Manual ...

Страница 83: ...ttons using the keys The zoom level is shown on the bottom left side of the image Using the cursor on the panel When you position the cursor on the panel the image pauses and the cursor information window is activated The depth of the cursor is shown at the cursor position Viewing DownScan history You can pan the image history by dragging the image to the left and right To resume normal DownScan s...

Страница 84: ... image in the active panel You can display different sources simultaneously using a multi panel page configuration Menu options for each panel are independent Ú Note Using transducers at the same frequency can cause interference For source setup information refer to the HDS Live Installation Manual Range The range setting determines the water depth that is visible on the image Preset range levels ...

Страница 85: ...vanced options Surface clarity Wave action boat wakes and temperature inversions can cause onscreen clutter near the surface The surface clarity option reduces surface clutter by decreasing the sensitivity of the receiver near the surface More options Stop Sonar When selected stops the sonar from pinging Use the option anytime you want to disable the sonar but not power off the unit FishReveal Sel...

Страница 86: ...larity option reduces surface clutter by decreasing the sensitivity of the receiver near the surface Palette Select between several display palettes optimized for a variety of fishing conditions Ú Note Palette choice is often a user preference and may vary depending on the fishing conditions It is best to select a palette that provides good contrast between the image details and FishReveal arches ...

Страница 87: ...ed to the system The 3D panel In 3D view the sea floor image is built up in real time directly under the vessel as the boat moves If you are not moving the image will remain stagnant You can also see other underwater objects and clusters of fish The 3D view shows both the left and right channels of data A Depth and temperature B Transducer beam C Range D 3D panel buttons E Depth indication line F ...

Страница 88: ...w shows available data at the cursor position including the distance and range from the vessel to the cursor position The history bar is used to pan back in the stored data The highlighted part of the History bar shows the image you are currently viewing in relation to the total image history stored Refer to Viewingimagehistory on page 90 Ú Note The history bar can be turned off Refer to Clearlive...

Страница 89: ...nged to look down or look more sideways from the vessel To change the camera rotation drag horizontally on the screen To change the camera elevation and tilt drag vertically on the screen 3D cursor mode When you activate cursor mode the camera position is the same as when cursor mode was enabled In cursor mode the image does not move with the vessel The image can be zoomed and the camera can be ro...

Страница 90: ... bar To resume scrolling showing current data select the clear cursor option or press the exit key Setting up the image Source Ú Note Available only if multiple sources with the same capability are available Used to specify the source for the image in the active panel You can display different sources simultaneously using a multi panel page configuration Menu options for each panel are independent...

Страница 91: ...creen clutter near the surface The surface clarity option reduces surface clutter by decreasing the sensitivity of the receiver near the surface Flipping the image left right If required flips the left right side of the image to match the direction of the transducer installation Vertical enhancement This option stretches the data so that the differences between depths are greater on the panel whic...

Страница 92: ... option anytime you want to disable the sonar but not power off the unit Clear live history Clears existing live history data from the screen and begins showing only the most current data View lock When enabled the camera will maintain the set relative rotation from the vessel For example if you rotate to face the starboard side of the vessel the camera will rotate to maintain the starboard view w...

Страница 93: ...e SpotlightScan returns match up correctly with the orientation of your trolling motor For installation instructions refer to the SpotlightScan Installation Manual The SpotlightScan transducer can be used for SpotlightScan imaging DownScan imaging or as a conventional broadband CHIRP transducer The SpotlightScan transducer works with most MotorGuide and Minn Kota cable steer trolling motors Its sc...

Страница 94: ... Calibrate on the device information dialog 3 Select your trolling motor foot pedal 4 Select Calibrate 5 Select OK on the confirmation dialog Aligning the SpotlightScan image You must align the SpotlightScan image with the direction the trolling motor is pointing If the image is not correctly aligned with the trolling motor the orientation of the image does not match the underwater environment aro...

Страница 95: ...lling motor Setting up the image Source Ú Note Available only if multiple sources with the same capability are available Used to specify the source for the image in the active panel You can display different sources simultaneously using a multi panel page configuration Menu options for each panel are independent Ú Note Using transducers at the same frequency can cause interference For source setup...

Страница 96: ...SpotlightScan and DownScan Advanced options Surface clarity Wave action boat wakes and temperature inversions can cause onscreen clutter near the surface The surface clarity option reduces surface clutter by decreasing the sensitivity of the receiver near the surface Position adjustment Used to align the SpotlightScan image with the direction the trolling motor is pointing Refer to AligningtheSpot...

Страница 97: ...lightScan operation tips Remove slack in the trolling motor cable to prevent image distortion Rotate the trolling motor at a slow constant speed to achieve the best results Reducing the range increases the size of the water column providing the best view of fish activity beneath the boat SpotlightScan HDS Live Operator Manual 97 ...

Страница 98: ...our chart panel When StructureMap overlay is selected the chart menu increases to show the StructureMap options The example below shows a chart panel with Structure overlay combined with a traditional SideScan panel StructureMap sources Two sources can be used to overlay Structure logs on the charts but only one can be viewed at a time Live data Used when SideScan data is available Saved files rec...

Страница 99: ... if no SideScan sources are available With this mode selected the StructureMap file is overlaid on the map based on position information in the file If the chart scale is large the StructureMap area is indicated with a boundary box until the scale is large enough to show Structure details Ú Note When saved files are used as the source all StructureMap files found on the storage device and in the s...

Страница 100: ...ucture overlay is enabled Not all options are available when saved StructureMap files are used as the source Unavailable options are greyed Range Sets the search range Transparency Sets the opaqueness of the Structure overlay With minimum transparency settings the chart details are almost hidden by the StructureMap overlay Palettes Used for selecting the image s color palette Contrast Determines t...

Страница 101: ...on while 455 kHz has greater depth and range coverage Clear live history Clears existing live history data from the screen and begins showing only the most current data Log sonar data Displays the log sonar dialog Source Selects StructureMap source StructureMap HDS Live Operator Manual 101 ...

Страница 102: ...dashboard Navigationdashboard Anglerdashboard Ú Note Additional dashboards can be activated from the menu if other systems are present on the network Customizing the panel You can customize the panel by Changing the data for each of the gauges in the dashboard Changing the dashboard layout Adding and deleting new dashboards You can also set limits for analog gauges All edit options are available f...

Страница 103: ...led to fit into the video panel Areas not covered by the image are colored black Setting up the video panel Video source The unit supports two video input channels You can select to view one channel only or to cycle the image between available video cameras Video source This unit supports NTSC and PAL video Check the local video standard or the standard of your cameras Adjusting the video image Yo...

Страница 104: ...Mirroring the video image Video input can be set to display a mirrored image This setting can be helpful for rear facing cameras used to back down the vessel 104 Video HDS Live Operator Manual ...

Страница 105: ... or equipment near the heading sensor used by the autopilot system Verify at regular intervals the course and position of the vessel Always switch the autopilot to standby and reduce speed in due time to avoid hazardous situations Autopilot alarms For safety reasons it is recommended to turn on all autopilot alarms when operating the autopilot For more information refer to Alarms on page 182 Selec...

Страница 106: ... Mode dependent information H Mode dependent buttons I Engage Standby button When the autopilot controller is the active panel it is outlined with a border Ú Note The autopilot controller can also be activated from the system controls dialog Engaging and disengaging the autopilot To engage the autopilot Select the preferred mode button 106 Trolling motor autopilot HDS Live Operator Manual ...

Страница 107: ... autopilot is in an active mode In the autopilot settings dialog you can select that the bar is off when the autopilot is in standby mode Autopilot modes The autopilot has several steering modes Anchor modes In these modes the trolling motor maintains the vessel position at a selected location Ú Note When in anchor mode the vessel heading can be affected by wind or current The following anchor opt...

Страница 108: ...ny drifting caused by current and or wind W To change the set heading Select a port or starboard button An immediate heading change takes place The heading is maintained until a new heading is set NAV mode Warning NAV mode should only be used in open waters Prior to entering NAV mode you must be navigating a route or towards a waypoint In NAV mode the autopilot automatically steers the vessel to a...

Страница 109: ...lable when navigating a route with more than one waypoint between the vessel position and the end of the route Turn pattern steering The system includes a number of automatic turn steering features When a turn pattern is activated the system creates temporary waypoints on the turn The last waypoint on the turn is the final waypoint When the vessel reaches the final waypoint the vessel goes into ar...

Страница 110: ...ing by 180 Turn variable Turn radius C turn Steers the vessel in a circle Turn variable Turn radius Degrees to turn Spiral Makes the vessel turn in a spiral with a decreasing or increasing radius Turn variables Initial radius Radius change per loop Number of loops Zigzag turn Steers the vessel in a zigzag pattern 110 Trolling motor autopilot HDS Live Operator Manual ...

Страница 111: ...arget speed is displayed in the autopilot controller There are two ways to control the target speed of the trolling motor Propeller rate set as a percentage of power A Cruise control speed B Switch between the speed options by selecting the speed icon The speed is increased decreased in preset steps by selecting the plus and minus buttons The speed can also be set manually by selecting the speed f...

Страница 112: ...play a compass symbol around your boat on the chart panel The compass symbol is off when the cursor is active on the panel Select active autopilot Selects if the autopilot controls the trolling motor or the outboard motor s Auto hide autopilot bar Controls whether the autopilot information bar is shown when the autopilot is in standby Arrival mode The autopilot switches from navigation mode to the...

Страница 113: ... point setup The trolling motor can store a number of anchor points labelled with MTG prefix Anchor points in the trolling motor are displayed in the Anchor point dialog These MTG anchor points can be saved as a waypoint in the MFD system The position of an MTG anchor point can be redefined to be identical to an existing waypoint or to the current vessel position Trolling motor autopilot HDS Live ...

Страница 114: ... or equipment near the heading sensor used by the autopilot system Verify at regular intervals the course and position of the vessel Always switch the autopilot to standby and reduce speed in due time to avoid hazardous situations Autopilot alarms For safety reasons it is recommended to turn on all autopilot alarms when operating the autopilot For more information refer to Alarms on page 182 Selec...

Страница 115: ...urns button G Mode dependent buttons H Standby button When the autopilot controller is the active panel it is outlined with a border Ú Note The autopilot controller can also be activated from the system controls dialog Engaging and disengaging the autopilot To engage the autopilot Select the preferred mode button Outboard autopilot HDS Live Operator Manual 115 ...

Страница 116: ...e In the autopilot settings dialog you can select that the bar is off when the autopilot is in standby mode Autopilot modes The autopilot has several steering modes The number of modes and features within the mode depend on the autopilot computer the boat type and available inputs Non Follow Up mode NFU In this mode the port and starboard buttons are used to control the rudder Activate this mode b...

Страница 117: ...g a calculated track line from present position and in a direction set by the user When the mode is activated the autopilot will draw an invisible track line based on current heading from the vessel s position The autopilot will now use the position information to calculate the cross track distance and automatically steer along the calculated track Ú Note If the vessel is drifting away from the tr...

Страница 118: ... of the route Cancel Cancels active navigation and deselects the current route or waypoint navigation The autopilot is switched to heading hold mode steering the vessel on the heading that was active when the cancel button was selected Ú Note This is different from selecting standby which does not stop current navigation Turning in NAV mode When the vessel reaches a waypoint the autopilot will giv...

Страница 119: ...The number of turn patterns depend on autopilot computer Ú Note Turn patterns are not available if the boat type is set to sail To start a turn Select the port or starboard button Turn variables All turn patters except the U turn have settings that you can adjust before you start a turn or at any time when the boat is in a turn U turn Changes the current set heading by 180 The turn rate is identic...

Страница 120: ...itive values indicate increasing radius Zigzag Steers the vessel in a zigzag pattern Turn variables Course change Leg distance Square Steers the vessel in a square pattern doing 90 course changes Turn variable Leg distance S turn Makes the vessel yaw around the main heading Turn variables Course change Turn radius Depth contour tracking Makes the autopilot follow a depth contour Ú Note DCT turn pa...

Страница 121: ...this alarm is activated an alarm will be raised if the depth data is lost during DCT To initiate a DCT turn Steer the boat to the depth you want to track and in the direction of the depth contour Activate auto mode then select depth contour tracking while monitoring the depth reading Select the port or starboard button to initiate the depth contour steering to follow the bottom sloping to starboar...

Страница 122: ...pth If the value is set too high the overshoot will increase and the steering will be unstable CCA the CCA is an angle that is added to or subtracted from the set course With this parameter you can make the boat yaw around the reference depth with s movements The larger the CCA the bigger yawing will be allowed If the CCA is set to zero there is no S ing Autopilot settings The Autopilot settings d...

Страница 123: ...your boat s steering cable steer or hydraulic steering with the NAC 1 Ú Note The autopilot must be commissioned prior to first use and any time after autopilot default settings have been restored Steering response Used to increase or decrease the steering sensitivity A low response level reduces the rudder activity and provides a more loose steering A high response level increases the rudder activ...

Страница 124: ...sed when retail mode is running the demonstration pauses After a time out period retail mode resumes Ú Note Retail mode is designed for retail showroom demonstrations Simulator source files You can select which data files that are used by the simulator It can be either pre recorded data files included in your device your own recorded log files or log files on a mass storage device connected to the...

Страница 125: ...Course Used for manually entering values when GPS source is set to Simulated course Otherwise GPS data including speed and course come from the selected source file Set start position Sets your simulated vessel position to the current cursor position Ú Note This option is only available when the GPS source is set to Simulated course Simulator HDS Live Operator Manual 125 ...

Страница 126: ...u options available depend on the radar sensor s connected to the system The Radar panel A Orientation B Range C Heading line D Cursor E Compass F Range markers G Range rings H Cursor position window Optional radar symbology 19 126 Radar HDS Live Operator Manual ...

Страница 127: ... the Radar application button on the Home page or by creating a favorite page with two radar panels Selecting the radar source You specify the radar in the Radar panel by selecting one of the available radars in the radar source menu option If you have a multiple Radar panel the radar is set individually for each radar panel Activate one of the radar panels and then select one of the available rad...

Страница 128: ...smit The scanner is on and transmitting Detected targets are drawn on the radar PPI Plan Position Indicator Ú Note You can also put the radar in transmit mode from the System Controls dialog Radar sector blanking Halo Radar only You can define up to four sectors on the PPI inside which no radar data is transmitted This enables you to blank out interference caused by features on your boat or from a...

Страница 129: ...dent and the source can be selected for a particular chart or radar panel in the same manner as dual radar described in Selectingtheradarsource on page 127 Ú Note Some controls that are related to physical properties of the radar itself are not independent of source These are Fast Scan Antenna Height and Bearing alignment MARPA is fully independent and up to 10 targets may be tracked for each virt...

Страница 130: ...r operation Go to cursor You can navigate to a selected position on the image by positioning the cursor on the panel and then using the go to cursor menu option Adjusting the radar image You may be able to improve the radar image by adjusting the radar sensitivity and by filtering out the random echoes from sea and weather conditions You can adjust the image settings from the radar menu Radar use ...

Страница 131: ...nd adjustability for each control Range Custom Adjustable Harbor Full Offshore Full Weather Full Bird Up to 24nm Threshold Custom Adjustable Harbor 30 Offshore 30 Weather 0 Bird 0 Gain Custom Adjustable Harbor Adjustable Offshore Adjustable Weather Adjustable Bird Adjustable Target Expansion Custom Adjustable Harbor Low Offshore Medium Weather OFF Bird OFF Sea Custom Adjustable Harbor Adjustable O...

Страница 132: ... Harbor and Weather modes because Fast Scan is Off in Weather mode The Interference reject setting can affect the interference seen or removed on both ranges Directional clutter rejection Broadband 4G Radar only This mode automatically works when GAIN AUTO and SEA HARBOR or OFFSHORE The purpose is to allow smaller vessels to be seen in the leeward direction of the sea clutter The GAIN of the radar...

Страница 133: ...tter settings for harbor and offshore conditions for all radar systems except Halo in addition to the manual mode where you can adjust the settings For all radar systems except Halo Sea clutter modes can be selected from the menu Auto Sea Offset Halo Radar only To allow fine tuning of the Sea control while in Auto mode Auto uses directional adaptive clutter rejection the Auto setting may be offset...

Страница 134: ...erence may exist try OFF for best radar image Radar threshold The threshold sets required signal strength for the lowest radar signals Radar returns below this limit are filtered and are not displayed Default value 30 Target expansion Target expansion increases the length of targets in range making them easier to see Rejecting radar interference Interference could be caused by radar signals from o...

Страница 135: ...adar antennas that have Doppler coloring functionality Ú Note When VelocityTrack is enabled antenna rotation speed may be reduced Ú Note When operating the radar in Dual range mode with one of the ranges set to 36 nm or more increased VelocityTrack coloring noise over land areas may be seen Doppler coloring is a navigation aid to distinguish moving targets approaching or diverging from your vessel...

Страница 136: ...d can be defined to apply for the radar source of the selected radar panel only or to all radar sources connected to the system The setting is only applied to those radars powered and connected at the time the setting is made If the all radar sources option is selected newly connected radars will use the specified values automatically VelocityTrack examples Approaching and diverging moving targets...

Страница 137: ...used for black green and black yellow radar palettes Red C1 C2 and D1 D2 indicating the target is on an approaching path to own vessel Its relative speed at that point is greater than the VelocityTrack speed threshold Not colored C3 and D3 D4 indicating it is temporarily neutral because its relative speed at that point is less than the VelocityTrack speed threshold Blue C4 C5 and D5 indicating the...

Страница 138: ... represent detail on your radar panel Radar orientation Radar orientation is indicated on the upper left corner of the radar panel as either HU Heading UP NU North Up or CU Course up Head up In head up mode the heading line on the PPI is oriented on the 0 on the bearing scale and towards the top of the screen The radar image is displayed relative to own ship and when the ship turns the radar image...

Страница 139: ...e antenna position origin to different location on the radar PPI The options described in the next sections are available Ú Note Offsetting the PPI center is allowed only in Relative motion PPIcenter Center PPIcenter LookAhead PPICenter Offset You return the antenna center to PPI center by using the offset option in the View menu Ú Note The bearing scale is according to the Consistent Common Refer...

Страница 140: ...t position then press the enter key or the left mouse key to move the PPI center to the cursor position True motion In true motion your vessel and all moving targets move across the Radar PPI as you travel All stationary objects remain in a fixed position When the vessel s symbol reaches 75 of the PPI radius A the radar image is redrawn with the vessel symbol re positioned B 180 opposite the curre...

Страница 141: ...from the menu if you need to reposition the marker Adjust the marker by dragging it into position 4 Save your settings Turning EBL VRM markers on and off When an EBL VRM marker is positioned you can turn the EBL VRM on off by deselecting the marker from the menu Placing EBL VRM markers by using the cursor 1 Position the cursor on the radar image 2 Activate the menu 3 Select one of the EBL VRM mark...

Страница 142: ...nu select Guard zones then select one of the guard zones 3 Select the shape for the zone The adjustment options depend on the guard zone shape 4 Select Adjust to define the settings for the guard zone The values can be set from the menu or by dragging on the radar panel A Bearing relative to the vessel heading B Depth C Range relative to vessel center D Width 5 Select the save option to save your ...

Страница 143: ...ARPA tracking is an important tool for collision avoidance Ú Note MARPA requires heading data for both the radar and the unit MARPA target symbols The system uses the target symbols shown below Acquiring MARPA target Typically it takes up to 10 full rotations of the scanner Tracking MARPA target not moving or at anchor Tracking and safe MARPA target with extension lines Dangerous MARPA target A ta...

Страница 144: ...RPA target tracking When targets are being tracked the radar menu expands to include options for cancelling individual targets or to stop the tracking function Cancel tracking individual targets by selecting the target icon and then selecting Cancel target on the menu Viewing MARPA target information Detailed information for MARPA targets can be displayed Select the desired target and then either ...

Страница 145: ... settings under Radarsettings on page 146 Recording radar data You can record radar data and save the file internally in the unit or save it onto a storage device connected to the unit A recorded radar file can be used for documenting an event or an operational error A logged radar file can also be used by the simulator Ú Note The record menu option is available if recording is turned on in the Ad...

Страница 146: ...agnetic North T M or to your relative heading R MARPA You can define the length of the MARPA trail making it easier to follow target movement A safe ring can be added around your vessel to present the danger zone The radius of the ring is the same as the closest point of approach as set in the Dangerous Vessels dialog Refer to Defining dangerousvessels on page 159 An alarm triggers if a vessel is ...

Страница 147: ...Installation The Installation option is used for radar installation described in the separate Radar or HDS Live Installation manuals Radar HDS Live Operator Manual 147 ...

Страница 148: ...t be installed according to the unit s Installation manual and to the documentation included with the audio device The audio controller The control buttons tools and options vary from one audio source to another A Control bar B Audio controller small and large displays C Source and source information D Control buttons E ON OFF button Ú Note The OFF button is located in the source list on small dis...

Страница 149: ...ually for each zone Adjustments to the bass and tremble settings will alter all zones Master volume control By default the volume for all speaker zones are adjusted when you adjust the volume You can adjust each speaker zone individually You can also define which zones that shall be altered when you adjust the volume Selecting audio source Use the source button to display the list of audio source ...

Страница 150: ...els The favorite list can be used for selecting a channel and for deleting the saved channels from the list Sirius radio Ú Note Sirius radio is available in North America only You can connect a compatible satellite module to the audio server to receive SiriusXM radio on your system Sirius service covers inland U S waters and coastal areas into the Atlantic and Pacific oceans Gulf of Mexico and the...

Страница 151: ...ton To page through favorite channels select the up or down audio control button Locking channels You can lock selected Sirius channels from being broadcasted A user selected 4 digit code must be entered to lock and unlock channels Viewing DVD video You can view DVD video from a FUSION Link device on units with a Video Adapter cable 000 11010 001 sold separately The DVD is shown on a video panel Y...

Страница 152: ...Video standard This unit supports NTSC and PAL video Check the local video standard or the standard of your cameras 152 Audio HDS Live Operator Manual ...

Страница 153: ...f an AIS target gets too close or if the target is lost Selecting an AIS target When you select an AIS icon the symbol changes to selected target symbol Only one target can be selected at a time Ú Note Pop up information must be enabled to see the vessel s name Refer to Chartsettings on page 49 Searching for AIS vessels You can search for AIS targets by using the find option in the menu If the cur...

Страница 154: ...t order and to display only a selected target type The vessels dialog also lists received AIS messages To display the vessels dialog select the data option in the menu AIS vessel details Detailed information about an AIS target is available from the AIS vessels details dialog To display the dialog select the AIS pop up select the info option in the menu 154 AIS HDS Live Operator Manual ...

Страница 155: ...SART data as a signal from a standard AIS transmitter An icon is positioned on the chart but this icon is an AIS vessel icon If your AIS receiver is compliant with AIS SART the following takes place when AIS SART data is received An AIS SART icon is located on the chart in the position received from the AIS SART An alarm message is displayed If you have enabled the siren the alarm message is follo...

Страница 156: ...he MOB function The display switches to a zoomed chart panel centered on the AIS SART position The system creates an active route to the AIS SART position Ú Note If the MOB function is already active this will be terminated and replaced by the new route towards the AIS SART position Ú Note If the AIS stops receiving the AIS SART message the AIS SART remains in the vessels list for 10 minutes after...

Страница 157: ...rn direction AIS target with past track Selected AIS target indicated with a square dashed line around the target symbol Dangerous AIS target indicated with bold line and with red color The symbol flashes until the target alarm is acknowledged by the operator Lost AIS target indicated with a line on the target symbol The symbol is located at the last received position from the target AIS SART AIS ...

Страница 158: ...et Icon filters By default all targets are shown on the panel if an AIS device is connected to the system You can select not to show any targets or to filter the icons based on security settings distance and vessel speed Course extension You can set the length of the Course Over Ground COG extension line for AIS vessels The length of the extension line is either set as a fixed distance or to indic...

Страница 159: ...s You can use the CPA Closest point of approach and TCPA Time to closest point of approach values to define when a target should be considered as dangerous When a target comes within the distance for CPA or within the time limit for TCPA the symbol changes to the dangerous target symbol AIS HDS Live Operator Manual 159 ...

Страница 160: ...on refer to www siriusxm com sxmmarine Sirius status panel When the weather module is connected to the system you get access to the Sirius status panel The status panel shows signal strength is indicated as 1 3 weak 2 3 good or 3 3 preferred It also includes antenna status service level and the electronic serial number for the weather module Sirius weather panel Sirius weather can be displayed as ...

Страница 161: ...her details If pop up is enabled you can select a weather icon to display the identity of the observation If you select the pop up detailed information about the observation is displayed You can also display the detailed information from the menu when the weather icon is selected SiriusXM weather HDS Live Operator Manual 161 ...

Страница 162: ...hest intensity Rain From light green light rain yellow orange to dark red heavy rain Snow Blue Mixed Pink Sea surface temperature SST You can show the sea surface temperature as color shading or as text When color coding is selected the SST color bar is shown on the left side of the display You define how the color codes are used to identify sea surface temperature Refer to Adjustingcolorcodes on ...

Страница 163: ...om In the graphics below the wind comes from the northwest Wind speed is indicated by a combination of small and large barbs at the end of the wind tail Zero knots Indeterminate wind direction Small barb 5 knots Large barb 10 knots Arrow barb 50 knots If a combination of 5 and 10 knot barbs are shown on a tail then add them together to give you the total wind speed The example below shows 3 x larg...

Страница 164: ...re yellow Storm attributes Lightning Watch box location and warning Marine zone location Marine zone Depending on your selected subscription SiriusXM services includes access to weather reports for U S and Canadian marine zones with the exception of the high seas zones You can select a marine zone and view its forecast You can also select a marine zone as your current zone of interest to be notifi...

Страница 165: ...e weather conditions The amount of information available in the system depends on the amount of weather activity the more complex it is the less time is available for animation You can animate the past or the future depending on which weather view you have turned on with precipitation overlay you can animate for the past and only assume weather conditions in the immediate future with colored wave ...

Страница 166: ...watchbox is defined by the National weather service When the alarm for watchbox is turned on an alarm occurs when your vessel is entering or inside a watchbox 166 SiriusXM weather HDS Live Operator Manual ...

Страница 167: ...d from a remote unit Smartphones and tablets The Link app The Link app must be used to connect a phone or tablet to the MFD When connected the Link app on the phone or tablet can be used to Remotely view and control the system Back up and restore settings Back up and restore waypoints routes and trails The Link app can be downloaded from the relevant phone tablet application store Connecting via a...

Страница 168: ...is is set up as an access point The MFD must be in access point mode to broadcast itself If not already in access point mode you will be asked to switch to this mode when you select the connect option in the dialog The MFD network name SSID will be displayed as an available network in the phone tablet 168 Remote control of the MFD HDS Live Operator Manual ...

Страница 169: ...connected follow the instructions on the MFD and on the table phone to connect Managing wifi connected remotes You can change the access level and remove the wifi connected remote controllers LR 1 Remote control Configuring the keys on the LR 1 The key presses for the optional wireless remote must be configured before the unit can be used Remote control of the MFD HDS Live Operator Manual 169 ...

Страница 170: ...8 ft to configure the remote Select a key configuration from the drop down list for each of the keys you want to configure Operating the LR 1 Press the dedicated key on the LR 1 to remotely control the MFD A green LED on the remote flashes for each key press to indicate that the remote is connected and working 170 Remote control of the MFD HDS Live Operator Manual ...

Страница 171: ... does not support sending messages from connected Bluetooth devices Connecting and pairing a phone Ú Note Bluetooth must be enabled on your phone before you can connect to the MFD Ú Note If you want to pair a phone while another phone is connected to the MFD see ManagingBluetoothdevices on page 175 Ú Note You must always connect to a phone from the MFD not the other way around Use the phone icon t...

Страница 172: ...dialog To connect a paired phone select the phone you want to connect When the phone and the unit are connected a phone icon is shown on the home page Incoming messages and phone notifications will now pop up on the MFD Phone notifications After the phone and unit are paired and connected use the phone icon to display the list of messages and the call history 172 Using your phone with the MFD HDS ...

Страница 173: ...text message or to a phone call select the message or call you want to respond to All options displays the new message dialog Responding to an incoming call A call must be answered or rejected from the phone You can respond to an incoming call by a text message not available for iPhones Message settings You can define message templates and set how you want the alert to appear in the settings dialo...

Страница 174: ...hone is not connected to any other Bluetooth devices manually set the iPhone to allow notifications from the MFD Missing notifications By default the connection profile for the phone is set to auto The connection profile should be changed to alternative if one of the following issues occurs the phone is connected and the alert type is set to pop up or notification but there is either no alert or t...

Страница 175: ... Message settings on page 173 Text messages appearing on the iPhone but not on the MFD Check that the text app is not open and active on the iPhone Managing Bluetooth devices Bluetooth enabled devices within range are shown in the Bluetooth devices dialog Refer to Bluetoothdevices on page 181 Using your phone with the MFD HDS Live Operator Manual 175 ...

Страница 176: ...ptions for all available system alarms Vessels The status list displays status and available information for the following vessel types AIS DSC See details in AIS on page 153 Info Includes tide information for available tide stations a trip calculator displaying voyage and engine information and a dialog including sun and moon information for selected date and position Storage Access to the file m...

Страница 177: ...feature Settings System settings Language Controls the language used on this unit for panels menus and dialogs Changing the language causes the unit to restart Boat settings Used to specify the physical attributes of the boat Text size Used for setting the text size in menus and dialogs Default setting Normal Key beeps Controls the loudness of the beep sound when a key is pressed Tools and setting...

Страница 178: ...ol the format for latitude and longitude coordinates Magnetic variation Magnetic variation is the difference between true bearings and magnetic bearings caused by different locations of the Geographic and the Magnetic north poles Any local anomalies such as iron deposits might also affect the magnetic bearings When set to Auto the system automatically converts magnetic north to true north Select m...

Страница 179: ...isplays copyright information software version and technical information for this unit The Support option accesses the built in service assistant refer to Servicereport on page 188 Services Used for accessing web sites that provide feature services Navigation Used for defining navigation settings Refer to Navigating on page 60 Wireless settings Provides configuration and setup options for the wire...

Страница 180: ...o re enter a password This dialog also allows you to disconnect devices that no longer require access Wireless devices This dialog shows the available wireless devices Select a device to display additional details Remembered hotspots Displays hotspots the unit has been connected to in the past Advanced Tools are available within the software to assist in fault finding and setting up the wireless n...

Страница 181: ...so weak spots or problem areas can be identified The application must be installed on and run from a tablet device The unit must be running Iperf server before initiating the test from the tablet On exiting the page Iperf automatically stops running Bluetooth Enables the built in Bluetooth functionality Bluetooth devices Displays the Bluetooth device dialog Use this dialog to pair or remove pairin...

Страница 182: ... codes are used Color Importance Red Critical alarm Orange Important alarm Yellow Standard alarm Blue Warning Green Lite warning Alarm indication An alarm situation is indicated with an alarm pop up message a flashing alarm icon If you have enabled the siren the alarm message is followed by an audible alarm A single alarm is displayed with the name of the alarm as the title and details for the ala...

Страница 183: ...e in the alarm listing until the reason for the alarm has been removed Disable Disables the current alarm setting The alarm does not show again unless you turn it back on in the alarm settings dialog There is no time out on the alarm message or siren They remain active until you acknowledge the alarm or until the reason for the alarm is removed Alarm settings You enable or disable the alarm siren ...

Страница 184: ... all available alarm options in the system From this dialog you can set the alarm limit and enable or disable an alarm Active lists all active alarms with details History lists the alarm history with time stamp The alarms remain in the list until they are manually cleared 184 Alarms HDS Live Operator Manual ...

Страница 185: ... to clean the screen Use plenty of water to dissolve and take away salt remains Crystallized salt sand dirt etc can scratch the protective coating if using a damp cloth Use a light fresh water spray then wipe the unit dry with a micro fiber or a soft cotton cloth Do not apply pressure with the cloth To clean the housing Use warm water with a dash of liquid dish soap or detergent Avoid using abrasi...

Страница 186: ...files to the system file recordings music pictures PDF files this may reduce the allowed file size for the log file The system logs as much data as possible within the file size limitation and then it starts overwriting the oldest data Exporting NMEA log files The NMEA log file can be exported from the storage dialog When you select the log database you are prompted to select a destination folder ...

Страница 187: ... Note Some software update files might increase the available space in the unit If so you will be prompted to insert a memory card in the unit Ú Note Do not add software update files to a chart card Ú Note Do not turn off the unit or remote device until the update is completed or until you are prompted to restart the unit You start the update from the updates dialog Maintenance HDS Live Operator M...

Страница 188: ...r remote device until the update is completed or until you are prompted to restart the unit Service report The system has a built in service assistant that creates a report of the devices connected to the network s This includes information as the software version serial number and information from the settings file The service report is used to assist in technical support enquiries You can add sc...

Страница 189: ...abase as part of your back up routine Waypoints The waypoints option in the storage dialog allows for managing waypoint storage Export all waypoints The export option is used for exporting all waypoints routes trails and trips Export region The export region option allows you to select the area from where you want to export data 1 Select the export region option Maintenance HDS Live Operator Manua...

Страница 190: ...waypoint export User Data File version 6 Used to export waypoints routes and colored tracks trails User Data File version 5 Used to export waypoints and routes with a standardized universally unique identifier UUID which is very reliable and easy to use The data includes such information as the time and date when a route was created User Data File version 4 Best used when transferring data from on...

Страница 191: ...PX GPS Exchange no depth This is the format most used on the web that shares among most GPS systems in the world Use this format if you are taking data to a competitor s unit Exporting the settings database Use the settings database option in the storage dialog to export your user settings Maintenance HDS Live Operator Manual 191 ...

Страница 192: ...work the engines can be monitored and controlled from the unit When the feature is also enabled in the advanced settings features dialog A Mercury icon is added to the home page select it to display the engine instrument panel You can customize which data is displayed on the info panel Refer to Infopanels on page 102 A Mercury settings dialog is added use this dialog to change engine settings Merc...

Страница 193: ...layed on the info panel Refer to Infopanels on page 102 If the Yamaha system supports Troll Control a Troll button is added to the control bar Select this button to enable disable troll control and control the trolling speed For more information refer to the engine manual or the engine supplier Evinrude engine integration If an Evinrude engine control head is available on the NMEA 2000 network the...

Страница 194: ... Home page when a CZone system is available on the network A separate manual is provided with your CZone system Refer to this documentation and to the unit s Installation manual for how to install and configure the CZone system CZone dashboard When the CZone is installed and configured an additional CZone dashboard is added to the Info panels You switch between a panel s dashboards by selecting th...

Страница 195: ...so review PairingwithdualPower Poles on page 196 When the Power Pole controller is opened the system connects to paired Power Poles When the connection is confirmed the control buttons are enabled The Power Pole controller displays control buttons for each Power Pole that is paired to the unit Single press the AUTO buttons to raise and lower the Power Poles automatically all the way up and down Th...

Страница 196: ... allow connection from other units The Power Pole Settings dialog also provides the option to add or remove Power Poles This option opens the same Bluetooth Devices dialog you open from the Wireless settings dialog Refer to Bluetooth devices on page 181 Pairing with dual Power Poles If dual Power Poles are installed on your boat the one that is paired first automatically becomes Port and the secon...

Страница 197: ......

Страница 198: ... 988 12063 001 ...

Отзывы: