Lorex Vantage ECO BlackBox LH014 Скачать руководство пользователя страница 104

88

Mobile Apps: Accessing your DVR Using a Mobile Device

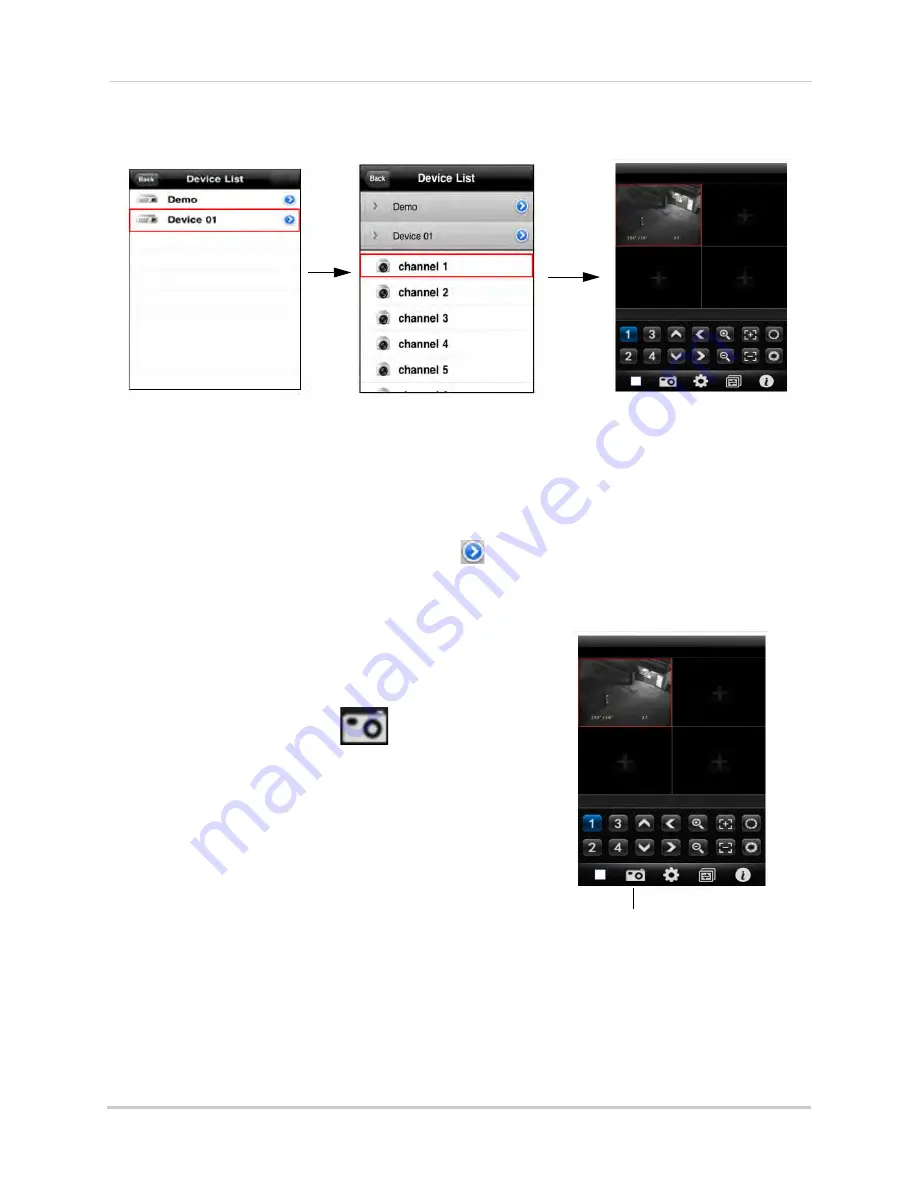
• The selected channel appears in the quad screen display.

TIP: 

Double-tap the channel to view video in full screen.

3

Repeat steps 1~2 as required for the remaining channels.

Deleting Accounts

• From the Device List, swipe your finger on 

 beside your device name. The Delete button 

appears. Touch the 

Delete

 button to remove the device.

Taking Snapshots

You can take a picture of the selected channel. The 
images save into your Photos directory. 

To take snapshots:

• Touch the camera button (

).

Touch the name of your DVR.

Select the desired channel.

The channel appears in quad 

Camera button

Содержание Vantage ECO BlackBox LH014

Страница 1: ...VIDEO SURVEILLANCE RECORDER LH010 ECO BLACKBOX SERIES Copyright 2012 Lorex Technology Inc Instruction Manual English Version 1 0 THE ECONOMICAL SOLUTION TO PROTECT YOUR HOME OR BUSINESS RETAIL INDUSTR...

Страница 2: ...FER SERVICING TO QUALIFIED SERVICE PERSONNEL The lightning flash with arrowhead symbol within an equilateral triangle is intended to alert the user to the presence of uninsulated dangerous voltage wit...

Страница 3: ...omer Service for warranty matters 1 888 425 6739 1 888 42 LOREX Tech Support for technical installation issues 1 877 755 6739 1 877 75 LOREX Mexico 001 800 514 6739 International 800 425 6739 0 Exampl...

Страница 4: ...comprend les renseignements sur les produits guides d utilisation guides de d part rapide et FAQ www lorextechnology com support En ligne 2 maneras sencillas de comunicarse con nosotros Norte Am rica...

Страница 5: ...ology com support If you require further installation assistance please visit www lorextechnology com installation or contact a professional installer Please note that once the components of this prod...

Страница 6: ...de ce produit vous ne pouvez pas retourner celui ci directement au maga sin sans son emballage original Favor de leer la gu a de instalaci n r pida y la gu a del usuario antes de instalar este produc...

Страница 7: ...f the obsolete outlet 5 Power Sources This product should be operated only from the type of power source indicated on the marking label If you are not sure of the type of power supplied toyourlocation...

Страница 8: ...moving covers may expose you to dangerous voltage or other hazards Refer all servicing to qualified service personnel 2 ConditionsRequiringService Unplugthisproduct from the wall outlet and refer serv...

Страница 9: ...ment does cause harmful interference to radio or television reception which can be determined by turning the equipment on and off the user is encouraged to try to correct the interference by one or mo...

Страница 10: ...can survive fire or extreme conditions Use product in accordance with the instructions provided All trademarks belong to their respective owners No claim is made to the exclusive right to use the trad...

Страница 11: ...em Information 6 Connecting Cameras 7 Installation Tips 7 Installing Cameras 7 Connecting BNC Cameras to your DVR 8 Connecting and Removing BNC Cables 8 Mouse Control 9 Remote Control 10 4 8 Channel R...

Страница 12: ...ing the Video Margin 31 Adding Privacy Zones 32 Record 33 Configuring Pre recording Settings 33 Configuring Backup File Duration Pack Duration 33 Configuring the Recording Schedule Continuous and Moti...

Страница 13: ...Address into the Browser 49 To connect using the DVR s local IP address on a PC 49 To connect to the DVR s local IP address on a Mac 50 Accessing your DVR Remotely over the Internet 51 Step 1 of 4 Por...

Страница 14: ...Auto Reboot 80 Lorex Player 11 Playing Backed up Video on PC 81 Installing Lorex Player 11 81 Running Lorex Player 11 81 Lorex Player 11 Interface Overview 82 About the Advanced Config menu 82 Lorex P...

Страница 15: ...A System Specifications 99 Appendix B Connecting a PTZ Camera 100 Configuring PTZ Settings 100 Using the PTZ Menu Local DVR 101 PTZ Presets and PTZ Cruise 101 Setting PTZ Presets 102 Selecting PTZ Pre...

Страница 16: ...xiv...

Страница 17: ...CD USB MOUSE ETHERNET CABLE REMOTE CONTROL may not be exactly as shown DVR DIGITAL VIDEO RECORDER HARD DRIVE SIZE NUMBER OF CHANNELS AND CAMERA CONFIGURATION MAY VARY BY MODEL PLEASE REFER TO YOUR PAC...

Страница 18: ...8 Channel 1 Video Input Connect BNC cameras 2 Video Output Outputs the DVR interface to a BNC connection This allows you to see your mouse cursor and have full control of the system on a secondary mo...

Страница 19: ...cursor and have full control of the system on a secondary monitor To switch the mouse and system interface between BNC and VGA monitors press 0 three times on the remote control NOTE Use a BNC to RCA...

Страница 20: ...DVR Step 3 Connect the Ethernet Cable Connect an ethernet cable included to the LAN port on the rear panel of the DVR Connect the other end of the ethernet cable to a router on your network Push and t...

Страница 21: ...the system loads a live display view Step 6 Verify Camera Image Power on the cameras and then verify the camera video quality before mounting the cameras to a permanent location Mountthecamerasunderas...

Страница 22: ...blank Mobile connectivity e g iPhone to the DVR User Name admin Password 0000 Quick Access to System Information To quickly open a window that displays vital system information right click click the...

Страница 23: ...eras 1 Mount the camera s to the desired mounting surface according to the instructions that came with the camera s Choose a firm mounting surface NOTE If you wish to mount cameras to drywall it is re...

Страница 24: ...camera power adapter to a power outlet Connecting and Removing BNC Cables BNC Bayonet Nut Connector is a special connector that locks on to the system port and cannot be accidently removed To connect...

Страница 25: ...ect a menu option During live viewing in Split screen View double click on a channel to view the selected channel in full screen double click the channel again to return to Split screen View 2 Right B...

Страница 26: ...ute audio during Live Viewing and Playback Mode 5 Playback Controls In Playback Mode press to fast forward increase fast forward speed In Playback Mode press to rewind increase rewind speed In Live Vi...

Страница 27: ...ions In Live Viewing Mode press to access System Information 3 MENU ESC Press to open the system menu In menus press to go back exit menu MUTE In Live Viewing and Playback Modes press to mute un mute...

Страница 28: ...rding M motion recording 3 Channel number Channel title Displays channel number or channel title To rename the channel number to a title see Configuring Custom Channel Names on page 30 C M C C 1 Date...

Страница 29: ...hannel Models Only Opens digital zoom Must be in Full screen Live Viewing Mode Record Search Opens the DVR Search Menu This allows you to search for video recorded on the DVR Start Stop Recording Star...

Страница 30: ...sing the mouse click on an option or field such as the User ID and Password fields if passwords are enabled The Virtual Keyboard opens Click Shift to switch between upper and lowercase letters Click t...

Страница 31: ...Bar and select the Zoom button A Zoom icon appears on the screen 3 Click and drag on the area of the screen you would like to enlarge The image zooms in on the selected area The box in the lower right...

Страница 32: ...other channel PIP1X2 shows 1 channel in full screen and 2 other channels Picture in Picture Mode opens To change the full screen channel click anywhere in the main viewing area To change the smaller c...

Страница 33: ...al DST Click the Setup button next to DST to configure automatic Daylight Savings Time adjustments Optional NTP Click the Setup button next to NTP to synchronize your DVR s time and date with a Networ...

Страница 34: ...button 2 Configure the following Daylight Saving Time Select Enable Time Offset Select the number of hours the system should move forward or backward when DST occurs Daylight Saving Time Mode Select...

Страница 35: ...e To enable NTP 1 Right click to open the Menu Bar and click the Main Menu button 2 Click System Beside NTP click Setup 3 Configure the following Enable Select Enable Server Address Select ntp lorexdd...

Страница 36: ...data For more details see Configuring Hard Drive settings on page 42 Event Recording The system also includes motion recording Recording Motion The system records when motion is detected by the camer...

Страница 37: ...rch tab opens 2 Configure the following CH Select the channel you wish to search Select All to search all channels Search Date Enter the month date and year you wish to search for video Playback Time...

Страница 38: ...button Your search results appear in the calendar In the top portion of the calendar results are shown for each day in the month In the bottom portion results are shown for each hour in the selected...

Страница 39: ...to the Search Menu Backing Up Video You can back up video to a USB flash drive not included connected to the DVR To back up video 1 Connect a USB flash drive to one of the USB ports on the DVR 2 Right...

Страница 40: ...Player 11 Playing Backed up Video on PC on page 81 or see Lorex Player for Mac Viewing Backed up Video on Mac on page 83 Converting Backed Up Video to AVI Files The DVR saves its backup files as propr...

Страница 41: ...d then locate the backed up video file on your hard drive 3 Select the desired file format 264 h 264 All File that you wish to search for Click Open 4 Click Start to convert and save the file in the d...

Страница 42: ...ble passwords you must select a 6 digit ADMIN password By default the system password is disabled Enabling and Changing Passwords You can change the system password of the ADMIN and the USER from the...

Страница 43: ...ultiple users to log in to the system When adding different users you can assign what menus they have access to For example you may want your friend to monitor your system while you are away while not...

Страница 44: ...e system from prompting you for a user or admin password during log in Password Enter your desired password Confirm Re enter the password 7 Click Apply to save your settings Now you can log in to the...

Страница 45: ...ra color settings camera title video output 2 Search Search for recorded video and log files on the system 3 Alarm Configure motion detection settings 4 System Configure system time and user accounts...

Страница 46: ...t hand corner D L Lower left hand corner U R Upper right hand corner D R Lower right hand corner OFF Do not display the channel name 4 Optional Use the drop downs next to Copy to copy settings to anot...

Страница 47: ...tedly to exit all menus The DVR prompts you to restart Click OK 5 The DVR restarts and asks you to confirm the new resolution Click Yes to confirm or No to revert to the old resolution If you do nothi...

Страница 48: ...Channel Select the channel you wish to configure Privacy Zone Select Enable to enable privacyzonesorDisabletodisableprivacy zones Area Setup Select the Area1 4 checkboxes to enable up to 4 privacy zon...

Страница 49: ...ngs Changing the file size changes the duration of backed up files For example if you select 15 minutes as your file size the system stores video files in 15 minute durations Configuring the Recording...

Страница 50: ...ion and video frame rate 1 Click the MainStream tab 2 Under the Quality drop down menu select from Good Better or Best to adjust the quality of recordings on each channel 3 Under the Resolution drop d...

Страница 51: ...ar to see the video available for that date 6 Click on the hour of the video you want to play back 7 Select the channel or channels you want to play back 8 Click Play to begin playback Video Playback...

Страница 52: ...ideos that are marked as Alarm or Continuous recording type This allows you to quickly and easily sort though videos that only have alarm attributes NOTE Videos are not marked as Alarm unless continuo...

Страница 53: ...stem has the ability to operate in DHCP mode and Static IP mode DHCP allows the router to assign an IP to the DVR Static IP mode fixes the IP of the DVR Fixing an IP of the DVR ensures that the IP wil...

Страница 54: ...Client Port enter the desired Client Port default 9000 NOTE 9000 is represented as 09000 3 In HTTP Port enter the desired HTTP Port default 80 4 Click Apply to save your settings 5 Right click to exit...

Страница 55: ...e DVR will send out email notifications every 3 minutes until the DVR stops detecting motion The DVR will only send out notifications when it detects motion triggers 5 Click Apply to save your setting...

Страница 56: ...our settings 5 Right click until you have exited all menus You will be prompted to restart Configuring DDNS settings You must create a DDNS account and enter your DDNS settings into the DVR before you...

Страница 57: ...he system to display a system message when an alarm triggers Buzzer Select the duration the system will beep when motion is detected Or select OFF to disable the beep during motion events Send Email S...

Страница 58: ...ding or linear recording 1 Select the HDD tab 2 Select the checkbox beside the hard drive you wish to configure 3 In the Overwrite drop down menu select Auto recommended or select the desired duration...

Страница 59: ...Language drop down menu select your desired system language 2 Click Apply to save your settings 3 Right click until you exit the menu Follow the on screen instructions to restart your system Changing...

Страница 60: ...able the Auto Reboot feature 1 Select the Maintain tab 2 Configure the following Auto Reboot Select Enable or Disable to activate or deactivate the Auto Reboot feature Reboot In the drop down menu sel...

Страница 61: ...to open the Menu Bar and click the Main Menu button 5 Click Advanced 6 Click Firmware Update 7 Follow the on screen instructions to update the firmware Do not remove the USB flash drive or power off t...

Страница 62: ...To configure system warnings 1 Click the Events tab 2 Configure the following Event Type Select the event that triggers the system to send out a notification Choose from Disk No Space low hard drive s...

Страница 63: ...connects to the system remotely there may be slow performance when accessing the system locally This is normal and not a malfunction Description Requirement CPU Pentium 4 or above Operating System Wi...

Страница 64: ...tep 1 of 3 Connect your DVR to the Local Area Network 1 Power off your DVR by disconnecting the power adapter 2 Connect an Ethernet cable included to the LAN port on the rear panel of the DVR Connect...

Страница 65: ...ocal network on a PC or Mac To connect using the DVR s local IP address on a PC 1 Open Internet Explorer NOTE If you are connecting using Internet Explorer 9 you must use the 32 bit version From the S...

Страница 66: ...If you are having difficulty logging into your system using Internet Explorer it is recommended to use the Client Software provided on the CD or as a free download from www lorextechnology com For in...

Страница 67: ...own above 8 Enter the DVR username and password to log in to the system By default the username is admin and the password is left blank Accessing your DVR Remotely over the Internet Setting up remote...

Страница 68: ...on your router to your DVR s IP address by following your router manufacturer s instructions For more information on port forwarding see the reference guides on www lorextechnology com NOTE If the abo...

Страница 69: ...o create a new account fill in the required fields on the right and click Create Account 3 Click Warranties to register your product for warranty NOTE Warranty registration is required to register for...

Страница 70: ...ion and click Create Address 6 Fill in the warranty registration form with your product and purchase details Check the sticker underneath your DVR for the Product Model Number and Serial Number Click...

Страница 71: ...e This is used to identify this device in your list of activated DDNS accounts that appears anytime you visit the DDNS page MAC Address Enter the MAC address of your Lorex product Right click and then...

Страница 72: ...nd click the Main Menu button 2 Click Network and select the DDNS tab 3 In the DDNS drop down menu select Enable Beside Server select LOREXDDNS default 4 Under Domain Name enter your Domain name URL R...

Страница 73: ...ou have entered your DDNS address into Internet Explorer or Safari enter the DVR user name and password at the login screen and click Login NOTE To log in remotely the default user name is admin The p...

Страница 74: ...desktop The DVR login screen appears 3 Configure the following IP Address Enter the DDNS address or local IP address of your DVR The DDNS address must include the URL Request you created when you reg...

Страница 75: ...igation Tabs Allows you to access the following tabs Live Watch live video Playback View saved video footage Remote Setting Configure system and networking options Local setting Configure where local...

Страница 76: ...Screen Main display screen for live viewing and playback You can also drag the screens to any desired position 7 PTZ Controls PTZ Pan Tilt Zoom control for connected PTZ cameras not included Changing...

Страница 77: ...ght corner 2 Click the Security tab 3 De select Enable Protected Mode 4 Click Apply to save your settings 5 Refresh Internet Explorer Recording Video You can record video footage directly onto your lo...

Страница 78: ...viewing video in its original aspect ratio To open the sub menu 1 Right click on a desired channel A sub menu opens 2 Click on one of the following Show Bit rate Displays video bit rate Original Propo...

Страница 79: ...from your DVR as an avi file This does not affect the format of video files that are backed up locally on the DVR i e using a USB flash drive NOTE This feature is not available via Mac 1 Click the Lo...

Страница 80: ...us and iris control of the camera Direction keys Click to pan and tilt the camera Speed Slider Increase or decrease the pan and tilt speed Preset Cruise Video Tab Use the Preset tab to configure camer...

Страница 81: ...ed month year and date 3 Under the Type drop down menu select the desired recording type you wish to search for Continuous Alarm or All 4 Select the channels you wish to search Check Synchronous playb...

Страница 82: ...ard button to advance the video by 1 frame Video Slider Drag the slider control the playback speed Download Content Allows you to download recorded videos to your computer hard drive To download video...

Страница 83: ...r hide the record time on the remote display 3 Click Save to apply your settings Configuring Privacy Zone Settings You can blank out a certain portion of the channel with a black box To configure a pr...

Страница 84: ...select 15 minutes then every file will contain 15 minutes of footage Pre record Select whether to enable or disable pre recording 3 Click Save to apply your settings Configuring the Recording Schedule...

Страница 85: ...k Copy to copy the schedule 6 Click Save to apply your settings Configuring System Recording Quality 1 Click the Remote Setting tab and click Record MainStream 2 Configure the following Channel Select...

Страница 86: ...it the IP address Subnet Mask Gateway and DNS settings AutoPortForwarding Select EnableorDisabletoenableordisabletheAutoPortForwarding feature 3 Click Save to apply your settings Configuring the Syste...

Страница 87: ...op down menu select Default to use the default Lorex email server recommended or select Custom to use your own custom SMTP email server If you want to use Lorex s email server recommended 1 In the Sen...

Страница 88: ...new email notification 2 Click Save to save your settings Changing the Mobile User Name and Password You can change the User Name and Password used to connect to the system with a mobile device To ch...

Страница 89: ...User Name that was emailed to you after DDNS registration Password EnteryourDDNSDevicepasswordthatwasemailedtoyouafterDDNSregistration 3 Click Save to apply your settings Configuring Motion Detection...

Страница 90: ...for motion 4 Click Save to apply your settings Configuring your System to Beep During Motion You can set your system to beep during motion This is useful to notify you if someone enters or exits an ar...

Страница 91: ...system should retain data For example if you select 30 days the hard drive will begin to overwrite itself after 30 days Note that hard drive size determines the duration of hard drive recording 3 Cli...

Страница 92: ...configure the system time and date 1 Click the Remote Setting tab and click System General 2 Configure the system format and time System Time Enter the desired system time and date An on screen calen...

Страница 93: ...ired user you wish to configure i e user1 User name Enter the desired user name Password Enter the desired user password Confirm Re enter the user password Active Select Enable or Disable to activate...

Страница 94: ...age at www lorextechnology com To upgrade the system firmware 1 Download and extract the file to your computer s desktop 2 Click the Remote Setting tab and click Advanced Firmware upgrade 3 Beside Upg...

Страница 95: ...notify you if there is a potential system problem To configure the system event settings 1 Click the Remote Setting tab and click Advanced Events 2 Configure the following Event Type Configure the ty...

Страница 96: ...ability To configure Auto Maintain 1 Click the Remote Setting tab and click Advance Maintain 2 Click the Auto Reboot drop down menu and select Enable or Disable to activate or deactivate the auto rebo...

Страница 97: ...quisites Back up video files from the DVR to your local hard drive Installing Lorex Player 11 1 Insert the software CD that comes included with the system 2 Click DVR Software Lorex Player PC Follow t...

Страница 98: ...ptures are stored To open the Advanced Config menu 1 Click the button 2 Click Select to change the snapshot save folder Then select the folder and click OK 3 Click OK to save changes Click here to ope...

Страница 99: ...te to the product page for your DVR model and download Backup Player for MAC 3 Extract the file and double click the Lorex Mac Player installer pkg file Follow the on screen instructions to install th...

Страница 100: ...ur Home folder dvr 3 Double click the video file in the playlist to begin playback Loading Multiple Video Files You can load an entire folder of video files To load multiple video files saved onto you...

Страница 101: ...bile Port Number of your DVR The Mobile Port default 1025 must be port forwarded before you can connect using a mobile device To find your Mobile port right click click the Main Menu button and then c...

Страница 102: ...App 1 In the App Store search for Lorex Mobile Eco 2 Touch the Free button iPhone or Install button iPad and then touch Install to download the app Enter your App Store password if required The App i...

Страница 103: ...rthenumberofchannelsoftheDVR 4 8 or 16 4 Touch the OK button and then touch the Back button Step 3 of 3 Connecting to your DVR 1 In Quad View touch the plus button If a channel is already selected tou...

Страница 104: ...ing channels Deleting Accounts From the Device List swipe your finger on beside your device name The Delete button appears Touch the Delete button to remove the device Taking Snapshots You can take a...

Страница 105: ...l List Touch to view channel in full screen 3 Pan Tilt camera PTZ only 4 Zoom in out PTZ only 5 Focus PTZ only 6 Iris PTZ only 7 Disconnect Disconnects channel 8 Snapshot Takes an image of the channel...

Страница 106: ...device s user s manual or the manufacturer s support site 1 Touch the Google Play Store icon in your Applications list 2 Press the search button 3 Enter Lorex Mobile Eco and then press the search butt...

Страница 107: ...5 In Quad View touch Touch the name of your DVR and select the channel you would like to display in the space in Quad view 1 Some routers may prevent you from connecting to your DVR using a DDNS addr...

Страница 108: ...rry apps consult your BlackBerry s user s manual or www blackberry com for support 1 Go to www lorextechnology com and search for the model number of your DVR look at the label underneath the DVR for...

Страница 109: ...DDNS address of the DVR e g tomsmith lorexddns net 1 Port Enter the Mobile Port number of the DVR by default port 1025 No of CHs Select the number of channels of your DVR User ID Enter the mobile acc...

Страница 110: ...APN Access Point Name on your Blackberry Contact your service provider for your Blackberry s APN name NOTE The instructions below may differ based on the model of your Blackberry smartphone For suppo...

Страница 111: ...enu 2 Select Advanced Options TCP IP 3 Select the checkbox beside APN Settings to enable APN 4 Beside APN enter your APN You must obtain the APN from your local service provider 5 Exit to save your se...

Страница 112: ...bile s user s manual or www microsoft com windowsphone for support Step 2 of 2 Configuring and Connecting to Lorex Mobile Eco 1 Open the Lorex Mobile Eco app on your phone 2 Click the Setting button 3...

Страница 113: ...p 1 Go to www lorextechnology com and search for the model number of your DVR look at the label underneath your DVR for the model number 2 Navigate to the product page for your model and download the...

Страница 114: ...5 User Name Enter the DVR s user name by default admin Password Enter the DVR password by default 0000 Alias Enter a DVR name of your choice 4 Save your settings From the main viewing window press the...

Страница 115: ...A System Specifications As our products are subject to continuous improvement Lorex Technology Inc and its subsidiaries reserve the right to modify product design specifications and prices without not...

Страница 116: ...ead screwdriver to loosen the screws above the RS485 ports then insert the cables and tighten the screws to secure cables 3 Connect the video cable to a BNC port Configuring PTZ Settings Before you ca...

Страница 117: ...s 4 Click Apply to save your settings Using the PTZ Menu Local DVR To control the PTZ camera locally on your DVR 1 Select the channel that the PTZ camera is connected to 2 Right click and press the PT...

Страница 118: ...ting PTZ Presets 1 In the No field select the number of the preset you would like to select 2 Click Go to to go to the preset Deleting PTZ Presets 1 In the No field select the number of the preset you...

Страница 119: ...location e g a back office The mouse and system interface are shown on either the VGA or BNC monitor Press 0 on the remote control three times to switch the mouse and system interface between VGA and...

Страница 120: ...ort marked 1 16 channel model Connect the BNC video cable from the camera to BNC Video INPUT port 1 or 2 2 Connect the RCA audio cable from the camera to the corresponding Audio INPUT 3 Right click to...

Страница 121: ...re available at www lorextechnology com Removing the Hard Drive To remove the hard drive 1 Remove the screws from the side panels 1x per panel and from the rear panel x3 of the cover 2 Gently slide th...

Страница 122: ...of the way 2 Place the hard drive with the power and data connectors facing left if looking at the DVR from the front and then slide the hard drive to the right 3 Reconnect the power and data cables E...

Страница 123: ...o open the Menu Bar and click the Main Menu button 2 Click Device 3 Click the checkbox under Select to choose the drive you wish to reformat 4 Click Format HDD Enter the system password 5 When the war...

Страница 124: ...o another outlet Test the outlet with another device such as a lamp or phone charger 16 channel only Power switch is set to OFF position Confirm that the power switch is in the ON I position Remote co...

Страница 125: ...the rear panel There is no picture on selected channels camera picture is not being displayed Camera cables are loose or have become disconnected Check the camera video cable and connections Disconnec...

Страница 126: ...structions under Step 3 of 4 Enable DDNS on the DVR on page 56 DDNS address not entered correctly If connecting through client software enter the URL request from the confirmation email and then lorex...

Страница 127: ......

Страница 128: ...R15 EXPAND AND CUSTOMIZE YOUR SYSTEM WITH A FULL RANGE OF CAMERAS ACCESSORIES Accessories www lorextechnology com Specialty Cameras Wireless Cameras Dome Cameras Digital Video Recorders Simulated Came...

Отзывы: