background image

Replacing the Hard Drive

21

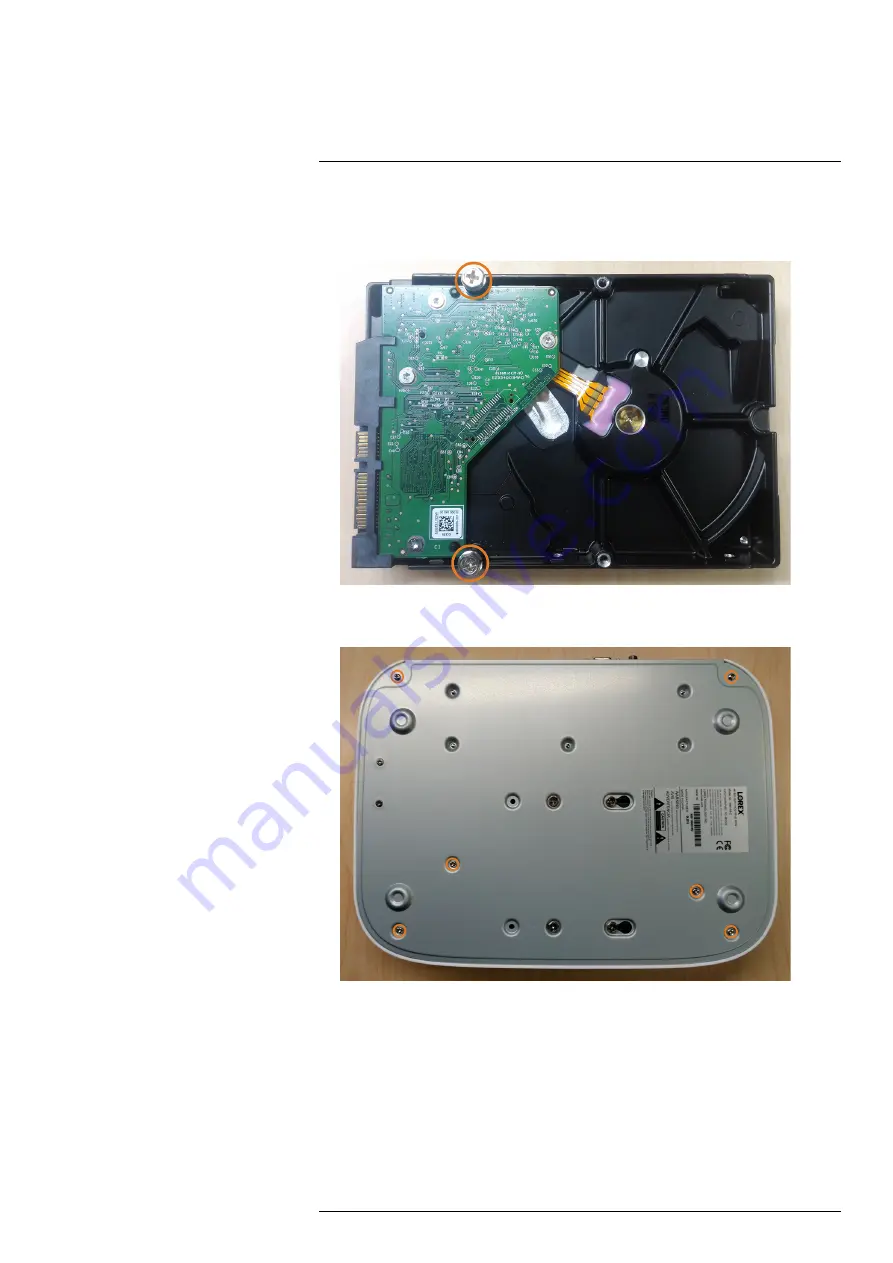
To install a new hard drive:

1. Insert the 2 hard drive screws closest to the SATA and power ports on the hard drive and

tighten them half way.

2. Power off the system, and unplug all cabling from the system.
3. Turn the recorder over. Remove the bottom panel screws (6×).

#LX400113; r. 9.0/57191/57191; en-US

96

Содержание N862 Series

Страница 1: ...User Manual N862 Series...

Страница 2: ......

Страница 3: ...User Manual N862 Series LX400113 r 9 0 57191 57191 en US iii...

Страница 4: ...NG TO QUALIFIED SERVICE PERSONNEL The lightning flash with arrowhead symbol within an equilateral triangle is intended to alert the user to the presence of uninsulated dangerous voltage within the pro...

Страница 5: ...g the Date Time 16 8 Using the On Screen Display 17 8 1 Navigation Bar 17 8 2 Quick Menu 17 8 3 Camera Toolbar 19 8 4 On Screen Keyboards 19 8 5 Camera Image Settings 20 9 Recording 22 9 1 Video Recor...

Страница 6: ...enu Overview 57 17 2 Setting the Monitor Resolution Display 57 17 3 Configuring Sequence Mode 58 17 4 Camera Menu 59 17 4 1 Viewing Camera Status 59 17 4 2 Camera Firmware Versions 60 17 4 3 Upgrading...

Страница 7: ...g a New Hard Drive 95 22 DDNS Setup Advanced 99 22 1 STEP 1 Port Forwarding 99 22 2 STEP 2 Create a Lorex Account 99 22 3 STEP 3 Activate Your Warranty 100 22 4 STEP 4 Sign Up for a DDNS Account 100 2...

Страница 8: ...Table of contents 25 3 Modification 110 25 4 RoHS 110 25 5 ICES 003 110 LX400113 r 9 0 57191 57191 en US viii...

Страница 9: ...ected to this product should bear the UL listing mark or CSA certification mark on the accessory itself and should not be modified so as to defeat the safety features This will help avoid any potentia...

Страница 10: ...r or heat register This product should not be placed in a built in installation such as a bookcase or rack unless proper ventilation is provided and the product manufacturer s in structions have been...

Страница 11: ...duct manufacturer can prevent fire electric shock or other hazards 4 Safety Check Upon completion of any service or repairs to this product ask the service technician to perform safety checks recommen...

Страница 12: ...pter Ethernet Cable USB Mouse HDMI Cable NOTE Hard drive size number of channels and camera configuration may vary by model Please refer to your package for specific details Check your package to conf...

Страница 13: ...back of the unit must be turned on to use the front panel power button 3 2 Back Panel 1 Power Input Connect the included AC power cable 2 Power Switch Press to power the system on off 3 PoE Video Inpu...

Страница 14: ...Recorder Overview 3 10 HDMI Connect to an HDMI monitor or TV not included using the included HDMI cable to view the system interface LX400113 r 9 0 57191 57191 en US 6...

Страница 15: ...d with your cameras Option 2 Connect Cameras to Local Network You can also connect your IP cameras to your local network for flexible installations For details see 4 8 Connecting Cameras to the Local...

Страница 16: ...cluded power adapter to connect the recorder to a nearby outlet 4 6 STEP 6 Upgrade Firmware to Latest Version If Available If a firmware upgrade is available you will be asked to install it once the s...

Страница 17: ...ndow This window contains vital system information including the model number serial number and device ID NOTE The QR code shown on this screen can be scanned during mobile setup to enter the system s...

Страница 18: ...steps below to connect the cameras to the NVR over the LAN NOTE Compatible with Lorex HD IP cameras For a list of compatible cameras please visit lorex com compatibility Step 1 of 2 Option A Connecti...

Страница 19: ...lick and select Device Search 2 Click Device Search The system searches the network for compatible cameras NOTE It may take a few minutes after you power up IP cameras for them to appear in your searc...

Страница 20: ...or telephone lines Secure cabling so that it is not exposed or easily cut Mount the camera in an area that is visible but out of reach Avoid pointing the camera at a glass window to see outside This m...

Страница 21: ...well as pro vide power to the camera without the need for a power adapter You can also connect cameras to a network switch or router see 4 8 Connecting Cameras to the Local Area Network LAN page 10 fo...

Страница 22: ...Camera Installation 5 NOTE Connect up to two Wi Fi products to NVRs Further Wi Fi devices can still be used through the Lorex Home App LX400113 r 9 0 57191 57191 en US 14...

Страница 23: ...mode click an individual channel to view it in full screen Click again to return to the split screen display mode While navigating menus click to open a menu option 2 Right button During live view ri...

Страница 24: ...System Time enter the current time and select your time zone Then click OK 4 Check the DST check box to enable auto Daylight Savings Time updates NOTE You can adjust the Start Time and End Time for D...

Страница 25: ...20 8 Playback Opens the Playback Menu This allows you to search for video recordings saved on the recorder s hard drive For details on using the Playback menu see 10 Playback page 27 9 Alarm Status Vi...

Страница 26: ...ettings for Pan Tilt Zoom PTZ cameras For full instructions on connecting and using PTZ cameras see page 4 Viewing Modes Select how many channels are shown on screen during live viewing 5 Camera Regis...

Страница 27: ...s page 85 to set a custom playback length 2 Digital Zoom Click to enable digital zoom Click and drag over the camera image to zoom in on the selected area Right click to return to the full camera imag...

Страница 28: ...a field where numeric characters are entered such as the date or time fields The Number Keyboard opens Right click to close the Number Keyboard 8 5 Camera Image Settings Use the Camera Setting menu t...

Страница 29: ...ims the brightest areas of the image to make them clearer Off Disable this function Day Night Mode This setting sets the camera s day night mode Select Auto for the camera to automatically determine w...

Страница 30: ...otion event of a person or vehicle is being recorded For more details on configuring smart motion detection of peo ple and or vehicles see 14 Smart Motion Detection page 45 9 2 Configuring Recording Q...

Страница 31: ...andwidth Bit Rate Type Select CBR Constant Bit Rate or VBR Variable Bit Rate to determine the bit rate type If you select VBR select the Quality from 1 lowest to 6 highest Bit Rate Kbps Select the bit...

Страница 32: ...s you to quickly change multiple schedules at once To make fine adjustments to a schedule click This will allow you to set exact start and end times for a schedule To disable all recording of the sele...

Страница 33: ...Stream continuously as long as this option is checked Stop The system will not record the Sub Stream for this channel This option is not recommended 4 Under Snapshot select Enable to enable snapshot...

Страница 34: ...on the side panel 3 Ensure HDD Full is set to Overwrite to overwrite the oldest recordings when the hard drive is full NOTE Select Stop Record for the system to stop recording when the hard drive is f...

Страница 35: ...yback 3 Check the channels you want to play back Click the icons to the right of each channel name to choose the video quality for Main Stream for Sub Stream 4 Click inside the video bar to select the...

Страница 36: ...e List Shows all available recordings for the selected date and channel s in list format 5 Playback Bar Time Scale Select the length of the time period shown on the playback bar 6 Recording Type Filte...

Страница 37: ...image You can then repeat to zoom in on a different area or click the icon again to disable zoom Show Hide Smart Search Rules Click to show hide active areas for smart detec tion of people and vehicl...

Страница 38: ...n playing back video from the selected time 5 Click to configure an area for the search 6 The icon changes to and the camera image appears with a grid overlay Click or click and drag to add remove squ...

Страница 39: ...k Click the icons to the right of each channel name to choose the video quality for Main Stream for Sub Stream 5 Click inside the video bar to select the playback time The system will begin playing ba...

Страница 40: ...11 Backup page 33 To play back video from a USB flash drive 1 Connect the USB thumb drive not included with video files on it into a free USB port on the recorder 2 From the Live View display right c...

Страница 41: ...e USB device will permanently erase all data This step cannot be undone Prerequisite Connect a USB flash drive not included to a free USB port on the unit To format a USB flash drive 1 From the Live V...

Страница 42: ...re cording types Channel Select the channel you would like to search or select All to search all channels Start Time End Time Select the start and end time for your search File Format Select DAV to s...

Страница 43: ...same time OR Click to open a backed up video file in another location 3 Use the Lorex Player controls to control playback or select other files for playback NOTE For a full overview of Lorex Player c...

Страница 44: ...deos at the same time OR Click to open a backed up video file in another location 5 Use the Lorex Player controls to control playback or select other files for playback NOTE For a full overview of Lor...

Страница 45: ...the video file 7 Add Files Click to open backed up video files 8 Export Files Export a video file to a different format 9 Digital Zoom Click then click and drag over a camera image to zoom in Right c...

Страница 46: ...mera was not significant enough to trigger mo tion recording See 12 2 Configuring Motion Detection page 38 to configure settings for mo tion detection and recording Motion recording Motion triggered v...

Страница 47: ...ge to reveal zone selection You can set up to 4 different zones with different sensitivity and threshold values Right click when finished 6 Click Set next to Schedule to choose which days and times of...

Страница 48: ...d on the se lected channel Set the length of recording following a video loss event in the Post_REC field Anti dither After an initial motion event the system will continue to record video if a second...

Страница 49: ...rens manually using the recorder or Lorex Home connectivity software see 13 2 Manually Activate Deterrence Features page 43 For a complete list of compatible deterrence cameras navigate to your record...

Страница 50: ...can manually activate the warning light and siren without enabling automatic warning light triggering 5 Click Set next to Area to set an active area for automatic deterrence The camera image appears...

Страница 51: ...ning light will stay on when motion is detected Select Warning Light for a solid white light or Strobe for a flashing light If you select Strobe set how quickly the light will flash under Strobe Frequ...

Страница 52: ...Active Deterrence 13 From the Live View display click on the Navigation Bar LX400113 r 9 0 57191 57191 en US 44...

Страница 53: ...on compatible Lorex deterrence cameras for an added level of smart security 14 1 Ensuring Accurate Person Vehicle Detection The following are important camera installation notes to ensure accurate Pe...

Страница 54: ...Smart Search Smart Search lets you filter recorded video to search for person detection events vehicle detec tion events or both NOTE In order to use Smart Search you must configure at least one chann...

Страница 55: ...ring Active View Track motion that is detected by following and zooming in on the moving object To configure the active view settings 1 From the Live View display right click to open the Quick Menu th...

Страница 56: ...annel and select channels you want to enable face detection on To configure face detection 1 From the Live View display right click to open the Quick Menu then click Main Menu 2 Click EVENTS then clic...

Страница 57: ...n the alarm is triggered including Record Channel Select the channels that will record when a face is detected on the se lected channel Set the length of recording following a video loss event in the...

Страница 58: ...to back up events USB flash drive required not included To perform smart search on face detection events 1 From the Live View display right click to open the Quick Menu then click Main Menu 2 Click E...

Страница 59: ...cess to system settings and camera feeds 16 1 1 Changing Passwords You can change the system password of the administrator and user accounts To change an account password 1 From the Live View display...

Страница 60: ...menus they have access to For example you may want your friend to monitor your system while you are away while not giving full access to your system To add a user 1 From the Live View display right c...

Страница 61: ...From the Live View display right click to open the Quick Menu then click Main Menu 2 Click ACCOUNT then click the User tab on the side panel 3 Click next to the account you want to modify 4 Update acc...

Страница 62: ...em tab select the menus the user account may access Under the Playback tab select which channels the user account may access recorded video from Under the Covert tab select the channels the user accou...

Страница 63: ...eeded then click OK 16 2 3 Deleting Groups Remove a group To delete a group 1 From the Live View display right click to open the Quick Menu then click Main Menu 2 Click ACCOUNT then click the Group ta...

Страница 64: ...ain menu From the Live View display right click to open the Quick Menu then click Main Menu OR From the Live View display hover the mouse near the bottom of the screen then click on the Navigation Bar...

Страница 65: ...click to open the Quick Menu then click Main Menu 2 Click DISPLAY then click the Display tab on the side panel 3 Under Resolution select the correct resolution for your monitor 4 Click Apply to save c...

Страница 66: ...ive display Face detec tion must be enabled on the correlating channel Original Scale Set the system to show the true aspect ratio of the cameras on the live display This may add black bars on the top...

Страница 67: ...start with View 1 and make your way to View 9 By default all viewing modes are included in the Sequence mode cycle 6 Configure the order of channels shown on screen for each viewing mode Uncheck chann...

Страница 68: ...17 4 3 Upgrading Camera Firmware You can update the firmware for connected IP cameras through the NVR Firmware upgrades provide enhanced functionality for the cameras Typically a camera firmware upgra...

Страница 69: ...lete before turning off or unplugging the cameras or NVR The cam eras will restart during the firmware update process 17 4 4 Configuring Video Overlay Settings The Overlay tab allows you to configure...

Страница 70: ...ay tab on the side panel then click the Privacy Masking tab on the top panel 3 Under Channel select the camera you would like to configure 4 Check Preview or Record Preview means the privacy mask zone...

Страница 71: ...to take snapshots only when triggered by motion de tection snapshot recording must be enabled in the motion detection menu see 12 Mo tion Detection page 38for details Image Size The image size is the...

Страница 72: ...number IP address and firmware version To access the Version Info menu 1 From the Live View display right click to open the Quick Menu then click Main Menu 2 Click INFORMATION then click the Informati...

Страница 73: ...el 17 5 3 BPS Shows bitrates of connected cameras The bitrate is the amount of data the camera is sending to the system To access the BPS menu 1 From the Live View display right click to open the Quic...

Страница 74: ...s that are currently detecting motion is shown The following alarms are shown in the Alarm Status menu Motion Detect Shows channels with active motion alarms Smart Motion Shows channels with active sm...

Страница 75: ...our system is sending and receiving To access the network load menu 1 From the Live View display right click to open the Quick Menu then click Main Menu 2 Click INFORMATION then click the Network tab...

Страница 76: ...ings NOTE This function only saves settings created in system menus It does not save or backup any video To save your system configuration to a USB thumb drive 1 From the Live View display right click...

Страница 77: ...uration was saved e g Con fig_20140425103727 5 Click Import to restore the system configuration 6 Click OK to confirm The system will restart to complete the operation 17 5 10 Restore Default Settings...

Страница 78: ...u then click Main Menu 2 Click INFORMATION Click the Update Reset tab on the side panel then click the Up grade tab on the top panel 3 Click System Upgrade 4 Click on the bin firmware file for your re...

Страница 79: ...n a static IP address advanced users only 4 If you uncheck DHCP configure the following IP Version Select IPv4 or IPv6 MAC Address Enter the MAC address you would like to assign to the system Make sur...

Страница 80: ...to 3 devices may connect to the system at the same time 17 6 3 Configuring Email Alerts You can configure the system to send out email alerts for motion detection or other events NOTE To send out moti...

Страница 81: ...ct Enter the subject line for the email alert Attachment Check to include an image attachment of the camera NOTE You must enable the Snapshot option for motion detection on each camera you would to re...

Страница 82: ...or motion detection on each camera you would to receive attach ments For details see 12 Motion Detection page 38 Encrypt Type Select SSL or TLS if your server uses encryption Select None if your serve...

Страница 83: ...t 17 6 5 P2P Setting The P2P Setting menu is used only to enable disable remote access to the system using a P2P connection CAUTION P2P connection is the primary method used for remote access to your...

Страница 84: ...guard events on a specific channel or the entire system You can also choose to back up events USB flash drive required not included To perform smart search on safeguard events 1 From the Live View dis...

Страница 85: ...uick Menu then click Main Menu 2 Click EVENTS Click the Event Settings tab on the side panel then in the drop down click the Smart Plan tab 3 Under Camera select the channel you would like to configur...

Страница 86: ...ect s that have been left behind in the designated area 6 Once the type of rule has been chosen click the Draw icon to edit the rule size and cov er area Select any anchor point of the polygon shape t...

Страница 87: ...monitor if one of your cameras loses video Send Email Check to enable email alerts You must configure email alerts before you will be able to receive them see 17 6 3 Configuring Email Alerts page 72...

Страница 88: ...r if overwrite is enabled All Configure warnings for all hard drive events 4 Configure the responses the system will take when the selected event occurs Show Message Show a popup message on the monito...

Страница 89: ...network events 4 Configure the following for the selected event type Show Message Check to show a popup message when the selected event occurs Send Email Check to enable email alerts You must configu...

Страница 90: ...e motion is detected NOTE Ensure you have set your preferences for motion detection see 12 Motion Detection page 38for details To configure pre recording 1 From the Live View display right click to op...

Страница 91: ...rive types Read Write Normal recording hard drive Read Only The system can playback data from this hard drive but it will not record to it To set the hard drive type 1 From the Live View display right...

Страница 92: ...d Estimate tab on the side panel 3 Select Recording Days for the total number of days worth of recordings your hard drive can store or select Disk Requirement for the total storage needed to record fo...

Страница 93: ...ecordings and or snapshots to File Length Enter the recording file length in minutes Channel Select a channel to set FTP recording preferences for Week Select a day of the week to configure FTP record...

Страница 94: ...stem will create a new video file for every 30 mi nutes of continuous recording Instant Playback Select the amount of time in minutes the system will go back when instant playback is activated in live...

Страница 95: ...e holi day to be repeated each year Holiday Range Select Date to select a specific date or select Week to select holidays based on which week they fall on Start Time End Time Enter when the date for w...

Страница 96: ...ccess the recorder or select Blocked Sites to add IP addresses or ranges that are not permitted to access the recorder 5 Click Add to enter an IP address or range 6 Click Apply when finished 17 7 Shut...

Страница 97: ...ows you to View live video from cameras Play back recorded video from the hard drive Manually record video clips or take a snapshot of live video Activate deterrence features including warning lights...

Страница 98: ...ecurity experience to the next level with smart home options that make accessing your system even easier For compatibility information as well as full instructions on setup and use visit lorex com Sma...

Страница 99: ...can be used to connect a self powered speaker that will play audio from the system requires audio capable camera or self power microphone To enable audio recording CAUTION Audio recording and or use...

Страница 100: ...ed CAUTION In order to use voice commands with your security system you must choose AAC encoding for the Sub Stream For more details on using voice commands with your security system see 19 Smart Home...

Страница 101: ...a second drive if you choose to 21 1 Removing the Hard Drive CAUTION Make sure that the system is OFF and the power adapter is disconnected before removing installing a hard drive To remove the hard...

Страница 102: ...refully then remove the top panel CAUTION The wiring to the front panel button and USB port runs along the top panel of the recorder When separating the top panel rest it carefully beside the bottom p...

Страница 103: ...screws 4 from the bottom panel Hold onto the hard drive so it remains in place when all screws have been removed 6 If you are not immediately going to install a new hard drive replace the top panel a...

Страница 104: ...rt the 2 hard drive screws closest to the SATA and power ports on the hard drive and tighten them half way 2 Power off the system and unplug all cabling from the system 3 Turn the recorder over Remove...

Страница 105: ...TION The wiring to the front panel button and USB port runs along the top panel of the recorder When separating the top panel rest it carefully beside the bottom panel as shown below 5 Line the 2 half...

Страница 106: ...arp edges of the bottom panel Slide the 2 pre inserted screws into the locked position then tighten the screws Insert and tighten the 2 remaining hard drive screws 7 Connect the power and SATA cables...

Страница 107: ...rt Forwarding If you are using DDNS you must port forward the HTTP and Client Ports default 80 and 35000 on your router to your recorder s IP address before you can remotely connect to your system Man...

Страница 108: ...ck the WARRANTIES tab 2 Click Activate Warranty 3 Enter your product information attaching bill of sale optional 4 Click Save Warranty Once submitted your warranty information will be summarized under...

Страница 109: ...Lorex account or on the confirmation email sent to you after regis tering for DDNS service To configure DDNS in the recorder 1 From the Live View display right click to open the Quick Menu then click...

Страница 110: ...rive is not detected by the system Hard drive cables are loose or not properly connected Remove the housing and check that hard drive cables are firmly connected There is no hard drive in the system O...

Страница 111: ...s PoE ports the camera power require ment may surpass the recorder s power output Lorex PTZ cameras come with a power adapter which you can use to power the camera instead of the recorder s PoE ports...

Страница 112: ...system will shut down or drop a camera as it does not have enough power to supply to the camera resulting in video loss When adding cameras to your recorder please make sure you are within your wattag...

Страница 113: ...4K please make sure that your monitor can support the higher resolution output of your recorder If your monitor cannot support the higher resolution of your recorder it will lose video signal and will...

Страница 114: ...way To know if your Lorex product will work with other lineup please see our Compatibility Chart 23 1 9 Low internet bandwidth Your internet plan plays a major role in your camera s ability to connec...

Страница 115: ...ording Scheduling Per Channel Continuous Motion Smart Motion Person Vehicle Face Detection Alarm Day Hour Back up File Format DAV ASF AVI MP4 Video Compression H 265 H 264 24 5 Playback Simultaneous P...

Страница 116: ...me may vary based on recording resolution and quality lighting conditions and movement in the scene 3 Fusion capabilities are limited to 2 wireless devices per system Wireless devices require an avail...

Страница 117: ...reasonable video performance Up to 3 devices may connect to the system at the same time For the latest list of supported apps and devices please visit lorex com compatibility 8 HDMI output supports 4...

Страница 118: ...interference to radio communications 25 2 CE This product and the supplied accessories are marked with CE and comply with the applicable harmonized European standards listed under Low Voltage Directiv...

Страница 119: ......

Страница 120: ...er registered trademarks or trademarks of Lorex Corporation and or its subsidiaries All other trademarks trade names or company names referenced herein are used for identification only and are the pro...

Отзывы: