DDNS Setup (Advanced)
25
9. Click
Save
to register your product for DDNS. A confirmation email will be sent to the
email address used to register for My Lorex.
You will need this information to ena-
ble remote access to your system.
Record your information below:
Domain name/URL Request:
DDNS User Name:
Device DDNS password:
25.2.3
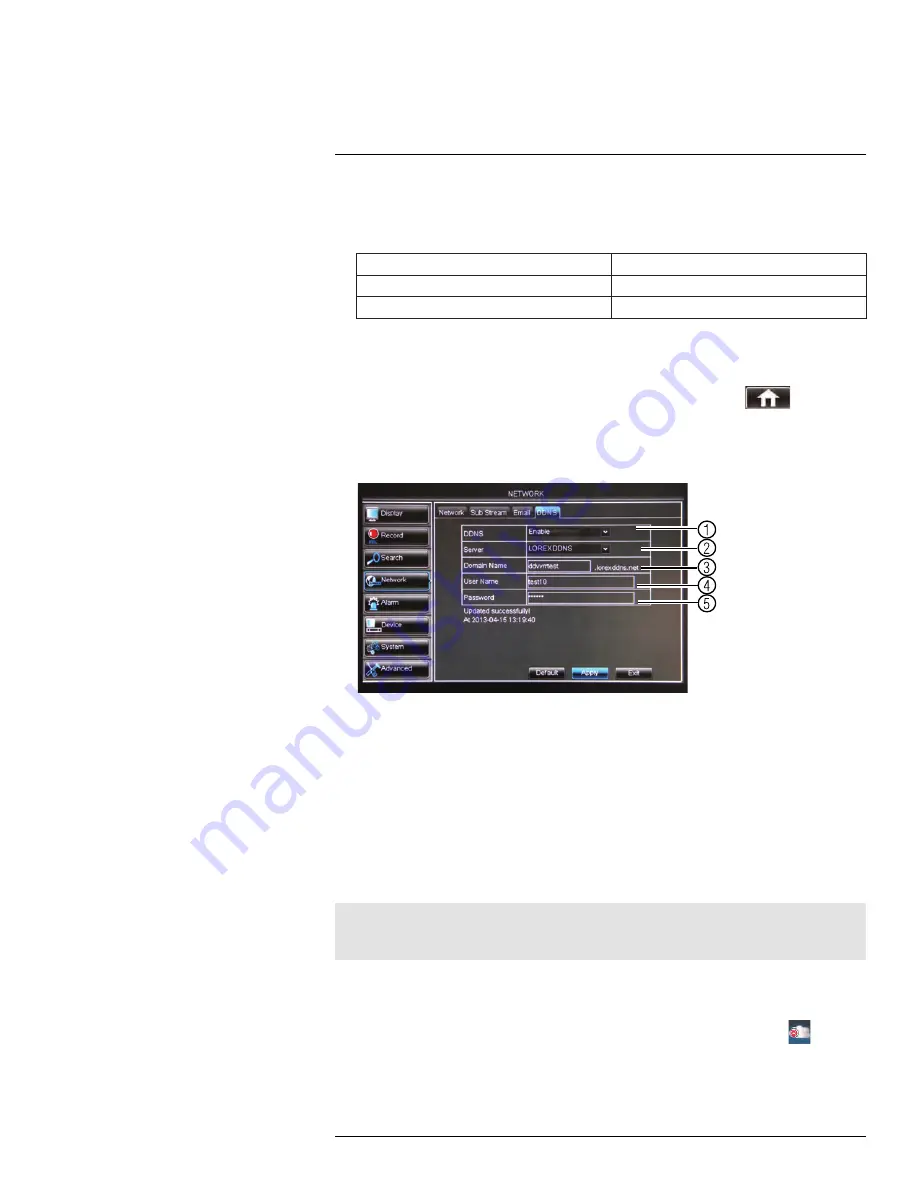
Step 3 of 4: Enable DDNS on the DVR
To enable DDNS in your DVR:
1. Right-click to open the Menu Bar and click the Main Menu button (
). Enter the
system password if prompted.
2. Click
Network
and select the
DDNS
tab.
3. Configure the following:
00
00
1
3
4
5
2
3.1.
In the
DDNS
drop-down menu, select
Enable
.
3.2.
Beside
Server
, select
LOREXDDNS
(default).
3.3.
Under
Domain Name
, enter your
Domain name/URL Request
from the confirmation email
that was sent after you created your DDNS account.
3.4.
Under
User Name
, enter your
DDNS User Name
that was emailed to you after DDNS
registration.
3.5.
Under
Password
, enter your
DDNS Device password
that was emailed to you after DDNS
registration.
4. Click
Apply
to save your settings.
25.2.4
Step 4 of 4: Connect to the DVR’s DDNS Address
Note
Please allow 10~15 minutes for the DDNS servers to update with your new DDNS address before at-
tempting to connect.
To connect using the DVR’s DDNS address on a PC:
1. Install the Lorex Stratus Client on a remote computer.
2. Once installation is finished, double-click the
Lorex Stratus Client icon (
)
from
the desktop. The DVR login screen appears.
#LX400012; r. 2.0/12066/12066; en-US
157
Содержание LH150 ECO4 SERIES
Страница 1: ...Instruction Manual LH150 ECO4 SERIES...
Страница 2: ......
Страница 3: ...Instruction Manual LH150 ECO4 SERIES LX400012 r 2 0 12066 12066 en US iii...
Страница 10: ......
Страница 177: ......


