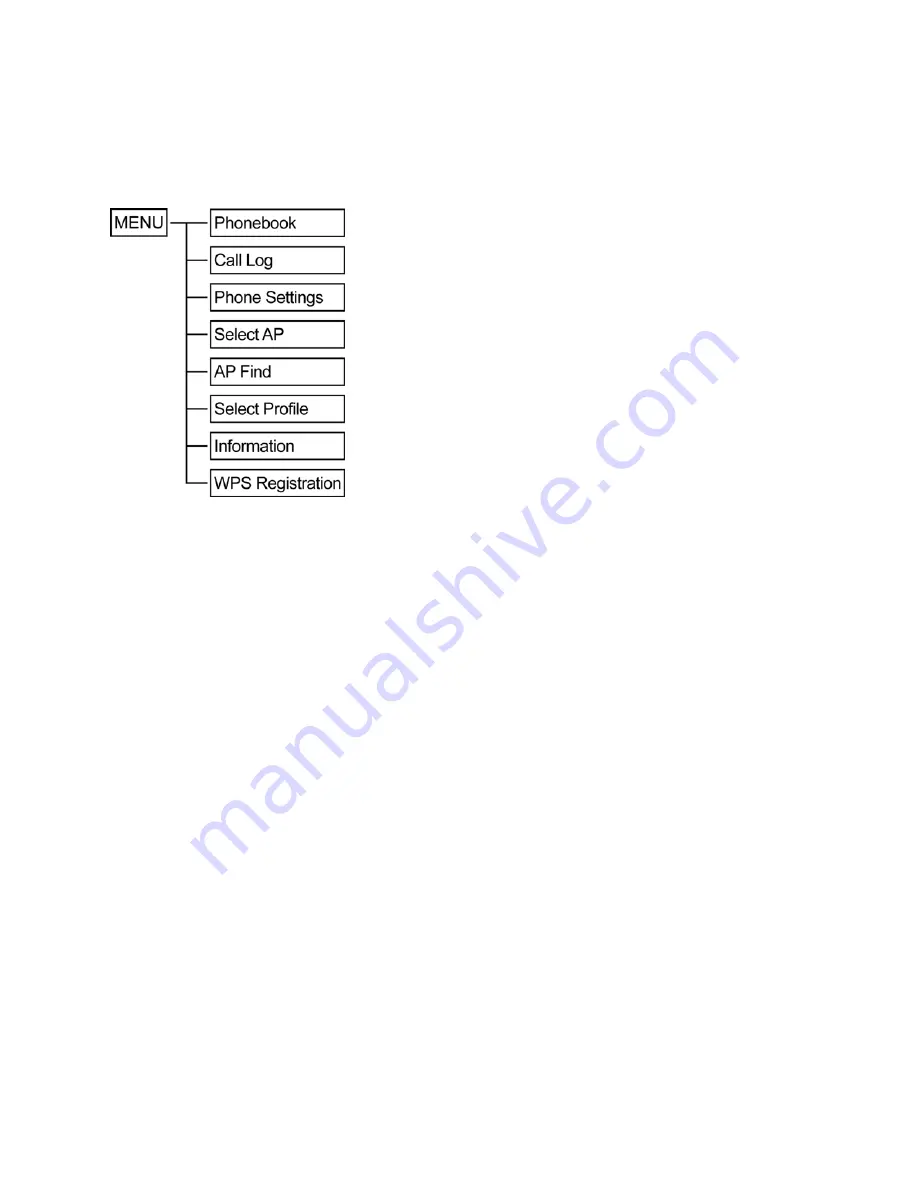
background image

Chapter


4


MMI


Menu


10 


M

M

a

a

i

i

n

n


M

M

e

e

n

n

u

u


The


menu


directory


enables


you


to


access


the


phone


settings


and


set


up


the


device


according


to


the


network


conditions


and


your


preferences.


The


menu


is


set


up


in


a


simple


and


easily


accessible


manner.


1.


Press


the


Menu


soft


key


to


access


the


main


menu.


2.


Scroll


through


the


main


menu


options


using


the


navigation


key.


3.


To


choose


a


menu


setting,


press


the


Select


soft


key.


4.


Press


the


Power/End


key


to


go


back


to


the


previous


level


of


the


menu.


When


you


access


the


menu,


the


display


screen


shows


the


menu


and


the


soft


key


items.


Soft


key


items


vary


depending


on


the


menu


options.


P

P

h

h

o

o

n

n

e

e

b

b

o

o

o

o

k

k


Your


WiFi


Phonebook


can


hold


up


to


50


contacts


which


you


can


access


quickly


from


the


main


screen


by


pressing


the


right


soft


key.


You


can


search


for


a


specific


entry


by


typing


the


first


letters


of


the


required


entry


or


press


the


Options


soft


key


to


enter


the


submenu.


A

A

d

d

d

d

i

i

n

n

g

g


C

C

o

o

n

n

t

t

a

a

c

c

t

t

s

s


To


add


a


contact


to


the


Phonebook,


perform


the


following


steps:


1.


Press


the


Options


soft


key


to


enter


Options


submenu.


2.


Select


New


Entry

.


3.


Enter


the


name


of


the


contact


in


the


Name


field.


4.


Press


the


down


key


to


select


type


of


entry.


5.


Use


the


navigation


key


to


scroll


to


either


SIP

,


No

,


or


IP

,


and


then


press


the


down


key


to


enter


value.


6.


Enter


the


value


of


selected


entry


type.


7.


Press


the


Save


soft


key


to


save


contact.


Note

:


You


can


only


save


one


entry


type


per


contact.


Содержание LHVF133

Страница 1: ...WiFi Phone User Manual V 0 2...

Страница 2: ...o operate the equipment The antenna s used for this transmitter must not be co located or operating in conjunction with any other antenna or transmitter This EUT is in compliance with SAR for general...

Страница 3: ...contains no metal and positions the handset a minimum of 1 5 cm from the body Use of other enhancements may not ensure compliance with FCC RF exposure guidelines If you do not use a body worn accessor...

Страница 4: ...Battery 3 Charging Your WiFi Phone 4 Installing the Belt Clip 5 3 Getting Started 6 Setting the Access Point AP 6 Setting the SIP Profile 7 4 MMI Menu 9 Phonebook 10 Call Log 11 Phone Settings 12 Sele...

Страница 5: ...local phone line Read this user manual carefully to learn how to operate this product and take advantage of its features P Pa ac ck ka ag ge e C Co on nt te en nt ts s When unpacking the WiFi phone en...

Страница 6: ...ay with LED backlight 4 Navigation Keys Navigates through menus Left select Profile decrease the speaker volume during a call Right call log increase the speaker volume during a call Up show dialed nu...

Страница 7: ...olume during a call 16 Belt Clip Gap Use to hold the belt clip 17 Speaker Transmits voice output hand free mode or plays plays ring tone 18 Battery Compartment Contains the Li ion battery I In ns se e...

Страница 8: ...the AC power adapter cable to the port at the rear of the cradle 2 Plug the AC power adapter into the mains socket To charge your WiFi phone using the charging cradle do the following 1 Plug the USB j...

Страница 9: ...tery for three hours before using your WiFi phone for the first time I In ns st ta al ll li in ng g t th he e B Be el lt t C Cl li ip p 1 Fit the belt clip lock into the gap on one side of the phone 2...

Страница 10: ...Starting wizard can only be seen after the performing master reset and boot for the first time S Se et tt ti in ng g t th he e A Ac cc ce es ss s P Po oi in nt t A AP P 1 When the phone is powered on...

Страница 11: ...lect the option then press the Select soft key 3 Enter network passkey using the numeric keypad on your phone 4 When passkey confirmation is complete the following screen appears 5 Press the Yes soft...

Страница 12: ...dit Domain Enter Domain and Domain port Press the Next soft key to continue 4 Select Save 5 Select New profile then press the Save soft key 6 Enter profile name then press the Save soft key 7 The phon...

Страница 13: ...t signal and the presence of a single bar indicates the weakest signal 2 Battery charging level The presence of all the five bars indicates that the battery is fully charged or has 100 charge Charging...

Страница 14: ...options P Ph ho on ne eb bo oo ok k Your WiFi Phonebook can hold up to 50 contacts which you can access quickly from the main screen by pressing the right soft key You can search for a specific entry...

Страница 15: ...ncel C Ca al ll l L Lo og g Your WiFi phone stores information about all calls received missed or dialed The lists are stored and displayed from the newest to the oldest entries The oldest entries are...

Страница 16: ...hinese Japanese German Spanish Select from the list of languages then press the Select soft key Ring Settings The Ring Settings menu allows you to configure the ring tone and volume settings of your W...

Страница 17: ...ave the settings by entering the name for the new profile settings Save As Save and apply the settings to a selected profile Delete Delete the selected profile Set Active Activate the selected profile...

Страница 18: ...Press the Select soft key 3 The phone will display a warning message press the Yes soft key to continue or the No soft key to cancel 4 When power save mode is modified the phone needs to be rebooted t...

Страница 19: ...e window displays information about finishing installing the software for DFU Device Firmware Upgrade mode See illustration below 8 Locate and execute the DFU executable file A Device Firmware Upgrade...

Страница 20: ...lish connection 4 If required enter the necessary security information 5 Press the Ok soft key to connect S Se el le ec ct t P Pr ro of fi il le e Use the Select Profile menu to select from existing p...

Страница 21: ...by supporting AP WPS PIN CODE setting area Enter the ping code wifi phone will start to enter AP setup and enroll stage Push button Method Hold the AP WPS Push button for seconds to start the PBC meth...

Страница 22: ...erview LCD Display 112 64 pixel monochrome LED Backlight Wireless Antenna PIFA Type USB Client WLAN 802 11 b g Microphone Speaker Receiver Lithium Polymer Battery 1200 mAH AC Adapter 100 240V input Vo...

Отзывы: