background image

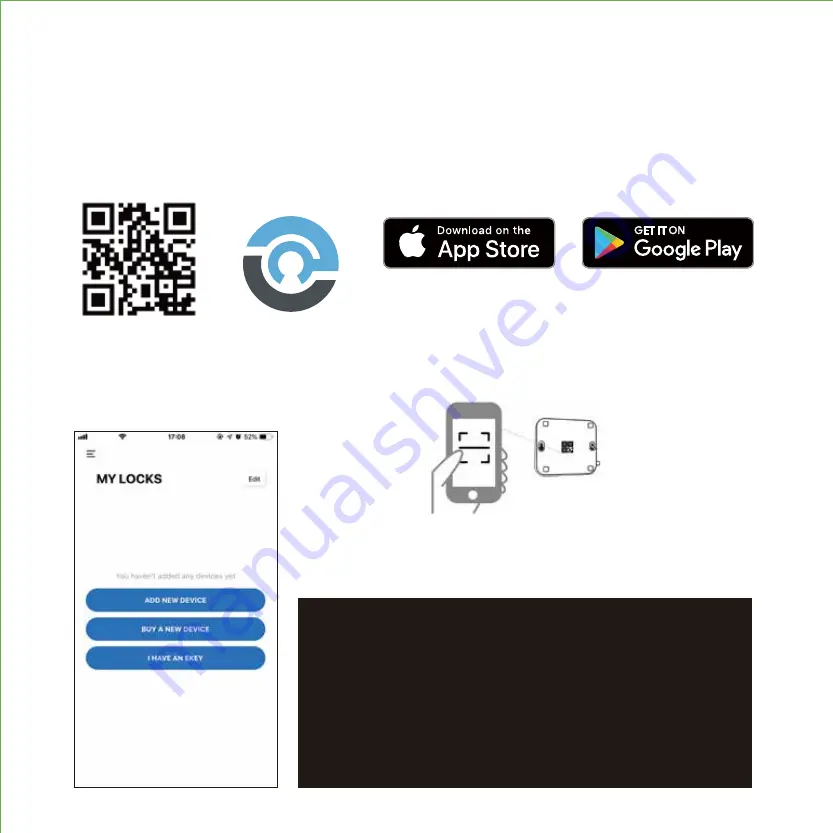
STEP 11. PAIRING LOCKLY VISION

11.2


After you have you successfully registered an account, you can proceed to Add New

Device and follow the step by step on screen instructions.

11.3


When prompted, make sure you scan the small QR code

located on the side or bottom of the Vision Connect to pair hub
with lock.

Scan or visit Lockly.com/app

You have completed the Lockly Vision

 and Vision Connect installation and setup. Now 

you’re ready to pair your lock.

11.1

Download the Lockly

®

 App and register an account.

IMPORTANT REMINDERS:

1.. Remember to register for warrant
2.. Allow your mobile phone to receive push notification
3.. Send in-app feedback if you encountered any issu
while using the App.
4.. Ensure your Lockly® App has the most updat
firmware. For more info, visit:
http://www.support.lockly.com/faq/firmware-update/

Scan QR code located on hub

Содержание DEADBOLT EDITION PGD1128

Страница 1: ...DEADBOLT EDITION SMART LOCK VIDEO DOORBELL INSTALLATION MANUAL VISION ...

Страница 2: ... ESD parts Avoid touching with bare hands For best practices 1 ground yourself by a touching a metal surface to discharge any ESD you might have b changing clothes if you are sparky and 2 avoid touching the internal pins C A U T I O N ...

Страница 3: ...iption A Keys B Exterior Assembly C Exterior D Mounting Plate E Adhesive F PM5 60mm Screw G Interior Assembly H PM4 12MM Screw I Battery Cover J Deadbolt K KA4 20MM Screw L Strike Plate N Dust Box P Wired Sensor Q R S T Sensor Magnet Vision Connect LAN Cable Power Plug U TF Card V Activation Card R Adhesive TAPE Adhesive TAPE V SCAN SAVE LOCK SERIAL ACTIVATION CODE PGDXXXXXXXXX XXXXXXXX ...

Страница 4: ......

Страница 5: ...plete installation you would need the following 1 2 Prepare door and remove existing lock If necessary use provided Installation Template to prepare door Phillips Screwdriver Flathead Screwdriver Ruler 1 35mm to 2 50mm 1 25mm 2 60mm or 2 70mm 2 54mm ...

Страница 6: ...e metal plate c and twist the deadbolt body d clockwise till it snaps to 2 3 8 III To return to default status while the deadbolt b is extended hold the metal plate c and twist the dead bolt body d counter clock wise till it snaps to 2 3 4 b a c d c d I Push the crank a to extend the deadbolt b Deadbolt at 2 3 4 70mm default shipping status STEP 2 ADJUST DEADBOLT AND INSTALL ...

Страница 7: ...on the slit hole or by pushing the crank towards the metal face plate 2 3 Insert the Deadbolt to the edge door hole make sure that its right side up and the slit hole is in vertical position then secure with 2 screws K K 2X STEP 2 ADJUST DEADBOLT AND INSTALL 1 2 ...

Страница 8: ...osition to the deadbolt slit hole and guide the cable under the deadbolt Secure with the adhesive strips 3 2 Before placing the exterior assembly on the door make sure the torque blade is in vertical position and the deadbolt is extended EXTERIOR VIEW 1 Vertical When installing the exterior assembly make sure the deadbolt is fully extended and the slit hole is vertically positioned on the bottom t...

Страница 9: ...oss threaded and turns smoothly Make five turns before using a screw driver to tighten the screws until the mounting plate is securely placed to the door 4 4 After securing the mounting plate use the physical key and try to unlock lock to check if the deadbolt is moving and not stuck Do not forget to take out the key before proceeding to next steps 4 2 Place the mounting plate on the interior side...

Страница 10: ...lexa or Google Assistant ensure the door sensors are properly installed to acknowledge your voice commands and to have the correct responses IMPORTANT Gap must be less than 3 4 when installed When installed on your door the distance between the wired sensor and sensor magnet must be less than 3 4 in order for the sensor to work When door frame is higher than the door panel add included foam pads a...

Страница 11: ...sure the arrow of the wired sensor P is placed next to the arrow of the sensor magnet Q as close as possible If needed add Foam Pads to level P Q as much as possible 2 3 4 70mm 2 3 8 60mm 3 4 20mm EVA STEP 5 PREPARING DOOR SENSORS FOR INSTALLATION P Q ...

Страница 12: ... 2 For left swing doors re route the door sensor wire through the side channel Pull the foam pad f then re insert to secure the wire Discard the excess part e for doors with 2 60mm backset as shown below Backset measure the distance of the door edge to the center of the door hole DO NOT INSTALL THE SENSORS YET Pull Insert P P f STEP 5 PREPARING DOOR SENSORS FOR INSTALLATION 3 2 1 e ...

Страница 13: ... PART B plug the small cable con nector x to y and screw tightly as shown STEP 6 INSTALLING THE INTERIOR ASSEMBLY G 6 2 Plug the larger cable that is coming through the door into the Interior PART G lock Match the red side of the plug with the red on the socket Ensure it is inserted tightly Tuck the cable under the hook and route it to the right as shown x y Connect and Screw Do not touch the pins...

Страница 14: ...ensure the thumb turn is vertical 6 4 Place the interior assembly against the mounting plate and make sure the torque blade is inserted to the thumb turn shaft 6 5 Secure the interior assembly with 2 screws H Torque Blade Thumb turn shaft Push the thumb turn shaft into the torque blade MAKE SURE IT IS IN THE VERTICAL POSITION ...

Страница 15: ... moves smoothly If you feel that there is a tight tension while you are turning it means that the lock may have not been installed straight Go back to Step 2 and re install the lock IMPORTANT If your lock is not properly installed it will open and close repeatedly at times and or it will reduce battery life 7 3 After you checked that the lock manually lock and unlock properly and deadbolt moves sm...

Страница 16: ...1 Peel off the paper layer of the adhesives from the back of the wired sensor P 8 2 Position the wired sensor P to the edge of the door Attach and secure with the adhesives 8 3 Retract the deadbolt by turning the thumb turn then close the door Before you peel off the paper layer of the adhesives from the sensor magnet Q align the arrow with the wired sensor P Install Q on to door frame Make sure y...

Страница 17: ...e deadbolt moves smoothly in and out of the door strike As there are many types of doors you may need to make slight adjustments so the deadbolt moves smoothly If anything is rubbing against the deadbolt when locking and unlocking you may experience a warning sound rapid beeping indicating that the lock is experiencing misalignment or something is blocking the deadbolt L K 2X N STEP 9 INSTALLING T...

Страница 18: ...ith Google Assistant or Amazon Alexa you will need to setup the Vision Connect included in the box STEP 10 VISION CONNECT SETUP IMPORTANT Vision Connect contains important video recording on the TF card ensure your selected location is discreet or a secured area to protect the privacy of your video recording LAN LED INDICATOR Power Plug TF Card RESET ...

Страница 19: ...our home If you re having issues with the setup we are here to help Call our customer care team 669 500 8835 or visit http lockly com help for suggested troubleshooting STEP 10 VISION CONNECT HUB SETUP 50 Feet 15 meters Distance Between Lockly Vision You Vision Connect Wi Fi Router Using an iOS or Android Device with Bluetooth Wi Fi enabled 3 feet 1 meter above the ground IMPORTANT Lockly Vision i...

Страница 20: ... Vision 1ft cable S Included 10 4 Plug the USB adapter to a wall socket STEP 10 VISION CONNECT HUB SETUP 10 5 After connecting to power wait for 2 minutes for Vision Connect to self calibrate Once the LEDs turned RED and blinking yellow Vision is ready to connect IMPORTANT Refer to Vision Connect Troubleshooting Guide if the LEDs do not meet the described conditions ...

Страница 21: ...inking from Red to Blue Then OFF Blue Slow Blinking Update in Progress Update Successful Update Failed Blue ON Blinking from Red to Blue After you plug in the LAN cable and Power adapter and wait for 2mins for Vision Connect to self calibrate During Firmware Update Vision Connect Troubleshooting Guide LED INDICATOR STATUS Power interruption during firmware update may damage the Vision Connect hub ...

Страница 22: ...sit Lockly com app You have completed the Lockly Vision and Vision Connect installation and setup Now you re ready to pair your lock 11 1 Download the Lockly App and register an account IMPORTANT REMINDERS 1 Remember to register for warrant 2 Allow your mobile phone to receive push notification 3 Send in app feedback if you encountered any issu while using the App 4 Ensure your Lockly App has the ...

Страница 23: ... Google LLC For a full list of commands help videos or to troubleshoot your Secure Link Wi Fi Hub visit us at https lockly com help To setup your lock to work with either voice assistant download the Amazon Alexa or Google Home App and add a new skill with Amazon Alexa or the Action for Google Assistant Add the Lockly Skill for Alexa or the Action for Google Assistant then follow on screen instruc...

Страница 24: ...erence to radio or television reception which can be determined by turning the equipment off and on the user is encouraged to try to correct the interference by one or more of the following measures Reorient or relocate the receiving antenna Increase the separation between the equipment and receiver Connect the equipment into an outlet on a circuit different from that to which the receiver is conn...

Страница 25: ... subi même si le brouillage est susceptible d en compromettre le fonctionnement IC Radiation Exposure Statement This equipment meets the exemption from the routine evaluation limits in section 2 5 of RSS 102 It should be installed and operated with a minimum distance of 20cm between the radiator and any part of your body Cet équipement est conforme à l exemption des limites d évaluation habituelle...

Страница 26: ...IMPGD1128FPW20200428 We re here to help help lockly com https lockly com help VISION ...

Страница 27: ......

Страница 28: ...http lockly com help VISION For the latest version of this manual please visit the link below ...

Отзывы: