background image

5

Instruction Manual

SECTION 2 - INSTALLATION

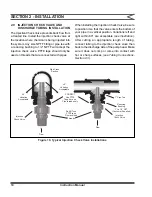
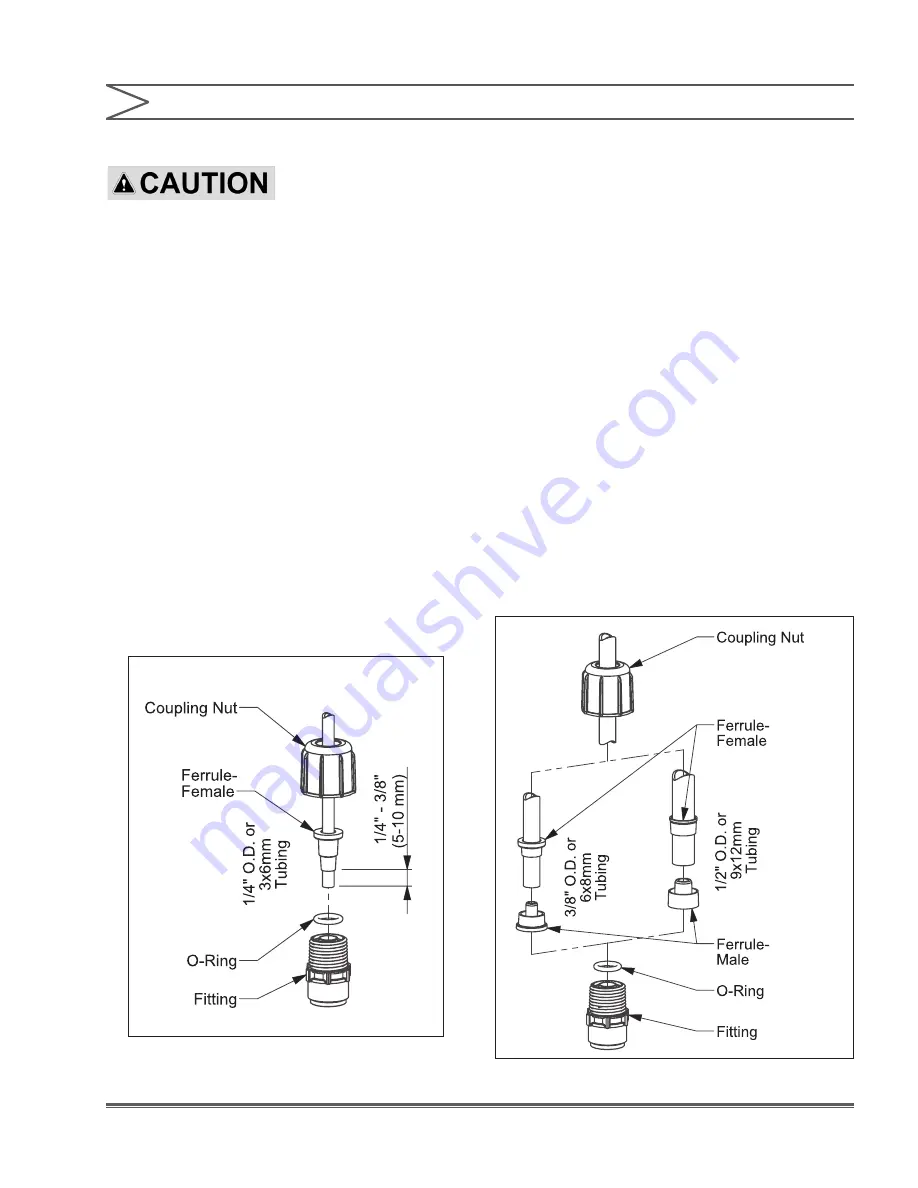
Figure 4a. 

2.3  TUBING CONNECTIONS

A.  USE ONLY LMI

®

 TUBING.

B.  DO NOT USE CLEAR VINYL TUBING ON THE DISCHARGE 

SIDE OF THE PUMP. THE PRESSURE CREATED BY THE 

PUMP CAN RUPTURE VINYL TUBING, WHICH IS ONLY FOR 

CONNECTION TO THE RETURN LINE OF THE FASTPRIME™ 

FITTING.
C.  BEFORE INSTALLATION, ALL TUBING MUST BE CUT 

WITH A CLEAN SQUARE END.
D.  VALVE AND HEAD CONNECTIONS FROM THE FACTORY 

ARE CAPPED OR PLUGGED TO RETAIN PRE-PRIME WATER. 

REMOVE AND DISCARD THESE CAPS OR PLUGS BEFORE 

CONNECTING TUBING.
E.  DO NOT USE PLIERS OR PIPE WRENCH ON COUPLING 

NUTS OR FITTINGS.

The LMI

®

 Tubing Connection System provides 

a reliable system to connect your pump to 
corresponding tubing sizes. To assemble tubing 

onto the fitting:

1. Insert tubing through Coupling Nut-Tubing 

should enter the smaller end of the Coupling Nut 

first, orienting the larger opening of the Coupling 

Nut toward the tubing end.

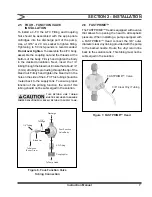
2a.  For  1/4”  OD  tubing:  Position  the  Female 

Ferrule so that 1/4” to 3/8” (5-10 mm) of tubing 
protrudes from the Female Ferrule. Orient the 
raised collar of the Ferrule toward the Coupling 

Nut 

(reference FIGURE 4a)

.

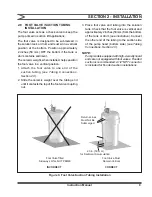
2b.  For 3/8” or 1/2” OD tubing: Position a Female 

Ferrule about one inch (25 mm) from end of 
tubing. Orient the raised collar of the Female 
Ferrule  toward  the  Coupling  Nut.  Then, 
insert  the  Male  Ferrule  onto  the  end  of  the 

tube, pushing the tube into the bottom of the 

groove  in  the  Male  Ferrule. Then  slide  the 
Female Ferrule down the tubing and with your 
fingers,  press  tightly  into  the  Male  Ferrule                        

(reference FIGURE 4b)

.

3.  Firmly hand tighten the Coupling Nut onto the 

fitting. 

Note: 

Tightening with pliers may cause the Ferrules 

to break.

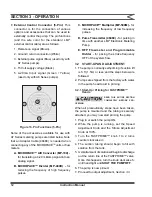
Figure 4b. Tubing Connections

Содержание ROYTRONIC A Series

Страница 1: ...ROYTRONIC Series A Electronic Metering Pumps Instruction Manual Manual No 2002 Rev C Rev Date 09 2015 ...

Страница 2: ... No Plug 7 Molded Head Single Ball Check Valves 8 Molded Head Double Ball Check Valves 9 Machined Head Double Ball Check Valves 1 0 2 in2 2 0 4 in2 3 0 8 in2 See Most Recent Price List for Material Options S FastPrime Head 4FV N FastPrime Head H AutoPrime Head 4FV A AutoPrime Head I Inch Tubing M Metric Tubing P 1 2 NPT 1 2 BSP Pipe U Black UV Resistant Tubing Model A 7 5 1 8 2 8 S I Model Code Co...

Страница 3: ...n supplier and the LMI Chemical Resistance Chart for compatibility of your specific LMI metering pump Contact your local LMI distributor for further information Tubing Connections Inlet and outlet tubing or pipe sizes must not be reduced Outlet tubing size must not be increased Make certain that all tubing is SECURELY ATTACHED to fittings prior to start up see Section 2 3 Tubing Connections ALWAYS...

Страница 4: ...G To reduce the risk of electrical shock the metering pump must be plugged into a properly grounded grounding type receptacle with ratings conforming to the data on the pump control panel The pump must be connected to a good ground Do not use adapters All wiring must conform to local electrical codes If the supply cord is damaged it must be replaced by the manufacturer stocking distributor or auth...

Страница 5: ...STMENT CONTROLS 11 3 2 START UP AND ADJUSTMENT 12 3 2 1 Start Up Priming for FASTPRIME Heads 12 3 2 2 Start Up Priming for Pump Supplied with 4 FV 13 3 2 3 Start Up Priming Without 4 FV 13 3 3 OUTPUT ADJUSTMENT 13 3 3 1 Total Pump Output 13 3 3 2 Calibration in Internal Mode 14 3 3 3 Calibration in External Mode 15 3 4 METHODS OF EXTERNALLY TRIGGERING OR PACING A7 AND A8 PUMPS 15 3 4 1 Control Mod...

Страница 6: ...IGURE 8 AUTOPRIME 8 FIGURE 9 Foot Valve Suction Tubing Installation 9 FIGURE 10 Typical Injection Check Valve Installations 10 FIGURE 11 Output Adjustment Controls 11 FIGURE 12 Pin Functions 3 Pin 11 FIGURE 13 Pin Functions 5 Pin 12 FIGURE 14 Calibration in Internal Mode 14 FIGURE 15 Triggering Through External Control Connector 15 FIGURE 16 Method of External Triggering 16 FIGURE 17 LIQUIFRAMTM D...

Страница 7: ...es to give you prompt and efficient service Please review this manual carefully Pay particularattentiontowarningsandprecautions Always follow good safety procedures including the use of proper clothing eye and face protection ThismanualisforRoytronic SeriesAELECTRONIC METERING PUMP 1 1 SPECIFICATION AXX1 AXX8 AXX2 AXX7 AXX9 Operating Temperature 14 to 113 F 10 to 45 C 14 to 113 F 10 to 45 C Voltag...

Страница 8: ...Please notify the carrier immediately if there are any signs of damage to the pump or its parts Metering Pump Ceramic Foot Valve Weight Low Level Sensor Optional External Control Cable Optional Tube Connection Hardware Injection Check Valve Four Function Valve Optional Foot Valve Tubing 0 to 3 Rolls Figure 1 Unpacking Check List ...

Страница 9: ...nsult distributor Note that suction conditions can affect the performance of the pump This effect is more pronounced with lower pressure pumps Consult your distributor for additional information Your LMI metering pump must be mounted so that the suction and discharge valves are vertical NEVER position pump head and fittings horizontally 2 2 1 Flooded Suction For flooded suction the pump is mounted...

Страница 10: ...mp may be mounted on a molded tank provided there is a recess to keep the pump stationary LMI 10 gallon tank part no 27421 35 gallon tank part no 27400 and 50 gallon tank part no 26350 have molded recesses for pump mounting 2 2 4 Suction Lift Shelf Mount The pump may be mounted on a shelf customer supplied maintaining a suction lift of less than 5 ft 1 5 m An LMI mounting kit part no 10461 is avai...

Страница 11: ...ing 1 Insert tubing through Coupling Nut Tubing should enter the smaller end of the Coupling Nut first orienting the larger opening of the Coupling Nut toward the tubing end 2a For 1 4 OD tubing Position the Female Ferrule so that 1 4 to 3 8 5 10 mm of tubing protrudes from the Female Ferrule Orient the raised collar of the Ferrule toward the Coupling Nut reference FIGURE 4a 2b For 3 8 or 1 2 OD t...

Страница 12: ...g when pumping into a vacuum such as the suction side of recirculating pump 1 Pressure Relief If the discharge line is over pressurized the valve opens sending solution back to the supply tank 2 Line Depressurization Opening the relief knob provides line drain back to the supply tank 3 Anti Syphon Prevents syphoning when pumping solution downhill or into a vacuum 4 Back Pressure Supplies approxima...

Страница 13: ...eed nut Firmly hand tighten the bleed nut in the hole on the side of the 4 FV This tubing should be routed back to the supply tank To ensure proper function of the priming function the end of this tubing should not be submerged in the solution THIS RETURN LINE TUBING MUST BE SECURED TO ENSURE PUMPED SOLUTION WILL SAFELY RETURN TO SUPPLY TANK Discharge 1 4 Through 1 4 Tubing 4 FVFitting Coupling Nu...

Страница 14: ...en installing a pump equipped with an AUTOPRIME Liquid End connect the 1 2 OD polyethylene tubing to the top vertical fitting and route this line back to the supply tank To ensure priming this tubing should not be submerged in the solution The horizontal fitting is the discharge and the bottom vertical fitting is the suction Return Fitting Use 1 2 polyethylene tubing here and route to supply tank ...

Страница 15: ... Tubing Connections Section 2 3 2 Slide the ceramic weight over the tubing end until it contacts the top of the foot valve coupling nut Returns Lines Must Not Be Submerged 2 0 in 50 mm for Sediment Accumulation Foot ValveTilted Sideways WILL NOT PRIME Foot Valve Must Remain Vertical INCORRECT CORRECT 3 Place foot valve and tubing into the solution tank Check that the foot valve is vertical and app...

Страница 16: ...on check valve at the location where chemical is being injected into the system Any size NPTF fitting or pipe tee with a reducing bushing to 1 2 NPTF will accept the injection check valve PTFE tape should only be used on threads that are connected with pipes When installing the Injection Check Valve be sure to position it so that the valve enters the bottom of your pipe in a vertical position Vari...

Страница 17: ...laced per stroke It is recommended that the stroke range stay between 20 and 100 4 Pulse Indicator Light This light will flash green when pumping in internal mode and will flash yellow when pumping in external mode The light is on between strokes and OFF during the actual stroke 5 Low Level Indicator Light This light will turn red when a low level sensor registers a low chemical level This will tu...

Страница 18: ...ncy pulses D Pulse Transmitter 48489 for pulsing in time with another LMI Electronic Metering Pump E RFP Flowmeter and Programmable Divider for pacing the stroke frequency OFF of the system flow 3 2 START UP AND ADJUSTMENT 1 The pump is normally self priming if suction lift is 5 ft 1 5m or less and the steps below are followed 2 Pumps are shipped from the factory with water in the pump head to aid...

Страница 19: ...p is mounted and the tubing is securely attached you may prime the pump 1 Plug in or switch ON the pump 2 While the pump is running set the speed knob and the stroke knob at 100 3 The suction tubing should begin to fill with solution from the tank 4 Once the solution begins to exit the pump head on the discharge side SHUT THE PUMP OFF 5 The pump is now primed 6 Proceed to output adjustment Section...

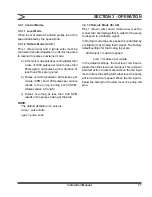
Страница 20: ...Internal Mode Pump until all the air is exhausted from the suction line and head 4 Turn the pump OFF Refill graduated container to a level starting point 5 Using a stopwatch or timer turn the pump on for a measured amount of time 120 pump strokes minimum The longer the time period the more confident you can be of the results Be sure to count the number of strokes during the calibration period when...

Страница 21: ...olume of solution pumped per stroke Example 720 ml in 240 strokes 3 0 ml per stroke Multiply this by your expected stroke rate per minute per hour or per day and compare with desired output requirements 7 Turn Stroke Adjustment Knob to your best estimate of required correction and repeat calibration procedure Note It may be helpful to decrease the speed of the pump in order to count the number of ...

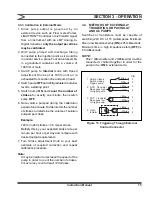
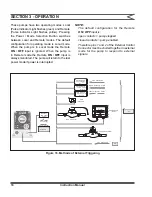
Страница 22: ... is interrupted NOTE The default configuration for the Remote ON OFF input is open contacts pump stopped closed contacts pump enabled Therefore pins 1 and 2 of the External Control Connector must be shorted together in external mode for the pump to respond to external signals Full Open Empt y Closed 4 20 milliamp DC 4 20 milliamp DC Higher Frequency Pulses Lower Frequency Pulses Pulse Transmitter ...

Страница 23: ...and 6 c Pulses occurring at less than 240 SPM results in the pump stroking at that rate NOTE The default definition of a pulse is close pulse starts open pulse ends 3 4 1 3 Remote Mode for A8 Pins 1 brown wire and 2 white wire must be connected shorted together in order for the pump to respond to a milliamp signal In Remote mode the pump speed is controlled by a milliamp mA Analog Input signal The...

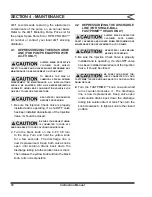
Страница 24: ...ION DRUM OR TANK 2 Turn the black knob on the 4 FV 1 8 turn to the stop Turn and hold the yellow knob for a few seconds The discharge line is now depressurized Keep both valve knobs open until solution drains back down the discharge tubing into the solution tank or drum Then release the yellow knob and turn the black knob to its normal position 4 2 DEPRESSURIZING THE DISCHARGE LINE FOR SINGLE BALL...

Страница 25: ...4 4 ASpare Parts Kit or RPM PRO PAC kit containing these parts may be obtained from your local distributor Replacing the LIQUIFRAM DIAPHRAGM 1 Carefully depressurize drain and disconnect the discharge line see previous sections in this manual 2 Place the Foot Valve into a container of water or other neutralizing solution Turn the pump on to flush the head assembly Once the pump head has been flush...

Страница 26: ...IER FOR ADDITIONAL PRECAUTIONS Refer to the LMI Metering Pump Price List for the proper Spare Parts Kit or RPM PRO PAC kit number or contact your local LMI stocking distributor 1 Carefully depressurize and disconnect the discharge line see Section 4 1 or 4 2 in this manual 2 Place the Foot Valve into a container of water or other neutralizing solution Turn the pump on to flush the head assembly On...

Страница 27: ...ng distributor 1 Isolate Injection Check Valve and depressurize pipe or drain pipeline 2 Carefully depressurize and disconnect the discharge line see Section 4 1 or 4 2 in this manual Spare part replacement kits include specific instructions for valve replacement Please follow the instructions included with the replacement kit 3 Carefully disconnect the tubing leading to the Injection Check Valve ...

Страница 28: ...eturn line by gently pulling tubing and moving it from side to side to gradually back tubing OFF of the barbed fitting 3 Hold return line tubing upright until solution drains back into solution drum or tank 4 Using a 3 4 or 19 mm socket or wrench remove Retaining Nut and pull out the entire FASTPRIME Valve assembly Remove and replace the two small O rings 5 Reinsert the FASTPRIME Valve assembly an...

Страница 29: ... Instruction Manual SECTION 4 MAINTENANCE O Rings FastPrimeTM Valve O Rings Retaining Nut FastPrime Valve FastPrime Knob 3 8 Clear Vinyl Tubing Figure 20 FASTPRIME Valve Assembly O Ring Replacement Contd ...

Страница 30: ... slides into the control panel The Stroke Knob can be used to turn the Stroke Shaft Continue to turn the Stroke Shaft until there is no longer any diaphragm movement It may be necessary to turn ON the pump in order to get the Stroke Knob completely forward however care should be taken to ensure that the Stroke Shaft is contacting the Plunger before turning ON the unit Otherwise the pump could be d...

Страница 31: ...25 Instruction Manual SECTION 4 MAINTENANCE Figure 22 Series A Drive Assembly Exploded View Diagram 4 8 SERIES A DRIVE ASSEMBLY EXPLODED VIEW DIAGRAM ...

Страница 32: ... P1 P2 P3 P2 P1 P3 P4 P4 A0 A1 PULSER EPU ASSEMBLY EPU ASSEMBLY POWER CORD POWER CORD A7 A8 PULSER WHT OR BLU WHT OR BLU YEL YEL YEL YEL GRN OR GRN YEL GRN OR GRN YEL Figure 23 EPU Wiring Diagram NOTE Refer to Section 2 3 for tubing connections SECTION 4 MAINTENANCE ...

Страница 33: ...ressure at discharge Pumps without multi function valve 8 Shut OFF valves in pressurized line Disconnect tubing at injection check valve see Priming Section 3 2 When pump is primed reconnect discharge tubing Pump Loses Prime 1 Solution container ran dry 1 Refill container with solution and reprime see Section 3 2 2 Foot Valve is not in a vertical position on the bottom of the tank 2 Foot Valve mus...

Страница 34: ...ection 3 3 2 5 Tubing run on discharge may be too long 5 Longer tubing runs may create frictional losses sufficient to reduce pump s pressure rating Consult LMI Distributor for more information 6 Clogged Foot Valve strainer 6 Remove Foot Valve strainer when pumping slurries or when solution particles cause strainer to clog Failure to Run 1 Pump not turned ON or plugged in 1 Turn ON or plug in pump...

Страница 35: ......

Страница 36: ...cudyne Industries a leading global provider of precision engineered process critical and technologically advanced flow control systems and industrial compressors Delivering consistently high levels of performance we enable customers in the most important industries and harshest environments around the world to accomplish their missions ...

Отзывы: