background image

12/56 

1.4.


Safety instructions for operation phases 

1.4.1.


Transport, assembly and installation 


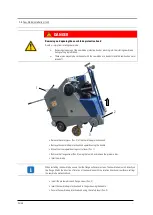
Transport, assembly and installation on/with the Floor saw may only be carried out in transport 
position. Secure the Floor saw against rolling away. 


Transport, assembly and installation on/with the Floor saw may only be carried out with removed saw 
blade and when the engine is turned off. 


Transport the Floor saw in compliance with the maximum operating weight, this should be exclusively 
done by crane. 


Transport may only be done, as long as all machine parts are tightened on the machine and individual 
parts cannot fall off. 


1.4.2.


Commissioning 


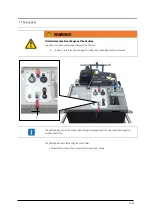
The commissioning of the Floor saw may only be carried out in transport position. 


When inserting the saw blade, observe the running direction. The cutting process must always be 
done clockwise, otherwise material is ripped out which causes small pieces of debris to fly around. 


When inserting the saw blade, protect against sharp edges. 


Ensure that the floor on which cuts are to be made fulfils load carrying capacities.. All obstacles must 
be cleared away from the cutting area and make sure there is sufficient lighting. 


Visual inspection of the whole Floor saw for damages and defects. Special check of the safety 
equipment. 


Keep water sources handy for refilling the water tank. Water sources may not be connected directly. 


Smoking is absolutely prohibited when filling the combustion motor. 


Special care is necessary when refilling the fuel tank. Motor parts that become hot during operating 
become a fire hazard. 


Fuel storage may only be in authorized containers. 


No rotating tools which have a maximum rotation speed smaller than the nominal speed of the 
machine can be used. 
Defective or broken tools must be replaced immediately. 


Содержание Compactcut 900

Страница 1: ...1 56 OPERATING MANUAL FLOOR SAW COMPACTCUT 900 LISSMAC Maschinenbau GmbH Lanzstrasse 4 D 88410 Bad Wurzach Telephone 49 0 7564 307 0 Fax 49 0 7564 307 500 lissmac lissmac com www lissmac com EN ...

Страница 2: ...2 56 ...

Страница 3: ...ax 49 0 7564 307 500 lissmac lissmac com www lissmac com Translation of the original operating manual Status 04 2017 The dissemination or duplication of this operating manual in any form or the reuse of contents is forbidden unless permitted in writing Non compliance is subject to compensation for damages All rights reserved for the purpose of patent utility model or design patent registration ...

Страница 4: ...situation If the situation is not avoided fatal or serious injuries can result The danger symbol can specify the danger This signal word signifies a dangerous situation If the situation is not avoided medium to slight injuries will result The danger symbol can specify the danger This signal word signifies a situation which presents risks to objects If the situation is not avoided property damage w...

Страница 5: ...ion of the saw blade drive This symbol designates the throttle valve for reducing the draining of the Floor saw This symbol indicates Working on the saw blade protective hood is prohibited when the saw blade is running This symbol indicates the running direction of the saw blade This symbol indicates Any implementation of the machine outside this range in which cutting work is done must be done wi...

Страница 6: ...uxiliary materials Maintenance service inspection repair and or Transport Along with the operating manual and the valid legal regulations for accident prevention in the country of use and the place of use also recognised technical regulations for safety and proper work are to be observed Required tool In order for the Floor saw to be operated a tool in the form of a saw blade is required These too...

Страница 7: ...7 56 Notes ...

Страница 8: ...a 18 2 4 Noise power level 19 3 Commissioning 20 3 1 Connections and operating materials 20 3 2 Tools saw blade 20 3 3 Control panel 21 3 4 Filling the tank with fuel 22 3 5 Parking brake 23 3 6 Saw blade installation tool 24 3 7 Adjusting the handles 25 4 Transport 26 4 1 Transport position 26 4 2 Moving the machine 27 4 3 Move with the crane 28 4 4 Fastening for transport 29 5 Operation 30 5 1 S...

Страница 9: ...on resistant sheet metal frame construction The compact design and balanced chassis allows easy maneuvering on the construction site The low center of gravity ensures an exact saw cut A very good straight cut due to an adjustable rear axle Lowering and raising the saw blade is done electro hydraulically with cutting depth display thereby preventing damage to the saw blade The height adjustable han...

Страница 10: ...or saw handles Any other use or use above and beyond is not considered intended use Intended use also includes compliance with the operating manual and observance of inspection and maintenance manual Non intended use Foreseeable misuse non intended use Cutting without saw blade protective hood Cutting without water Cutting of wood plastic or metal except for reinforcement in concrete Building chan...

Страница 11: ...loor saw Establish responsibilities of the personnel for operating changeover servicing and repairing the machine Make sure that only authorized personnel works at the machine The operator must wear personal safety equipment according to the safety regulations such as safety shoes safety gloves and safety glasses Remaining in the working area of the Floor saw unnecessarily is prohibited Direct una...

Страница 12: ...e cutting process must always be done clockwise otherwise material is ripped out which causes small pieces of debris to fly around When inserting the saw blade protect against sharp edges Ensure that the floor on which cuts are to be made fulfils load carrying capacities All obstacles must be cleared away from the cutting area and make sure there is sufficient lighting Visual inspection of the who...

Страница 13: ...ly be carried out by qualified electricians Only suitable and tested tools must be used For protection before acceleration move the depth setting of the saw blade slowly into the solid floor Avoid any contact with the running tool It is prohibited to cut without the saw blade protective hood or the drive motor cover The operator must be protected by turning parts 1 4 4 Moving the Floor saw The Flo...

Страница 14: ...lugs are especially at risk After cleaning remove the covers tape completely During service and repair work always tighten loose bolt joints If dismantling is required for fitting servicing and repair the safety fittings must be remounted and checked immediately following the service and repair work No rotating tools which have a maximum rotation speed smaller than the nominal speed of the machine...

Страница 15: ...ational guidelines To prevent dust build up during cutting the saw blade must be wetted and cooled using water Dry cutting is prohibited and damages not only the saw blade 1 5 4 Noise See Chapter 2 4 Noise power level 1 6 Transport To implement using a crane slinging equipment with sufficient load carrying capacity must be used Slinging equipment must be checked for damage before use Name expert i...

Страница 16: ...facturer If the machine is not immediately put into operation after unpacking it must be protected from moisture and dirt 1 8 Environmental protection Packaging material cleaning agents used or residual operating materials as well as removed wear parts such as drive belts or motor oils must be taken to recycling corresponding to the valid regulations for environmental protection at the place of us...

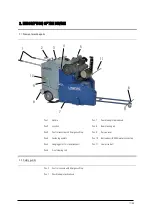
Страница 17: ... rod Pos 3 Control console with Emergency Stop Pos 9 Service cover Pos 4 Fastening eyelets Pos 10 Ball valve with GEKA water connection Pos 5 Hanging point for crane transport Pos 11 Fixer drive belt Pos 6 Front steering rod 2 2 Safety guards Pos 3 Control console with Emergency Stop Pos 7 Saw blade protective hood 1 3 4 5 9 8 10 6 7 2 11 ...

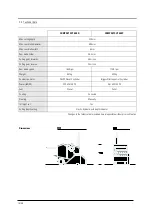
Страница 18: ...rse 25 m min Saw blade speed 1650 rpm 1750 rpm Weight 657 kg 539 kg Combustion motor DEUTZ Diesel 2 cylinder Briggs Stratton petrol 2 cylinder Power kW PS 22 3 kW 30 PS 26 1 kW 35 PS Fuel Diesel Petrol Cooling Air cooled Steering Manually Left right cut Yes Cutting depth setting Electro hydraulic with depth indicator Changes to the technical data included here are possible without prior notificati...

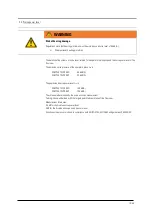
Страница 19: ... the operator s place LpA is COMPACTCUT 900 D 95 6 dB A COMPACTCUT 900 P 93 6 dB A The guaranteed noise power level LwA is COMPACTCUT 900 D 100 dB A COMPACTCUT 900 P 104 dB A The values are determined by the noise emission measurement Testing is done under load with the largest permitted saw blade of the Floor saw Measurement tolerances 2 5 dB for the A value noise power level 4 dB for the A value...

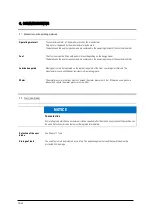
Страница 20: ...ts Moving parts must be lubricated on the lubrication points of the Floor saw at regular intervals The manufacturer uses qualified heat resistant multi purpose grease Water The water pressure in the lines must not exceed the water pressure of 5 bar Otherwise use a pressure reducer and reduce the water pressure to max 5 bar 3 2 Tools saw blade NOTICE Tool selection No rotating tools which have a ma...

Страница 21: ...operating hours counter Pos 2 Charge indicator lamp Pos 3 Emergency stop Pos 4 Oil pressure Pos 5 Motor oil temperature indicator Pos 6 Parking brake Pos 7 Ignition switch Pos 8 Motor speed control lever Pos 9 Variable controller sinking speed Pos 10 Cutting depth indicator Pos 11 Saw blade lifting control lever Pos 12 Control lever direction of movement forward reverse Emergency Stop is an emerge...

Страница 22: ...absolutely forbidden during refueling Remove all ignition sources NOTICE Fuel storage Fuel storage may only be in authorized containers The containers must be marked accordingly Open the tank lid Pos 1 Fill fuels through the filter sieve in the opening Fill fuel tank up to the filter sieve Close the tank lid Pos 1 1 ...

Страница 23: ...hine In order to secure the Floor saw against rolling away the parking brake must be used The parking brake must not be used to brake during running operation It is only used to secure against unintentional rolling The parking brake is activated using the control lever Move the control lever Pos 1 up or down for opening or closing 1 ...

Страница 24: ...ove the saw blade protective hood upwards using the handle Move Floor saw upwards using control lever Pos 1 Remove the flange screw Pos 3 using the tool kit and remove the pressure disc Insert saw blade When installing the saw blade ensure that the flange surfaces are clean The saw blade must sit directly on the flange Match the direction of rotation of the saw blade with the rotation direction ar...

Страница 25: ... Adjusting the handles The handles must be adjusted for each operator The operator can select between three different heights Loosen clamping screw Pos 1 Pull out the handles and insert in the desired position 1 ...

Страница 26: ...nt points NOTICE Transport of the machine When transporting the Floor saw unintentional position changes must be prevented Motor oil can leak into the combustion area of the motor and damage it All moving parts that can fall swing or interfere during transport must be removed The saw blade protective hood must be removed Saw blade is removed to avoid damage to the saw blade Combustion motor is tur...

Страница 27: ...o move the machine Preparation Release the Emergency Stop Pos 1 Set the motor speed control lever Pos 5 on the lowest position Move the joystick Pos 7 into the middle position Switch on machine using the ignition key Pos 3 Move the machine upwards using control lever Pos 6 Start the machine using the ignition key Pos 3 Moving manually Move the machine upwards using control lever Pos 6 Release the ...

Страница 28: ...nts Injury from machine parts The machine may only be transported or moved in transport position Hang Floor saw with slinging equipment with sufficient carrying capacity on the crane eye Pos 1 Name expert instructors before the lifting process Only use suitable transport vehicle with sufficient load capacity Lift carefully and pay attention to the centre of gravity Always keep an eye on the Floor ...

Страница 29: ...achine Only transport the machine in the transport position Secure the machine via the attachment points All moving parts that can fall swing or interfere during transport must be removed Observe transport position Pay attention to the permitted total weight of the transport vehicle Fasten the Floor saw with sufficient slinging equipment 1 1 ...

Страница 30: ... be cut off WARNING Cutting process The operator contracted with cutting must start the forwards movement using the joystick operators are restricted to standing only in this area of the Floor saw The Floor saw may only be operated by one person direct other people away from the cutting area or block the area off DANGER Tighten release saw belt The saw blade is started immediately when the machine...

Страница 31: ...lled with sufficient fuel A suitable saw blade which meets the optimal conditions must be mounted The water cooling system must be functional 5 3 Moving or setting up the Floor saw WARNING Danger of injury from rotating saw blade If rotating cutting blades are touched clothing can be caught and extremities can be cut off When moving the machine the saw blade must be at a standstill Location change...

Страница 32: ... Joystick position when starting the machine If the joystick is not in the neutral position when starting it must first be put in the neutral position in order to move the machine The drive belts must be released Preparation Put the Floor saw in position Fold the steering rod forward and downwards Loosen the Emergency Stop Pos 1 Set the motor speed control lever Pos 4 on the lowest position Move t...

Страница 33: ...tion key Pos 3 Tension the drive belts using the tensioning lever Set motor speed using the control lever Pos 5 to full load Slowly connect the saw blade drive via the control lever Pos 4 Lower the saw blade using the control lever Pos 8 until the saw blade scratches the floor Set cutting depth indicator Pos 7 to zero Lower the saw blade using the control lever Pos 8 until the desired cutting dept...

Страница 34: ... During cutting the Floor saw pulls to the side by the saw blade and thus the cutting line runs off To work against this running off the toe in of the rear axle can be adjusted The toe in is adjusted by turning the set screw Pos 1 1 ...

Страница 35: ...s 4 of the saw blade protective hood Remove the saw blade protective hood Pos 2 upwards using the handle Move Floor saw upwards using control lever Pos 1 Insert saw blade When installing the saw blade ensure that the flange surfaces are clean The saw blade must sit directly on the flange Match the direction of rotation of the saw blade with the rotation direction arrow down cutting the saw blade p...

Страница 36: ...lade protective hood Remove the saw blade protective hood upwards using the handle Remove the flange screw using the tool kit and remove the pressure disc Retrofitting Remove puller Pos 2 of the blade holder from its position Pos 3 Screw the puller Pos 2 in the centre of the saw blade flange and remove the blade holder Pos 1 Place the new blade holder Pos 1 in the centre of the blade holder Pos 1 ...

Страница 37: ...ed with each machine Especially pay attention to the safety and maintenance procedures Lubrication Use only high quality grease which meets the specifications on lubrication nipples The lubricant used for the Floor saw is called Energrease LS2 BP Before each use Daily Weekly Monthly Visual inspection for recognisable damage and deficiencies Clean the Floor saw thoroughly depending on use Check mot...

Страница 38: ... secured against turning on by other people Opening the protective guard while the saw blade is still rotating is prohibited The lubrication points are located on the underside of the Floor saw Saw blade shaft Lubricate the vertical bearing of the saw blade shaft Pos 1 monthly Flange bearing Lubricate the rotation point of the scissors axis Pos 2 monthly Vertical bearing Lubricate the vertical bea...

Страница 39: ...39 56 The service cover is located on the back of the Floor saw remove it Roll ring The roll ring tensions the chain and minimizes the wear of the drive parts Lubricate the roll ring or chain monthly ...

Страница 40: ...machines or parts Only use undamaged lifting gear and loading equipment with sufficient lifting capacity and length The centre of mass of the machine is off centre The depth stop for the immersion depth of the saw blade can be adjusted on the underside of the Floor saw via the two hexagonal screws Pos 1 1 1 ...

Страница 41: ...be secured against turning on by other people Opening the protective guard while the saw blade is still rotating is prohibited The effects of an improperly tensioned drive belt Drive belt too loose Drive belt slips on the v belt pulley no or low power transmission Drive belt tightened too much Excessive wear much heating of the v belt pulley with resulting damage Remove the flange protection pos 1...

Страница 42: ...st for correct belt tension To be optimally tensioned the drive belts must yield approx one belt thickness during the push test with the thumb when in the coupled condition Again release the drive belts using the tensioning lever Replace the cover panel of the drive belts pos 2 and flange protection pos 1 Idle position uncoupled The idle position can be set by releasing the tensioning lever pos 2 ...

Страница 43: ...ng down the old drive belts Place new drive belts in the guides Replace sheet metal pos 3 on the belts and fasten using the hex head screws Screw covers pos 1 and pos 2 back on Perform pushing test for correct belt tension To be optimally tensioned the drive belts must yield approx one belt thickness during the push test with the thumb when in the coupled condition 1 2 3 ...

Страница 44: ... machine must be secured against turning on by other people Opening the protective guard while the saw blade is still rotating is prohibited The air filter sucks in the ambient air and filters the foreign substances These foreign substances are deposited in the air filter over time and reduce the flow of air If the vacuum in the air filter is too large the service switch Pos 2 changes over and sig...

Страница 45: ...ating manual of the combustion motor Incorrect saw blade direction of rotation Check saw blade direction of rotation Floor saw does not start Fuel tank empty Refill fuel Fuel filter contaminated Remove and clean fuel filter Battery voltage too weak Check batter voltage and charge if necessary Control lever direction of movement in wrong position Put control lever direction of movement in centre po...

Страница 46: ...que in Nm Max tightening torque in Nm Max tightening torque in Nm M4 3 3 4 8 5 6 M5 6 5 9 5 11 2 M6 11 3 16 5 19 3 M8 27 3 40 1 46 9 M10 54 79 93 M12 93 137 160 M14 148 218 255 M16 230 338 395 M18 329 469 549 M20 464 661 773 M22 634 904 1057 M24 798 1136 1329 M27 1176 1674 1959 M30 1597 2274 2662 ...

Страница 47: ...should be used as a proof of already performed maintenance and as a service book All warranty and service work must be entered as proof Machine type Serial number year of manufacture Date Performed maintenance or service works Date signature ...

Страница 48: ...ond tools are marked in colours Depending on the application purpose and area tools are different To have the best results the parameters must match With this diagram the optimal cutting performance can be determined In the LISSMAC sales booklet the prices for the tools are determined This sales booklet can be obtained from the manufacturer at any time ...

Страница 49: ...uide elements such as guide strips guide bushings guide rails rollers bearings anti slide plating Tension elements from quick coupling systems Flushing head seals Plain and roller bearings which do not run in oil bath Shaft sealing rings and sealing elements Friction and overload couplings braking equipment Carbon brushes collectors Easily dissolvable rings External potentiometer and manual switch...

Страница 50: ...igned exclusively for cutting grooves into concrete or asphalt using water Cutting uses saw blades and the machine may only be operated for cutting of floors COMPACTCUT 900 D COMPACTCUT 900 P Cutting depth 320 mm Saw blade Ø max 800 mm Saw blade holder 25 4 mm Combustion motor DEUTZ Diesel 2 cyl Briggs Stratton petrol 2 cyl Output power max 22 3 kW 30 PS 26 1 kW 35 PS Saw blade speed 1650 rpm 1750...

Страница 51: ...51 56 9 CIRCUIT DIAGRAM ...

Страница 52: ...52 56 ...

Страница 53: ...53 56 ...

Страница 54: ...54 56 ...

Страница 55: ...55 56 ...

Страница 56: ...56 56 ...

Отзывы: