‑ 13 ‑
EN
•
Children from group II, III, (15 - 36 kg) can be in a forward-facing position in position
1 only.
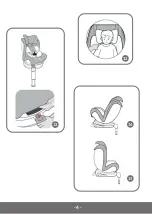
SEAT LINER
The seat liner is intended for babies, raises their comfort and serves as additional support
(see: fig. 19). If the child needs more space in the child safety seat, remove the seat liner.
HOW TO REMOVE COVERING
•
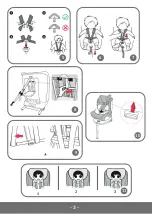
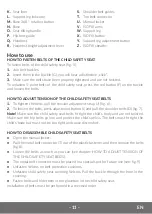
Remove 5-point belts of the child safety seat. (See: fig. 8 and 9)
•
Lift the headrest as high as possible.
•
Unfasten Velcros and remove the covering from the child safety seat.
To put the cover back on, follow the steps above in a reversed order.
HOW TO INSTALL IN THE CAR
A. ASSEMBLY WITH SAFETY BELTS
1.
Installation in a rear-facing position, the child secured with safety belts of the child
safety seat (group 0+, 0 - 13 kg).
•
Place the child safety seat on the car seat.
•
Turn the child safety seat to the rear-facing position; to do so, press the base rotation
button (M) (see: fig. 13).
•
Press the support leg adjustment button (Y), then extend the leg and adjust its length
so that it contacts the vehicle floor (the indicator will turn green when the support leg
is sufficiently extended).
•
Pull the car seat belt.
•
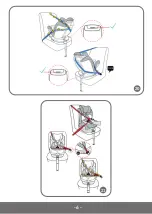
Carry the shoulder part of the belt (D) through the shoulder belt guide (A) marked in blue.
•
Carry the hip part of the belt through the hip belt guide (P) marked in blue.
•
Press the child safety seat against the car seat as much as you can. Pull the hip belt
towards the buckle in order to tighten it as much as possible. Next pull the shoulder
belt to tighten other parts of the belt. Make sure the belts are not twisted and properly
hold the child safety seat.
•
Put the child in the child safety seat and secure it with product’s safety belts. (See: fig. 20)
Information:
•
For children from group 0+, the child safety seat must be fixed in a rear-facing position
only, and inclination angle must be as high as possible (position no. 5). To make sure
the child safety seat is properly installed, try to move it before use.
•
Make sure the car seat belt is not twisted!
•
Make sure the belts have been properly fastened. After fastening, you should hear a
distinctive „click”. (See: fig. 20)
Содержание Braam
Страница 2: ...2 2 1 3 4...
Страница 3: ...3 5 6 7 9 8 10 11 2 3 1...
Страница 4: ...4 12 13 15 14...
Страница 5: ...5 16 17 18 19...
Страница 6: ...6 21 20...
Страница 7: ...7 22 24 23 25 26 27...
Страница 39: ...39 RU 0 I II III help lionelo com BrandLine Group Sp A Kr glewskiego 1 61 248 III 22 36...
Страница 40: ...40 RU ISOFIX 9 1...
Страница 42: ...42 RU 5 1 2 G 3 5 F 1 J 6 2 I D 7 T 8 9 R 12...
Страница 44: ...44 RU 1 5 1 4 5 17 II III 15 36 1 19 5 8 9 A 1 0 0 13 360 13 Y D A P 20...
Страница 45: ...45 RU 0 5 20 2 I 9 18 360 M 13 Y D A P 21 3 II III 15 36 5 8 9 360 M 13 Y...
Страница 48: ...48 RU D A P 6 25 A B 22 25 ECE R44 04...
Страница 130: ...130...
Страница 131: ...131...
Страница 132: ...132...
Страница 133: ...133...
Страница 134: ...134...
Страница 135: ...135...
Страница 136: ...136...
Страница 137: ...137...
Страница 138: ...138...
Страница 140: ...www lionelo com...


