


10
9
LEGACY Control System operations
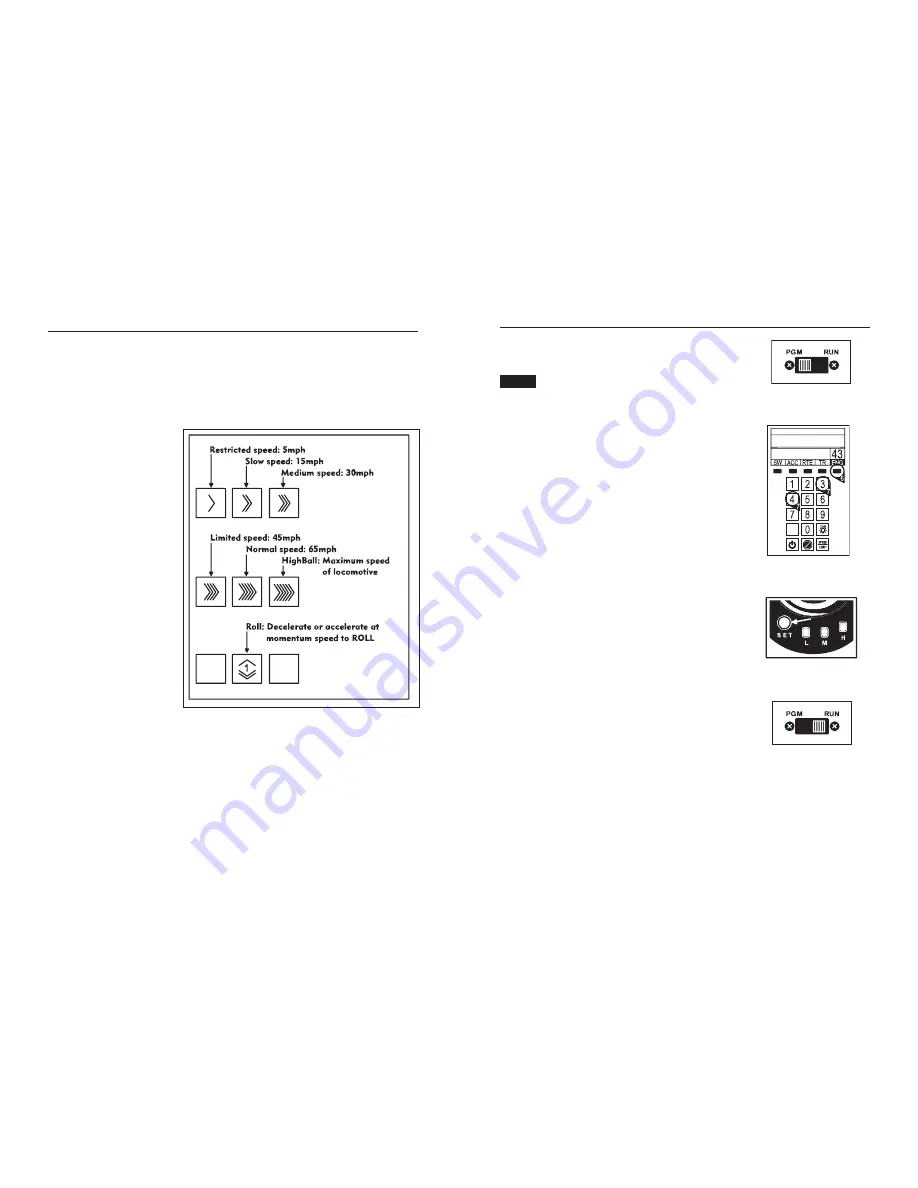
THE SPEED BAR
Selection of Official Rail Road Speeds
T
he Speed Bar is used to select a new touch-screen Icon Control set. This set of touch-
screen keys is used to select official Railroad Speeds. Two additional controls, "High Ball,"
(Top Speed) and "Brake to Roll," (speed step one) are possible with this Touch-Screen set of
controls. Pressing AUX-1 returns you to the standard control panel.
17. Press, hold and release the
RR Speed icons one by one.
Experiment.
18. The speed of the engine
changes with each press and
release of a different RR
Speed key.
19. TowerCom dialog occurs each
time you press and hold a RR
speed key.
20. The Engineer dialog
responds and the speed of the
engine changes as soon as
you release the RR speed key.
21. If you touch a RR speed
key and release it quickly, a
speed change is enabled with
no dialog scene.
22. You can also use the Velocity
Throttle and other action
controls in this mode and
continue to use Official RR
speeds at the same time.
23. Repeat step 17.
24. Press AUX-1 to leave the RR speed mode and return to the standard mode and return to
the standard control panel.
25. Press the speed bar to toggle between the Official RR Speed Control Panel and the
Standard Control Panel.
At this point you know the basics of how to operate. There is a lot of fun waiting as you
experience the interaction of the controls and the touch-screen.
Be sure to read the entire Lionel Legacy Control System Manual to get the most from your
Lionel products.
See reference numbers 17, 18, 19, 20, 21, 22, 23, 24, and 25
10
LEGACY Control System operations
Assigning a new ID# to your locomotives
1. Make sure no other CABs are in use.
2. Slide the engine’s PGM/RUN switch to PGM
Work with only one locomotive at a time.
3. Power down your track.
4. Put the engine on the track.
5. Power up your track.
6. Press ENG on the remote.
7. Enter a unique engine ID# 1 to 99.
8. Press SET.
9. The horn should blow, the headlight pulse, or both.
10. Power down your track.
11. Take the engine off the track (if needed to access the PGM/
RUN switch).
12. IMPORTANT! Slide the engine’s PGM/RUN switch back to
RUN right away.
13. Put the engine on the track (if needed).
14. Power up your track.
15. You are ready to operate.
Note!
See reference numbers 1-5
See reference number 12
See reference numbers 8 & 9
See reference numbers 6 & 7


