background image

–     –

–     –

6

7

Initial Setup

There are several boards that are included with the Basic Evaluation 
Kit and the Master Development System. The Basic Evaluation Kit 
includes two Carrier Boards and two Remote Control Demo Boards. The 
Master Development System includes these boards but also adds two 
Programming Docks and two Prototype Boards.

The Carrier Boards have a TT Series transceiver on a daughter board with 
headers. These boards snap into sockets on the other boards, enabling the 
modules to be easily moved among the test boards.

There are two Remote Control Demo Boards that are populated differently. 
Board A has the buttons on the right column and board B has them on the 
left column. These accept the Carrier Boards and are used to demonstrate 
the remote control functionality of the TT Series. They can also be used for 
range testing. These boards use hardware configuration, so if any changes 
have been made to the modules using the software then they may not 
operate correctly. A restore to default configuration can be used to reset 
the modules.

The Programming Docks have a socket for a Carrier Board and a USB 
interface for connection to a PC. This is used with the demonstration 
software included with the kit to configure the module through its 
Command Data Interface.

The Prototype Boards have a socket for a Carrier Board, a USB interface 
and a large area of plated through holes that can be used to develop 
custom circuitry. The board can be powered either from the USB 
connection or an external battery.

The development software supports Windows 7 and 10; with Java 1.6 or 
later.

        Warning:

 Installing or removing a Carrier Board while power is 

applied could cause permanent damage to the module. Either turn 
off power to the board or unplug the USB cable before installing or 
removing a Carrier Board

!

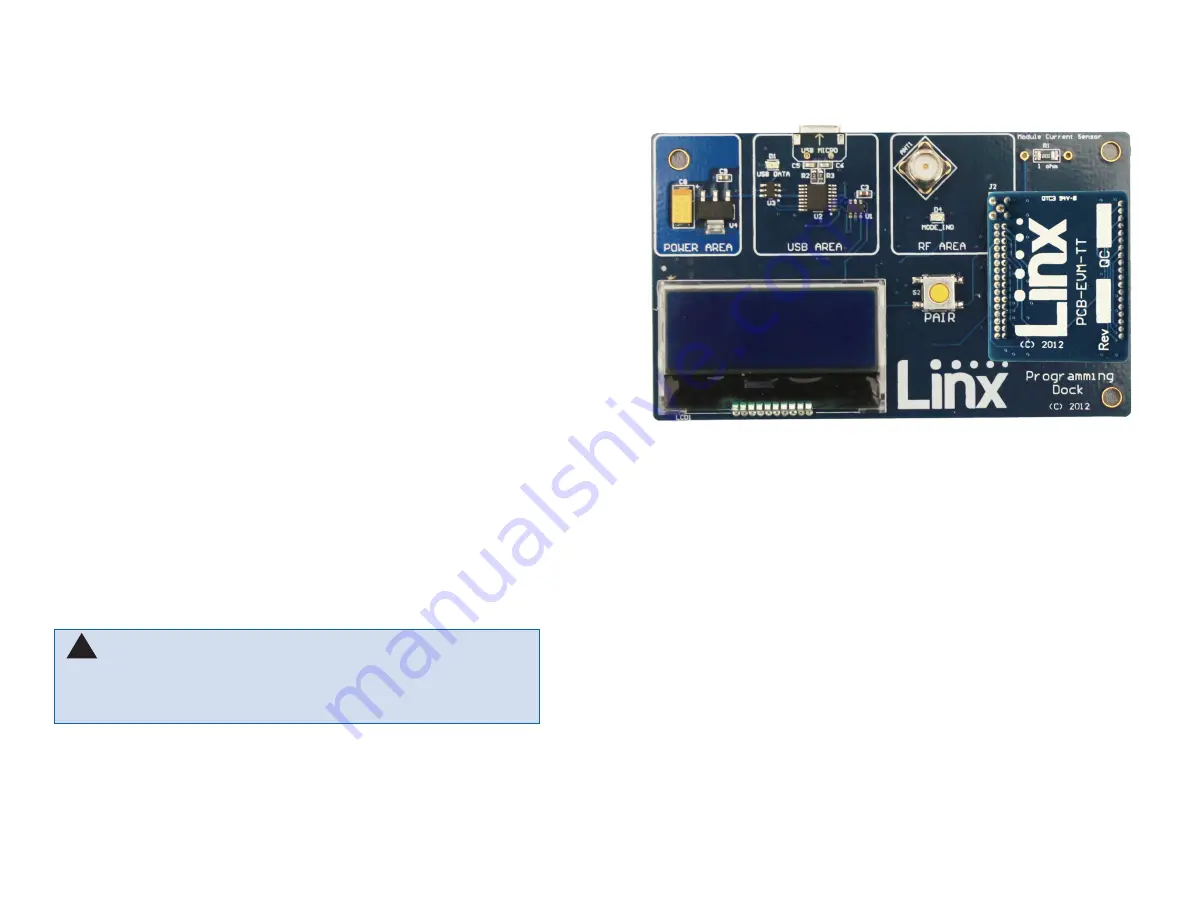
Using the Programming Dock

Snap a Carrier Board onto the socket on the Programming Dock as shown 
in Figure 8.

Connect a micro USB cable into the connector at the top of the board. 
Plug the other end into a PC. The board is powered by the USB bus. 
The demonstration software included with the kit or custom application 
software can be used to configure the module through its Command 
Data Interface. The LCD is used to display information about the module. 
This includes the module’s local address and a custom nickname. The 
nickname is entered using the development kit software and can be 
any name that helps distinguish the modules from one another. This is 
convenient when multiple programming docks are connected to the same 
computer. Please see the development kit software section for more 
information on the nicknames.  

The TT Series transceiver has a serial Command Data Interface that offers 
the option to configure and control the transceiver through software instead 
of through hardware. This interface consists of a standard UART with a 
serial command set. This allows for fewer connections in applications 
controlled by a microcontroller as well as for more control and advanced 
features than can be offered through hardware pins alone.

Figure 8: Programming Dock with a Carrier Board

Содержание CON-SOC-EVM

Страница 1: ...ss mainly focus on the distribution of electronic components Line cards we deal with include Microchip ALPS ROHM Xilinx Pulse ON Everlight and Freescale Main products comprise IC Modules Potentiometer...

Страница 2: ...TT Series Master Development System User s Guide...

Страница 3: ...nd warranty Customers may use our non Function Modules Antenna and Connectors as part of other systems in Life Safety Situations but only with necessary and industry appropriate redundancies and in co...

Страница 4: ...modules Application Development A prototyping board allows the development of custom circuits directly on the board All signal lines are available on headers for easy access Software Development A pr...

Страница 5: ...or 3 Dual Row Header 4 Single Row Header TT Series Transceiver Carrier Board Figure 3 TT Series Transceiver Carrier Board 1 2 2 3 3 4 4 Bottom Top TT Series Transceiver Carrier Board Pin Assignments F...

Страница 6: ...ders 12 Command Data Interface Routing Switches on back Figure 7 Prototype Board 4 1 2 3 10 6 7 8 11 5 9 11 11 Remote Control Demo Board Board B Board A Remote Control Demo Board Objects 1 Carrier Boa...

Страница 7: ...powered either from the USB connection or an external battery The development software supports Windows 7 and 10 with Java 1 6 or later Warning Installing or removing a Carrier Board while power is ap...

Страница 8: ...problem with either the board or the ambient RF environment in which the board is operating First check the battery switch positions and antenna connection Next measure the receiver s RSSI voltage wit...

Страница 9: ...power adapter The board is powered by the USB bus This board features a prototyping area to facilitate the addition of application specific circuitry The prototyping area contains a large area of plat...

Страница 10: ...the active module and the Permissions Mask for each one 7 The demo area replicates a remote control device The appearance changes with the programmed configurations 7 4 1 2 3 10 6 8 11 5 9 Figure 13...

Страница 11: ...r Development System Software Additional Information The Advanced Configuration tab Figure 16 offers more detailed configuration options for the active module 1 The Local Address box shows the module...

Страница 12: ...ched or momentary operation for each status line output is set Either the LATCH_EN hardware line is used to set all of the lines the same way or the Latch Mask is used to set the lines individually 14...

Страница 13: ...o Command Set Tab Items Menu The Sandbox tab shows the interaction of all of the connected modules on one screen Figure 20 shows two modules on the screen but up to 8 modules can fit at one time Click...

Страница 14: ...with the active device This is accomplished by dragging modules from the Available or Known Modules lists to the Given Permissions window as shown in Figure 23 Figure 21 The Master Development System...

Страница 15: ...s enabled by the module s Command Data Interface Any changes are highlighted in red In the example in Figure 27 the output mask has been changed to all inputs S0 is latched the Paired module is given...

Страница 16: ...n on the transmitter module activates an LED on the receiving module Figure 30 shows the transmitter Figure 31 shows the receiver Figure 28 The Master Development System Software Demo and EZConfigurat...

Страница 17: ...t asking for a name of the profile Figure 34 Figure 32 The Master Development System Software Sandbox Figure 33 The Master Development System Software Saved Profiles Window Once saved the profile appe...

Страница 18: ...1 RA5 2 RA4 3 MCLR 4 RC5 5 RC4 6 RC3 7 RC2 8 RC1 9 RC0 10 RA2 11 ICSPCLK 12 ICSPDAT 13 GND 14 U2 PIC16F1824 VCC GND PGD PGC MCLR CMD_DATA_IN CMD_DATA_OUT IDENTITY CRT_LRN MODE_IND GND SER_I O R14 330...

Страница 19: ...GREEN GND SW1 SPDT GND VCC B1 GND Vin 1 GND 2 Vout 3 U1 C1 0 47uF GND C2 100uF Figure 39 Remote Control Demo Board RF Carrier Area Schematic VCC S0 D0 SEND D5 R12 330 D3 R10 10K GND GND VCC S1 D1 SEN...

Страница 20: ...43 44 45 46 47 48 49 50 51 52 53 54 55 56 GND GND GND GND GND GND GND GND GND GND GND GND GND R35 10k R34 10k R33 10k R32 10k R30 10k R28 10k R22 10k R21 10k R18 10k R15 10k R14 10k R13 10k R12 10k R...

Страница 21: ...DNP GND MODE_IND R8 330 ohm D4 MODE_IND BLUE R24 10k S2 VCC PAIR PAIR GND R41 0 ohm R40 0 ohm VCC GND SW1 LADJ Figure 45 Programming Dock Board Signal Routing Schematic GND GND C1 4 7uF C4 0 01uF L1...

Страница 22: ...ULT U2 R5 10k GND 5VUSB GND C8 0 47uF FAULT IN 1 GND 2 EN 3 FAULT 4 ILIM 5 OUT 6 TPS2553 SW3 5VUSB EN FAULT GND 1 2 J3 100mil Header Battery Input D1 GND R7 53 6k R9 53 6k GND Q1 R3 10k BCD Charger VC...

Страница 23: ...54 55 56 38 37 36 35 29 30 31 32 33 34 7 8 9 10 11 12 13 14 15 16 17 18 19 20 21 22 23 24 25 26 27 28 1 2 3 4 J6 100mil Header 1 2 3 4 5 6 7 8 9 10 11 12 13 14 15 16 17 18 19 20 21 22 23 24 25 26 J5 1...

Страница 24: ...stomer including without limitation breach of contract breach of warranty strict liability or negligence Customer assumes all liability including without limitation liability for injury to person or p...

Отзывы: