background image

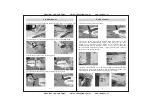
12.Install the front landing gear and tighten into place using the provided wrench.

C-185 Manual

7

C-185 Manual

8

13.Install the motor as shown, and fit it by using the provided screw.

14.Glue the head cover into place as shown.

15.Install the propeller and carefully tighten the prop screw.

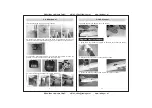
17. Connect the two wings halves together using the provided rod. Pay 
attention  to  the  dihedral(upward  angle  of  the  wings).Do  not  glue, 
leaving  the  wing  halves  unglued  allows  you  to  separate  them  for 
transporting  the  plane  to  the  field  or  pond.  If  you  want  to  connect  the 
two wing halves more tightly and don

t want to disassemble , that you 

can also use the glue to fit them.

18.Connect the extended wire of the aileron/flaps. Then install the wing 
struts into the wings, then screw them into the fuselage as shown.? Do 
not attempt to fly the plane without the wing struts in place.

16.Install the nose carefully as shown.

Modellbau Lindinger GmbH        e-Mail: [email protected]         www.lindinger.at

Modellbau Lindinger GmbH        e-Mail: [email protected]         www.lindinger.at

Содержание C-185

Страница 1: ...C 185 Manual Modellbau Lindinger GmbH e Mail office lindinger at www lindinger at Modellbau Lindinger GmbH e Mail office lindinger at www lindinger at...

Страница 2: ...ople or structures 4 Do lot fly or launch the model towards people s faces 5 Do not fly in strong winds or rain or thunderstorms 6 Keep your hands and face away from the propeller Disclaimer 1 This RC...

Страница 3: ...nent Center Of Gravity Center Of Gravity It is VERY important that the center of gravity be checked before attempting flight Move the battery around until the CG is correct Assembly Use of epoxy glue...

Страница 4: ...as shown and make sure to keep good alignment while drying 9 Install the rudder and steering rods as shown 8 Install the elevator control rod as shown 10 Put the tail cover into position as shown 11 A...

Страница 5: ...e leaving the wing halves unglued allows you to separate them for transporting the plane to the field or pond If you want to connect the two wing halves more tightly and don t want to disassemble that...

Страница 6: ...rs into place on the back of the floats as shown 2 Glue the servos into place on the floats as shown 3 Install the steering linkages and waterproof cover as shown 20 Install your receiver and check th...

Страница 7: ...nents in fresh water you can simply let them sit in the sun to dry off usually they will start working again when they are dry Some tips for flying off water as follow 4 If the water is too smooth the...

Страница 8: ...ropeller 6 plastic parts 7 Floats 8 Water rudder 9 9g servo 10 17g servo 11 ESC 12 Brushless Motor 3 Elevator and Rudder 4 landing gear Modellbau Lindinger GmbH e Mail office lindinger at www lindinge...

Отзывы: