background image

27 


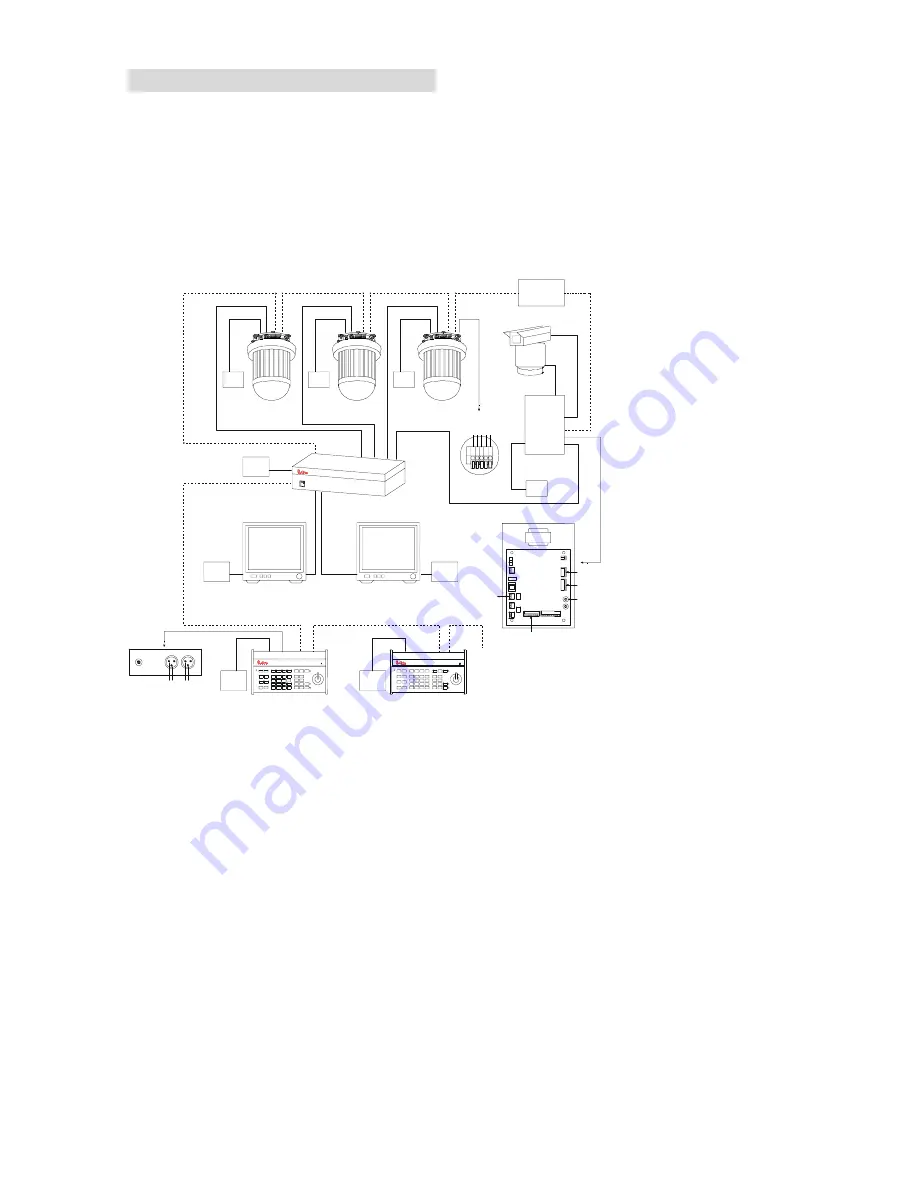
Fast Dome , Matrix and Keyboard   

Matrix System is designed to process multiple video systems and video switching. 
Its central process unit (CPU) can manage multiple video signals simultaneously and control other 
linking systems, such as PIH-7000 or PIH-7600 fast dome or PIH-820 telemetry receiver.    All 
telemetry remote control and signal transmissions are through twisted pair.    One matrix can 
manage up to 64 fast domes. 


RS-485 Connection 

between Matrix and 

Fast Dome 

TXD+ of receiver jack 
on matrix connects to 
TXDI+ of 1

st

 fast dome 

and TXD- of matrix to 
TXDI- of fast dome 


Linking 2

nd

 Fast 

Dome 

TXDO+ of 1

st

 dome 

connects to TXDI+ of 
2

nd

 dome and TXDO- 

of 1

st

 dome to TXDI- of 

2

nd

 dome   

64 fast domes can be 
linked through the 
connection as shown 

Multiple PIH-800II keyboards can be used for matrix control.    1

st

 keyboard is the master and rests 

are slaves.    Up to 8 keyboards can be used in one system.    Each keyboard has a Dip Switch for ID 
setting. (Please refer to keyboard’s manual for detail) 

RS-485 Connection between keyboards 

TXDO+ of 1

st

 keyboard RS-485 OUT connects to TXDI+ of 2

nd

 keyboard RS-485 IN 

TXDO- of 1

st

 keyboard RS485 OUT connects to TXDI- of 2

nd

 keyboard RS-485 IN 

RS-485 Connection between keyboard and matrix 

TXDI+ of 1

st

 keyboard RS-485 IN connects to 1

st

 pin TXD+ of matrix’s keyboard jack 

TXDI- of 1

st

 keyboard RS-485 IN connects to 2

nd

 pin TXD- of matrix’s keyboard jack 


1

3

2

1

3

2

DC 12V

IN

OUT

TX

D

I+

TX

D

I-

T

X

DO

-

T

X

DO

+

AC

AC

AC

AC

TX

D

I+

TX

D

I-

TX

D

O

-

TX

D

O

+

GN

D

NEXT
KEYBOARD

NEXT
DOME

RS-485

RS-485

RS-485

RS-485

RS-485

RS-485

VIDEO
IN

DC

1

2V

1

2V

DC

DC

1

2V

KEYBOARD

KEYBOARD

MONITOR 

1

MONITOR 2

MATRIX

FAST

DOME 

1

DOME 2

FAST

DOME 3

FAST

PIH-820

PAN/TITL

CAMERA

FAST

DOME

CAMERA

MATRIX

PAN/TITL

AC

1

2V

DC

1

2V

DC

CONTROLLER 

1

CONTROLLER 2

MATRIX

P IH- 864

P O W E R

F 1

F2

F4

F 3

1

P R E S E T 1

P R E S E T 2

F A S T

P R E S E T 3

2

3

SET UP

MO N

6

5

4

CA M

9

8

7

ENT

0

CLR

P R E S E T

ESC

A UX

CTRL2

CT RL1

A UTO

S PRAY

WIPE R

SEQ

ZOOM

IN

FAR

FOUCS

IRIS

O

NEAR

OUT

PAN

RESET

A LARM

ZOOM

F OUCS

IRIS
C

A UTO

A UTO

FO UCS

IRI S

KE Y PR O

PIH-800

P O W E R

F1

F 2

F 4

F3

1

P R E S E T 1

P R E S E T 2

F A S T

P R E S E T 3

2

3

SE TUP

M ON

6

5

4

CAM

9

8

7

ENT

0

CLR

P R E S E T

ESC

AUX

C TRL2

CTRL1

AUTO

SPRAY

WIP ER

SE Q

ZOO M

I N

FA R

FOU CS

IRIS

O

NEAR

OUT

PAN

RESE T

ALARM

ZOOM

FOUCS

IRIS

C

AUTO

AUTO

FOUC S

I RIS

K EY P RO

PIH-800

Telemetry

Receiver


Содержание PIH - 7000

Страница 1: ...FAST DOME CAMERA PIH 7000 SERIES PIH 7600 SERIES INSTALLATION OPERATION MANUAL E...

Страница 2: ...ural Drawing Pendant Mounting 11 Embedded Mounting False Ceiling 12 Attached Mounting Fixed Ceiling 16 Pendant Mounting External Housing 19 System Configuration Fast Dome and Keyboard 25 Single Dome 2...

Страница 3: ...ition 35 Setting Preset Position Group 35 Changing Preset Data 36 Activating AutoPan 36 Deleting Preset Data 37 Alarm Management 37 Alarm Response Mode 37 Lock Mode 37 Release Mode 38 Alarm Output 38...

Страница 4: ...lines provides high definition images and Digital Signal Processing maintains optimum quality in varying conditions with intelligent use of Back Light Compensation Auto Zoom Etc With continuous rotat...

Страница 5: ...be set as NO normally open or NC normally close for each Fast Dome z Two types of alarm response mode Lock Mode Release Mode z Build in 1 4 CCD high resolution DSP colour camera 1 480 TV Lines high r...

Страница 6: ...bject on the connection cable and change the cable if there is damage on cable Violation may cause short circuit fire and injury 10 Make sure ground is well connected to avoid damage caused by lightni...

Страница 7: ...6 STRUCTURAL ELEMENT Dome Cover Alarm In Out Jack Camera Case Video In Out Jack Decoration Ring Power In Jack RS 485 In Out Jack Camera Base...

Страница 8: ...an be set either NC normally close or NO normally open mode Turn number 2 switch to ON position to choose NC mode Turn number 2 switch to OFF position to choose NO mode Camera Function Switch Turn num...

Страница 9: ...ON 8 6 7 1 1 ON 2 3 4 5 ON 8 6 7 5 4 3 2 ON 7 6 8 1 1 1 7 6 8 5 4 3 2 2 3 4 5 ON 8 6 7 5 4 3 2 7 6 8 ON 1 2 3 4 5 8 6 7 ON ON 1 2 3 4 5 8 6 7 1 1 5 4 3 2 7 6 8 ON 5 4 3 2 ON 7 6 8 1 1 ON 2 3 4 5 8 6...

Страница 10: ...6 AWG 80 300V UL 24 AWG 80 C 300V 4 RS 485 In Out Jack RS 485 Input TXDI TXDI to receive signal from keyboard matrix DVR or multiplexer through twisted pair cable RS 485 Output TXDO TXDI sending out s...

Страница 11: ...10 INSTALLATION Indoor Installation Structural Drawing Embedded Mounting Attached Mounting Outdoor Installation Structural Drawing Pendant Mounting...

Страница 12: ...11...

Страница 13: ...the chosen area Use a pencil and a compasses to mark a circle 6 7 170 mm in diameter and cut the circle Step 2 The Ceiling Ring Attach the ring to ceiling Tighten the three tapping screws into the cei...

Страница 14: ...cover from camera Put on the three L shape screw nuts Attach fix ring with screw nuts Tighten the three black screws into the screw nuts Step 4 Camera Setting Untighten the three screws from the base...

Страница 15: ...onnection cable Step 5 Attach the Camera Body and Base Reconnect the connection cable Attach camera body to base Turn camera body clockwise to tight position Tighten the three screws to fix the camera...

Страница 16: ...fix ring into the hole Turn the camera body clockwise to tight position Tighten three black screws Put on decoration ring Turn the ring clockwise to tight position Step 8 Install The Dome Cover Attach...

Страница 17: ...rate the dome cover from camera Untighten the three screws from the base Turn the camera body anti clockwise Separate the camera body and the base Unplug the connection cable Attach base to ceiling Ti...

Страница 18: ...ower Refer to page 7 8 for the setting Step 3 Attach Camera Body and Base Reconnect the connection cable Attach camera body to base Turn camera body clockwise to tight position Step 4 Connection Conne...

Страница 19: ...18 Step 5 Install Decoration Ring Put on decoration ring to base Tighten the three screws Step 6 Install Dome Cover Put on dome cover to camera body Turn dome cover clockwise to tight position...

Страница 20: ...hten 2 screws to fix the PSU 1 2 When use 90 260Vac power sources Put PSU into the box Put the clamp on PSU Tighten the 2 screws to fix the PSU Step 2 Install the Power Box Drill 4 holes on desired lo...

Страница 21: ...knob Connect the AC power cable to AC Input jack Connect the AC power cable below to AC Output jack Connect the DC power cable above to DC Input jack DC Input Fan Heater Wiring Fast Dome Wiring Video...

Страница 22: ...e and tighten the knob Connect the telemetry control RS 485 to RS 485 Input TXDI TXDI Connect the Alarm input cable to Alarm Input Alarm 1 GND Connect the video cable to output jack Step 4 Attach the...

Страница 23: ...ody to base Unplug the connection cable Attach the base to housing Connect the housing cable Tighten 3 screws to fix base Step 5 Camera Setting Setting Fast Dome ID Setting Alarm Mode Setting Camera F...

Страница 24: ...se Turn camera body clockwise to tight position Tighten the three screws to fix the camera body Step 7 Install The Dome Cover and Housing Cover Attach the dome cover to the camera Turn the dome cover...

Страница 25: ...ng and Fast Dome Connect the fan heater cable to pin jack Connect the FastDome cable to connection jack Step 9 Install the Power Box Bracket and Housing Attach the bracket and housing to the box Tight...

Страница 26: ...CHING POWER 24Vac 90 260Vac Controller Keyboard Monitor Monitor Monitor PIH 680 CO LOR MU LTI PLEXER 1 2 3 4 POW ER ON OFF AUT O T IME MIN MAX C SET 5 6 7 8 E NT C AME RA PLA Y BACK FRZ 9 4 1 TR I G D...

Страница 27: ...N jack of keyboard connects to TXDO on RS 485 OUT jack of PIH 804 Multiplexer AC ADAPTOR RS 485 ADAPTOR AC RS 485 DATA PIH 804 CONTROL CHAIN 1 CHAIN 2 CONTROL CHAIN 4 CONTROL CHAIN 3 CONTROL 24Vac 90...

Страница 28: ...d RS 485 IN TXDO of 1st keyboard RS485 OUT connects to TXDI of 2nd keyboard RS 485 IN RS 485 Connection between keyboard and matrix TXDI of 1st keyboard RS 485 IN connects to 1st pin TXD of matrix s k...

Страница 29: ...1st DVR s keyboard jack connects to TXDI of keyboard RS 485 IN jack TXD of 1st DVR s keyboard jack connects to TXD of keyboard RS 485 IN jack TXDI TXDI TXDO TXDO GND DC 12V 12V DC 12V DC NEXT DOME RS...

Страница 30: ...485 jack connects to TXDI of 1st fast dome and connect TXD to TXDI Linking 2nd Fast Dome TXDO of 1st dome connects to TXDI of 2nd dome and TXDO of 1st dome to TXDI of 2nd dome 64 fast domes can linked...

Страница 31: ...To control the pan and tilt movement of the dome simply use the joystick on the keyboard to pan the camera left push the joystick to the left to tilt down pull the joystick down towards you To move t...

Страница 32: ...rged on the screen Zooming will stop when the key is released To Zoom Out Push ZOOM OUT key one beep should be heard The viewing angle becomes wider and target will become smaller on the screen Zoomin...

Страница 33: ...uto Iris or Manual Iris Iris Open Push IRIS O key one beep should be heard to open the iris and brighten the picture Iris will stop when the key is released Iris Close Push IRIS C key one beep should...

Страница 34: ...2 8 PRESET keys Joystick Control Move the Joystick to bring the camera to the desired view position Adjusting Lens By using ZOOM IN OUT FOCUS NEAR FAR AUTO and IRIS O C AUTO keys Please refer to page...

Страница 35: ...tored For the first 16 Presets on each dome the above steps must be repeated For presets 17 128 there is a default speed and dwell setting so steps 5 and 6 are not required Follow are the 7 steps for...

Страница 36: ...roup allows the management of the 16 preset positions before Auto Scanning The first 16 preset positions of each dome are separated into 4 groups Preset group must be set for the auto pan reference Gr...

Страница 37: ...uto Pan function is chosen the fast dome will auto touring the preset groups by the entered data To activate Auto Pan Push AUTO PAN key one beep will be heard and the LED will illuminate confirming th...

Страница 38: ...ionship Between Alarm Inputs and First 6 Presets Alarm Input 1 will send the dome to Preset Position 1 Alarm Input 2 will send the dome to Preset Position 2 Alarm Input 3 will send the dome to Preset...

Страница 39: ...ome will move between alarmed points every 5 seconds and back to first preset position after 60 seconds The audio alert for alarm trigger will remain on until it is manually cancelled by push the ALAR...

Страница 40: ...ng Camera Image Device 1 4 Inch Interline Transfer CCD Horizontal Pixel NTSC 811 PAL 795 Vertical Pixel NTSC 508 PAL 596 Horizontal Effective Pixel NTSC 768 PAL 752 Vertical Effective Pixel NTSC 494 P...

Страница 41: ...n Out Manual Control Zoom In Out Accuracy 0 25 Electrical Power Supply 24Vac or 90Vac 260Vac Option Input Voltage 12Vdc Power Consumption 13W Control Interface RS 485 1 Input 1 Output RS 485 Voltage 5...

Страница 42: ...Input 1 Output RS 485 Voltage 5 6V Alarm Input 6 Input Pull up Alarm Input Voltage 5 6V Alarm Output 1 Output NC or NO mode setting Alarm Output Voltage 0 5A 120Vac 1A 24Vdc Environmental Operation T...

Страница 43: ...uto Focus LED Off Auto Focus AUTO FOCUS Auto Focus LED On Open Iris IRIS O Auto Iris LED Off Close Iris IRIS C Auto Iris LED Off Auto Iris AUTO IRIS Auto Iris LED On 180 Horizontal Instant Flip 180 RE...

Страница 44: ...keyboard 3 4 Check if the fast dome is under Auto Pan mode Please deactivate the Auto Pan 3 5 Check if alarm is triggered Cancel triggered alarm 4 Poor Focusing 4 1 Dusts on dome cover or housing cove...

Страница 45: ...44 NOTES...

Отзывы: