background image

16

17

Press “ ” to confirm your settings, and the Date display will start to flash. Use the “ ” and “ ” buttons 
to set the correct date.
Press “ ” to confirm your settings, and the language selection for the Weekday displays will start to 
flash. Use the “ ” and “ ” buttons to select a language.
Press “ ” to confirm your settings, and to end the setting procedures.

Note


-

After 20 seconds without pressing any button, the clock switches automatically from Set Mode to Nor-
mal Time Mode.


-

You can choose between 7 languages: English, German, Italian, French, Spanish, Dutch and Danish.

 
Setting the Daily Alarms

Press the“ ” button once to switch to the display calendar or alarm time.
Press and hold down the “ ” button for 2 seconds until the alarm time hour display will start to flash. 
Use the “ ” and “ ” buttons to set the required hour. 
Press the “ ” button to confirm your settings, and the Minute will start to flash. Use the “ ” and “ ” 
buttons to set the required minute. 
Press the “ ” button to confirm your setting and to end the setting procedure.

Note


-

After 20 seconds without pressing any button the clock switches automatically from setting mode to 
Normal clock mode.

 
Turning the alarm on and off

To turn the alarm on, set the alarm switch to “ ”. The “ ” icon will be shown on the LCD display. 
To turn the alarm off, set the alarm switch to “ ”. The “ ” icon will disappear. 

Operating Instructions

Do not place the outdoor sensor in full sunlight as this may lead to inaccurate measurement.

First Use

Open Weather Station battery compartment cover. Insert 2 x AA batteries observing polarity [ “+” and 
“–“ marks].
Open the sensor’s battery compartment. Insert 2 x AA batteries observing polarity [ “+” and “–“ marks].
When you insert the batteries, all the icons on the LCD display will briefly light up for 3 seconds, and 
you will hear a beep tone, and the Weather Station will detect the indoor temperature & humidity.
The Weather Station will now start to make a connection to the Remote Sensor. This operation takes 
about 3 minutes and is displayed by a flashing reception RF antenna symbol in the “REMOTE SENSOR” 
display area on the receiver.
After the receiver has created a connection to the Remote Sensor, it will enter the Radio control time 
receive mode.


Reception of the Radio signal

The clock automatically starts the DCF signal search after 7 minutes of any restart or after the batteries 
have been changed. The radio mast icon starts to flash.
At 1:00 / 2:00 / 3:00 am, the clock automatically carries out the synchronization procedure with the DCF 
signal to correct any deviations from the exact time. If this synchronization attempt is unsuccessful (the 
radio mast icon disappears from the display), the system will automatically attempt another synchroniza-
tion at the next full hour. This procedure is repeated automatically up to a total of 5 times. 
To start the manual DCF signal reception, press and hold down the “ ” button for two seconds. If no 
signals are received within 7 minutes, then the DCF signal search stops (the radio mast icon disappears) 
and starts again at the next full hour. 
Press the “ ” button once during RC reception,  to stop searching for the radio signal.

Note


-

A flashing radio mast icon indicates that the DCF signal reception has started.


-

A continuously displayed radio mast icon indicates that the DCF signal was received successfully.


-

We recommend a minimum distance of 2.5 meters to all sources of interference, such as televisions or 
computer monitors.


-

Radio reception is weaker in rooms with concrete walls (e.g.: in cellars) and in offices. In such extreme 
circumstances, place the system close to the window.


-

During the RC receive mode, only the “ ” button functions, the other buttons do not. If you want to 
carry out other operations, please press “ ” button to exit the RC receiving mode.

Setting the Time Manually

Press “ ” once to switch to the display calendar or seconds counter.
Press and hold down the “ ” button for 2 seconds and the 12/24 hour mode display starts to flash. Use 
the “ ” and “ ” buttons to set the correct 12/24 hour mode.
Press “ ” to confirm your settings, and the time zones will start to flash. Use the “ ” and “ ” buttons 
to set the correct time zone (-12 to +12).
Press “ ” to confirm your settings, and the hour display will start to flash. Use the “ ” and “ ” buttons 
to set the correct hour.
Press “ ” to confirm your settings, and the minute display will start to flash. Use the “ ” and “ ” 
buttons to set the correct minute.
Press “ ” to confirm your settings, and the Month and Date icon display will start to flash. Use the “ ” 
and “ ” buttons to set the date display on Month/Date or Date/Month.
Press “ ” to confirm your settings, and the Year display 2015 will start to flash. Use the “ ” and “ ” 
buttons to set the correct year.
Press “ ” to confirm your settings, and the Month display will start to flash. Use the “ ” and “ ” but-
tons to set the correct month.

!

1.

2.
3.

4.

5.

1.
2.

3.

4.

5.

6.

7.

8.

9.

10.

11.

1.
2.

3.

4.

1.
2.

1.

2.

3.

4.

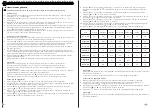
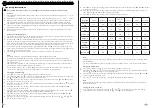
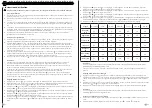
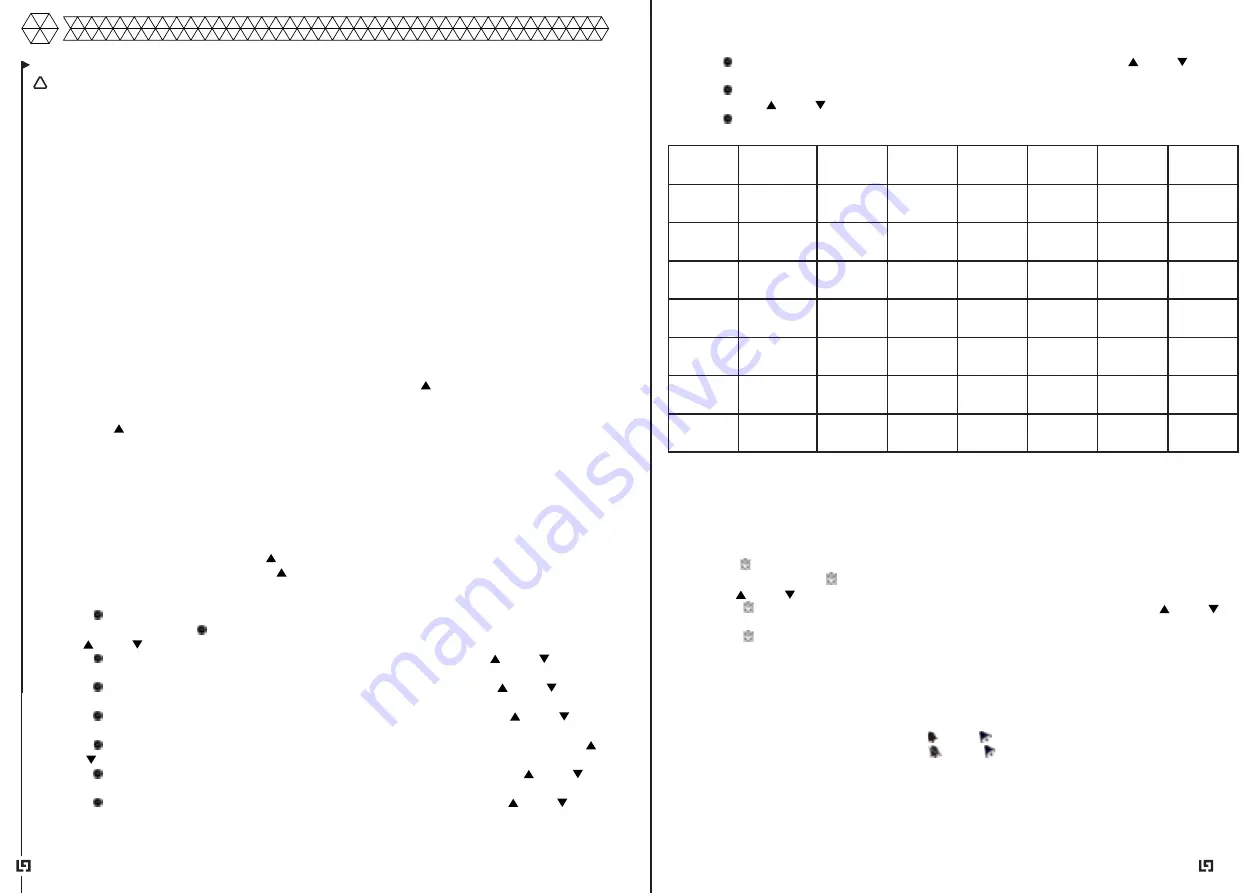
Language

 Sunday

Monday

Tuesday

Wednes-

day

Thursday

Friday

Saturday

German, 

GE

SO

MO

DI

MI

DO

FR

SA

English, 

EN

SU

MO

TU

WE

TH

FR

SA

French, FR

DI

LU

MA

ME

JE 

VE

SA

Italian, IT

DO

LU

MA

ME

GI

VE

SA

Spanish, 

SP

DO

LU

MA

MI

JU

VI

SA

Dutch, DU

ZO

MA

DI

WO

DO

VR

ZA

Danish, DA

SO

MA

TI

ON

TO

FR

LO

Содержание LG1177

Страница 1: ...station User Manual Weather Station Manuel d utilisation Station Météo et capteur CHN MADE IN CHINA Model Modèle LG1177 NL p 2 11 EN p 12 21 FR p 22 31 Lees de instructies Please read the manual Veuillez lire ce mode d emploi ...

Страница 2: ...araat leiden Elektra Haal het weerstation en de sensor NIET uit elkaar repareer en herstel het apparaat NIET Dit kan schade aan het apparaat aanbrengen Voor de eigen veiligheid mogen deze onderdelen alleen vervangen worden door geautoriseerd onderhoudspersoneel Stuur het weerstation en de sensor altijd naar een servicecentrum voor reparaties om schade en persoonlijk letsel te voorkomen Zorg ervoor...

Страница 3: ...thermosensor inbegrepen 433 92MHz RF zendfrequentie 60 meter zendbereik in een open ruimte IP nummer Sensor IPX4 Station Overige eigenschappen DCF radiogestuurde tijdfunctie Eeuwigdurende kalender tot het jaar 2099 Dag van de week in 7 talen selecteerbaar door gebruiker Engels Duits Italiaans Frans Spaans Nederlands en Deens Tijd in optionele 12 24 uurs indeling Dagelijkse wekkerfunctie Automatisc...

Страница 4: ...de ontvangstmodus voor de radiobesturingstijd Ontvangst van het radiosignaal De klok begint automatisch met het zoeken naar het DCF signaal 7 minuten na een herstart of nadat de batterijen zijn vervangen Het icoon van de radiomast begint te knipperen Om 1 00 2 00 3 00 uur voert de klok automatisch de synchronisatieprocedure met het DCF signaal uit om eventuele afwijkingen van de exacte tijd te cor...

Страница 5: ... van de verschillende kanalen van de draadloze temperatuur en vochtigheid om te schakelen Wanneer de wordt weergegeven schakelt het kanaal automatisch om de 5 seconden naar een ander kanaal Indien het weerstation geen transmissie van een draadloze sensor ontvangt display op de LCD houdt u de toets 3 seconden lang ingedrukt om de transmissie handmatig te ontvangen De draadloze sensor zal een animat...

Страница 6: ...eginnen te knipperen Gebruik en om de juiste weersomstandigheden in te stellen om de weersvoorspelling nauwkeuriger te maken Het weerstation zal de volgende weersymbolen tonen Het weerstation kan de barometrische druktendens weergeven Je kunt de volgende displays zien The barometric pressure will rise The barometric pressure will remain constant The barometric pressure will fall Achtergrondverlich...

Страница 7: ...ces of heat Do NOT cover the Weather Station or the Sensor when they are switched on Never put objects on top of or against the devices This poses a risk of fire electric shock or injury Electronics Do NOT reconstruct repair or disassemble the Weather Station or the Sensor This can damage the device Fo r safety reasons these parts may only be replaced by authorized service personnel In order to pr...

Страница 8: ...rmo Sensor Included 433 92MHz RF transmitting frequency 60 meter transmission range in an open area IP Number Sensor IPX4 Station Other Features DCF Radio controlled time function Perpetual Calendar Up to Year 2099 Day of week in 7 languages user selectable English German Italian French Spanish Dutch and Danish Time in optional 12 24 hour format Daily Alarm Function Automatic snooze function The m...

Страница 9: ...n procedure with the DCF signal to correct any deviations from the exact time If this synchronization attempt is unsuccessful the radio mast icon disappears from the display the system will automatically attempt another synchroniza tion at the next full hour This procedure is repeated automatically up to a total of 5 times To start the manual DCF signal reception press and hold down the button for...

Страница 10: ...econds to receive transmission manually The remote temperature will show an animation of the RF antenna symbol the Base Station will re receive the wireless signal of the remote sensor Note When the wireless sensor sets different channels the weather station REMOTE SENSOR also wants to switch to the same channel When there is no wireless sensor signal transmission on the channel will be displayed ...

Страница 11: ...uct runs on batteries tap the field The backlight will turn on for 15 seconds When the product s power supply is connected to the power adapter the battery will automatically disconnect the power and the backlight will always be on Press the button to adjust the bright ness of the backlight You can choose 5 modes 4 different brightnesses for the backlight and switch off the backlight Users can cho...

Страница 12: ...ui manquent d expérience et de connaissances si elles ont bénéficié d une supervision ou ont reçu des instructions concernant l utilisation de l appareil en toute sécurité et si elles comprennent les risques encourus La Station Météo et le Capteur ne sont pas des jouets Veillez à ce que les enfants de moins de 8 ans ne jouent pas avec ces appareils Ne couvrez PAS la Station Météo ou le Capteur lor...

Страница 13: ...entation Électrique Station Météo Pile 2x 1 5V Type LR6 AA Sortie 5V 1A Capteur Pile 2x 1 5V LR6 AA Adaptateur Consommation Électrique 6 W Pression barométrique Plages de mesure de la pression barométrique 600 hPa mb 1100 hPa mb 17 72 inHg 32 50 inHg Pression alternativement en hPa mb ou en inHg Humidité Plage de mesure intérieure et à distance 20 RH 95 RH Mesure de la température Plages de mesure...

Страница 14: ...ommande Réception du signal Radio L horloge lance automatiquement la recherche du signal DCF après 7 minutes de tout redémarrage ou après le remplacement des piles L icône du mât radio commence à clignoter À 1h00 2h00 3h00 du matin l horloge effectue automatiquement la procédure de synchronisation avec le signal DCF pour corriger les éventuels écarts par rapport à l heure exacte Si cette tentative...

Страница 15: ...pour recevoir la transmission manuelle ment La température à distance affichera une animation du symbole de l antenne RF et la Station de Base recevra à nouveau le signal sans fil du capteur à distance Remarque Lorsque le capteur sans fil définit des canaux différents la station météo REMOTE SENSOR veut également passer sur le même canal Lorsqu il n y a pas de transmission de signal de capteur san...

Страница 16: ...ne sur piles appuyez sur le champ tactile Le rétroéclairage s allumera pendant 15 secondes Lorsque l alimentation électrique du produit est connectée à l adaptateur d alimentation la batterie se déconnecte automatiquement et le rétroéclairage reste toujours allumé rétroéclairage toujours allumé Appuyez sur le bouton pour régler la luminosité du rétroéclairage ensoleillé légèrement nuageux nuageux ...

Страница 17: ... LifeGoods B V Wisselweg 33 1314CB Almere Netherlands 11 2021 V 1 www lifegoods nl ...

Отзывы: