background image

4

SAFETY PRECAUTIONS

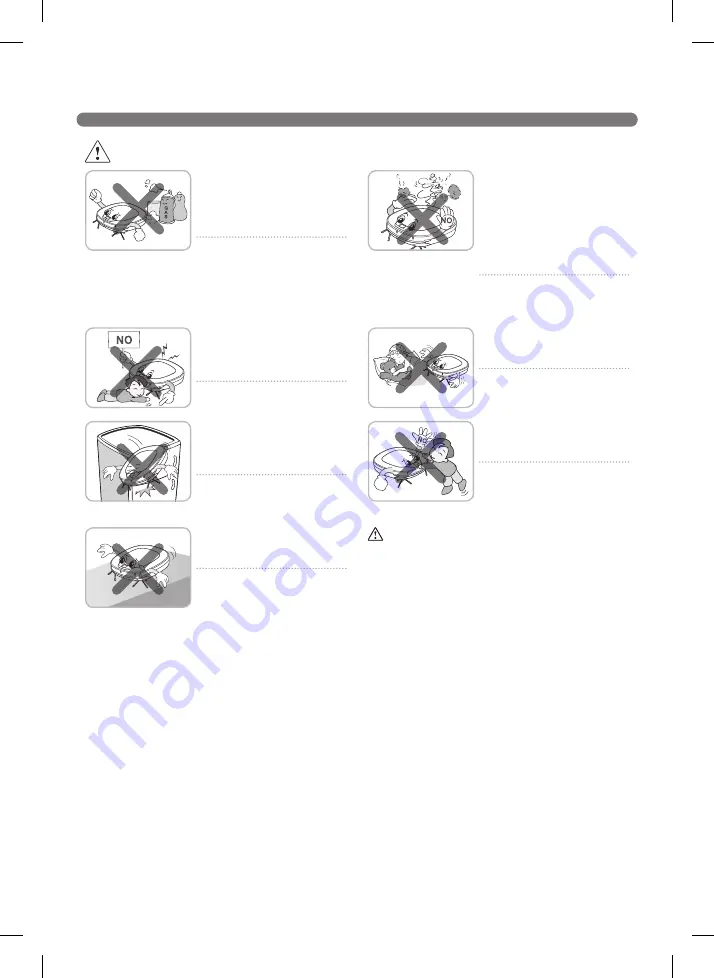
Do not insert any part of the 

body, such as a hand or foot, 

below the brush or wheels of 

the Robot Cleaner while in use. 

Doing so can cause injury or 

product damage.

Do not operate the Robot 

Cleaner on narrow and high 

furniture such as a wardrobe, 

refrigerator, desk, table, etc. 

Doing so can cause injury, 

product failure or damage which 

is not covered by the warranty.

Do not operate the Robot 

Cleaner in a room where a child 

is sleeping. 

Doing so can cause injury or 

product damage.

Do not leave Children or 

pets near the Robot Cleaner 

unsupervised.

Doing so can cause injury or 

product damage.

  This product is intended for indoor domestic 

home use and should not be used in mobile 

applications. it should not be used in 

commercial applications such as workshops 

or garages or around indoor swimming pools, 

etc.

Do not activate the device on a 

floor that has more than a 10 

degree incline.

The device may not work 

properly.

WARNING

Gasolin

e

Detergent

Do not spray or use 

inflammable materials, 

surfactants, or drinking water 

in the vicinity of the Robot 

Cleaner.

Doing so can cause fire or 

product failure. 

*  Inflammable materials: 

gasoline, thinner, etc. 

*  Surfactant: detergent, articles 

for bath, etc.

Turn the power supply off 

immediately if any abnormal 

sound, odor, or smoke is 

generated from the Robot 

Cleaner by removing it from the 

home station and turning off 

the main switch on the rear side 

of the unit.

Failure to do so can cause fire 

or product failure.

Содержание VR7621SPG

Страница 1: ...e Turbo mode is automatically activated on carpets which enables the Robot Cleaner to run more efficiently Drawer Mop Plate Option The Drawer mop plate makes it much easier for users to fit and remove the mop without having to turn over the device My Space Mode By commanding it to clean a particular area the Robot Cleaner quickly cleans that desired area Repeat Cleaning The Robot Cleaner will cont...

Страница 2: ...Auxiliary cleaning modes Mop cleaning option Location search function Smart diagnosis Smart Application Function Product info initialization Cleaning the dust bin Cleaning the dust bin filter Cleaning the brush Cleaning the sensor charging terminal Cleaning the side brush Cleaning the ultra microfiber mop option 4 ADDITIONAL INFORMATION 5 REFERENCE 2 6 7 8 9 10 11 12 13 14 15 16 17 18 19 20 21 22 ...

Страница 3: ...4 This appliance can be used by children aged from 8 years and above and persons with reduced physical sensory or mental capabilities or lack of experience and knowledge if they have been given supervision or instruction concerning use of the appliance in a safe way and understand the hazards involved Children shall not play with the appliance Cleaning and user maintenance must not be made by chil...

Страница 4: ... Cleaner near a heating device Doing so can cause product deformation fire or product failure Do not use the Robot Cleaner when candles or fragile objects are placed on the floor Doing so can cause fire or product failure Always use a dedicated power outlet with a 10 amp rating If multiple appliances are connected to an outlet simultaneously they can generate enough heat to cause a fire Do not for...

Страница 5: ...ded for indoor domestic home use and should not be used in mobile applications it should not be used in commercial applications such as workshops or garages or around indoor swimming pools etc Do not activate the device on a floor that has more than a 10 degree incline The device may not work properly WARNING Gasoline Detergent Do not spray or use inflammable materials surfactants or drinking wate...

Страница 6: ...aner and cause product failure or the cord of an appliance can be disconnected Make sure the Robot Cleaner is not put on a table or desk with the power ON It may result in an injury or damage to the product In rare cases the Robot Cleaner s brush can damage carpet If this happens immediately stop the cleaning operation When a carpet has long tassels the tassels can be damaged Do not let the main u...

Страница 7: ... to remove carpets that are thicker than 20 mm as they may cause it to malfunction Please close any balcony doors as the wheels may get stuck while cleaning Tip CAUTION If the floor is wet or has wet spots wipe them up before using the Robot Cleaner Do not use the Robot Cleaner on a wet surface Doing so can cause product failure When attaching the mop ensure that it is fitted correctly so that it ...

Страница 8: ...ng Tool Cleaning brush It s on the dust bin cover Mop plate option for cleaning sensors for cleaning the filter Ultra microfiber mop 2 pieces option Batteries for remote controller 2 units of AAA size Home station Robot Cleaner Remote controller Side brush 2 pieces option Pet Brush option DVD Manual Adapter ...

Страница 9: ...lay Manipulation button Dust bin cover button Ultrasonic sensors Obstacle detecting sensor window Detecting sensors of home station Receiving sensors of remote controller Power switch Ventilation port Cliff detection sensor Side brush Charging terminal Brush Wheel Battery Lower camera sensor option Front view Rear view Bottom view ...

Страница 10: ...an be different from actual objects Home station Dust bin Remote controller holder Charging terminal Sponge filter Dust bin handle Cleaning brush Dust bin cover Suction port flap EPA filter Filter cover Dust bin lid opening button Power cord fixing hook ...

Страница 11: ...be heard each time a button is pressed Used to turn the power on from Standby start or stop cleaning If the button is pressed whilst the unit is powered ON it will start cleaning If button is pressed during the cleaning it will stop the cleaning If the button is pressed for about 2 sec whilst the power is ON the power will be returned to Standby If the button is pressed in Smart Diagnosis mode it ...

Страница 12: ...ower is ON p17 Home Used to recharge the Robot Cleaner by making it return to the Home Station p18 Turbo Used to activate or deactivate Turbo mode p21 Start Stop button Pressing the button will Start or Stop the Robot Cleaner My Space Used to put the Robot Cleaner in My Space clean mode p20 Mute Used to activate or deactivate Mute mode p12 Diagnosis Used to run Smart Diagnosis Available only when ...

Страница 13: ...bo Mode Operational Status icon This indicates the operational status of Hombot Homing icon This indicates the conditions of Homing and Charging Repeat Mode icon This indicates the settings for Repeat Mode Remote connection Icon Displayed when the smartphone connect to Robot Cleaner ...

Страница 14: ...ing to use the mop for cleaning remove the mop before using Robot Cleaner Before starting the device it s better to remove carpets that are thicker than 20 mm as they may cause it to malfunction Please close any balcony doors as the wheels may get stuck while cleaning 1 Open the battery cover by lifting the rear hook of the remote controller 2 Insert two AAA batteries checking for nodes while load...

Страница 15: ...he cleanness of the dust bin before starting cleaning and close the dust bin compartment cover on the main unit 4 Start cleaning p17 Press the START STOP button or button on the Remote Controller once again while the Robot Cleaner is turned on You will hear an announcement of the cleaning mode and cleaning will begin once the Robot Cleaner has reversed and turned around 5 6 Automatic charge p18 Us...

Страница 16: ...ix the home station against the wall so that it does not move 5 When the remote controller is not used store it in the remote controller holder on the home station 1 5 1 5 2 ﻣﺘﺮ 1 5 ﻣﺘﺮ 1 5 ﻣﺘﺮ 2 Fixing hook of power cord Always keep the home station plugged in when in use If the home station is not plugged in the Robot Cleaner will not return to the station to charge automatically How to Install ...

Страница 17: ...s the power will be on and a melody will sound If 10 minutes elapse without the Robot Cleaner having being given an active command after being turned on the power will automatically return to Standby again Press and hold the START STOP button for two seconds or Power button on the remote controller while the Robot Cleaner is turned on A melody will sound when the power is turned off If the power c...

Страница 18: ... the power will be turned on Press the START STOP button one more time to start cleaning After the Robot Cleaner is turned on press the button on the remote controller A melody will sound and cleaning will begin Press the button during the cleaning cycle to stop cleaning When the power is off press the Power button on the remote controller to turn the power on During cleaning collisions can happen...

Страница 19: ...on the back of the Roboking is turned off Please turn the switch on is announced repeatedly then turn on the Main Power Switch Method 2 When the HOME button of the remote control or the Robot Cleaner is pressed charging will be prompted by automatically generating a searching signal and returning the Robot Cleaner to the home station Automatic charging Manual charging Take the following precaution...

Страница 20: ... following conditions are met 10 minutes before engaging in reserved cleaning function User input keys on the product or remote control without disconnecting the charger with the power switch off the user is online on the application on the smart device The whole user interface will flicker for up to 3 seconds when enabling or disabling power saving mode Flickering The user cannot control the robo...

Страница 21: ...and press button Factory release default setting is Zigzag Zigzag Cleaning By pressing a direction key on the Remote Controller you can move the Robot Cleaner manually Robot Cleaner will clean the area by pressing the forward backward left right buttons accordingly on the keypad of the remote control While in Manual mode the robot cleaner will run into obstacles placed behind it if the backward ke...

Страница 22: ...e while the Robot Cleaner is in operation press button first then select a cleaning mode The cleaning will then start from the begining Tip My Space The 2nd stage Pressing the button will then make the Robot Cleaner clean the manually outlined area by itself Upon failure to correctly outline a zone a voice will announce which says Area does not meet the specified conditions Please continue to make...

Страница 23: ...ing the same button will cancel Turbo mode with a voice message In Turbo mode Robot Cleaner runs more intensely for a powerful clean Turbo mode will reduce the battery duration Turbo Mode Floor Master Function Turbo mode will automatically operate when the Robot Cleaner cleans carpets Pressing Repeat button on Remote Controller will activate Repeat mode with a voice message While in Repeat mode pr...

Страница 24: ...h the ultra microfiber mop to the Velcro of the mop plate as shown in the figure 2 Firmly slide the Mop Plate into the furrows until you hear a click sound Note that if the Mop Plate is not secured correctly it may separate during the cleaning 3 It is essential that the fixing hooks on the Mop Plate align correctly on to the fixing grooves on the underside of the cleaner For mop cleaning mount the...

Страница 25: ...cleaning position by more than 1 m it becomes difficult for the Robot Cleaner to search for it s previous location 2 Press the START STOP button on the Robot Cleaner or button on the remote controller Robot Cleaner will then start the location search function along with an audio guide When the location search is successfully completed it will continue cleaning from where it was moved If the locati...

Страница 26: ...ound 1 meter around the home station If the Mop Plate is attached the process will not be activated 3 When the Smart Diagnosis has successfully finished Robot Cleaner will return back to the Home Station and inform the result through a voice message After the voice message pressing the HOME button on the Remote Controller or main unit will allow the voice message to be repeated To terminate the di...

Страница 27: ...n Smart Diagnosis again and if the same message is announced contact an LG Electronics service center Please check for dirt on the left wheel Check for foreign materials on the left wheel Please check for dirt on the right wheel Check for foreign materials on the right wheel A problem has been found on the left wheel sensor Run Smart Diagnosis again and if the same message is announced contact an ...

Страница 28: ...ation Android Higher than 4 1 2 Jelly Bean iOS Higher than iOS 8 iPhone5 Screen resolution 1920x1080 Connecting to the Wireless Access Point without proper security setup may cause security issues If security is set up internally for your organization it may affect connection therein To improve the quality of the application in use modifications may be proceeded without notice to customers 1 Searc...

Страница 29: ...th the Create account button on the sign in screen page Fill the Blanks on create account screen page to create account 3 If you have successfully created an account try to sign in on the Sign in page after receiving an authentication sign in e mail Don t change Nation Language in the Startup Screen page If you change it you will not be able to register your robot cleaner that you purchased in nat...

Страница 30: ...aner on to your smartphone via Wi Fi How to register the product The distance between the Robot Cleaner and the router should be within 5m there should be no obstacle between the router and the Robot Cleaner to help reduce problems during registration Replacing the router changing its security settings or changing the router settings on the app will require the Robot cleaner to be reregistered You...

Страница 31: ...her the Smart ThinQ mark is printed or not If there is a Smart ThinQ mark on the product press the Yes button Wi Fi Register product Android Registering the product is required for the initial connection only you can then connect to the Robot Cleaner thereafter without having to repeat this process Tip Product category ...

Страница 32: ...Cleaner press Robot cleaner image to connect to Robot Cleaner Product network Register product Android Select AP Wi Fi Press the TURBO button Register product Registered user list Product selection screen when connection unavailable Product selection screen when connection available With the network function enabled on the Robot Cleaner press Access to connect to the Robot Cleaner 5GHz bandwidth i...

Страница 33: ...uct iOS The distance between the Robot Cleaner and the router should be within 5 m there should be no obstacle between the router and the Robot Cleaner to help reduce problems during registration Replacing the router changing its security settings or changing the router settings on the app will require the Robot cleaner to be reregistered You can change the router information in the product networ...

Страница 34: ... the network please enter the network ID and password to connect to the product Product network Register product iOS Select network Press TURBO button Select LG_HOMBOT_REG Wi Fi Product registration Check connections Product selection screen when connection available With the network function enabled on the Robot Cleaner press Access to connect to the Robot Cleaner 5GHz bandwidth is not supported ...

Страница 35: ...e icon selects the product list page Dashboard Displays the status of robot cleaner Displays setting status of Schedule Cleaning Start Cleaning immediately Start searching for the Home station Mode Menu You can set serveral modes of the robot cleaner You can check for any alert history Menu Schedule Cleaning Cleaning Diary Smart Diagnosis Setting Simple Control You can run Roboking manually on the...

Страница 36: ...y Smart Diagnosis Setting Mode Menu Cleaning mode Repeat mode Turbo mode Simple Control You can operate the Robot cleaner manually on the Simple control screen In addition you can start cleaning or self navigate it back to the docking station by pressing the Start Cleaning or Start Charging button ...

Страница 37: ...button will change to the Cleaning paused button once cleaning has begun The Start Charging button will change to the Stop button during its return to the docking station You can control the robot cleaner by tilting your smartphone Simple Control Simple control screen Screen during cleaning Moving to the Home station tilting control tilting control Guide Pressing the Change Gyro button allows oper...

Страница 38: ...hedule cleaning menu After enabling Schedule cleaning set up the time and repetition and then click Save to complete scheduling Menu Schedule Cleaning The Schedule cleaning menu on the application has the same function as that of the remote control Setting up or starting Schedule cleaning can only be done whilst the Robot Cleaner is charging Tip With Schedule cleaning on With Schedule cleaning off...

Страница 39: ...leaning completion Robot Cleaner location Location of the Robot Cleaner when it started cleaning Controlling the playback speed You can control the playback speed of the cleaning animation Each click of the triangle button will accelerate the playback speed from X1 to X2 X4 X8 and X16 Rotate Map Each click of this button will rotate the map 90 degrees clockwise The Cleaning Diary list shows the 20...

Страница 40: ...he diagnosis by taking a corresponding measure If the symptom persists contact the customer service center of LG Electronics Menu Smart Diagnosis Smart Diagnosis on the application provides the same function as that of the remote control Refer to pages 24 and 25 for details on Smart Diagnosis Smart Diagnosis can only be activated whilst the Robot Cleaner is charging Tip Smart Diagnosis Smart Diagn...

Страница 41: ...aner a pop up where you can enter a new nickname opens up to 10 characters allowed including English Korean and numeric You can check the current software version of the Robot Cleaner and the latest version If the current software is not the latest please update it Refer to the details on Software Update Basic Information shows the current version of the application and open source license informa...

Страница 42: ...le is downloaded to the Roboking when the updating starts 4 When download is completed the update will be started after tansmitting files to the Roboking 5 The Roboking will turn off and on again automatically in the process and updating will resume 6 A voice message saying that update is completed will be announced when the update is done The Roboking will turn off and on again to apply the updat...

Страница 43: ...ching home station Away mode start cleaning Sleeping mode start searching home station If more than one Robot cleaner is registered only one of them can be set by the mode function In the event that there are 2 registered Robot cleaners the first Registered one will be the one set by the mode function You can change which of the Robot Cleaners will be set by the mode function by editing them Edit ...

Страница 44: ...unction for smooth transaction 1 Press and hold down the Turbo and Home buttons for 3 seconds with the power on all displays will then be lit with a ding sound 2 Press Start Stop to initialize the product power will be turned off 3 Pressing Start Stop again will turn Robot Cleaner on with a melody Product info initialization Initialization returns the following information as factory default setti...

Страница 45: ... it upward 3 Pull the hook on the left of Filter Cover on the rear of Dust Bin to separate the filter and the sponge Note that separating the filter may result in dust dropping Refer to p 44 when cleaning the Dust Bin Filter 4 Lift the dust bin lid upward while pressing the separation button on the dust bin 5 Empty the dust bin and clean it with a cleaning brush or under running water 6 After clea...

Страница 46: ...orrectly assemble EPA and Sponge Filter onto the Filter housing 2 Thoroughly clean out the fine dust particles on the EPA Filter with a vacuum cleaner or cleaning brush Do NOT wash the EPA Filter with water Its suction power will be reduced To preserve the performance of the Robot Cleaner clean the EPA Filter at least once a week with a brush or vacuum cleaner The EPA and sponge filters must be fi...

Страница 47: ...to separate it from the main unit Carefully clean the Brush with a vacuum cleaner or scissors Turn the Main Power Switch OFF before starting the clean Put the Robot Cleaner upside down on a soft cloth After checking for foreign materials press down the Fixing Hook and pull it up to separate the brush Cover By using the cleaning tool clear hairs and other debris and foreign materials on the Brush a...

Страница 48: ...ng terminals as follows 1 Turn off the power switch on the rear side of the Robot Cleaner Injury can be caused by the activation of the Robot Cleaner if the main power is not turned off 2 Lay a smooth cloth on the floor turn over the Robot Cleaner and put it on the cloth Please make sure to remove the dust bin before rotating the main body Otherwise the dust in the dust bin may fall out 3 Use a sm...

Страница 49: ...r at the end of a table to make cleaning the side brush easier Make sure that the Robot Cleaner is not in danger of falling 4 Soak the side brush in warm to hot water 5 Press down on the side brush for about ten seconds so that it is completely submerged in the water 6 Slowly wipe the side brush by sliding it through your hand 7 Rotate the side brush and repeat steps 4 6 for each section of the br...

Страница 50: ... in a damp or wet state it will cause the Robot Cleaner to malfunction To avoid odors dirt and dust should be washed off the mop after it is used for cleaning Follow these directions to wash the ultra microfiber mop To avoid product malfunction only use the ultra microfiber mop provided with the Robot Cleaner Additional microfiber mops can be purchased by visiting a nearby LG Electronics service c...

Страница 51: ...terial after observing the wheels Please make sure to remove the dust bin before turning over the main body Otherwise the dust in the dust bin may fall out A warning message will be given if Robot Cleaner cannot go on cleaning due to any unfavourable condition Is the Robot Cleaner stuck s After removing it from the obstacle place the Robot Cleaner back onto the flat floor Upon a voice message The ...

Страница 52: ...y power is almost nil the voice Battery is low is generated Initiate battery charging of the Robot Cleaner by moving it to the home station s When the Robot Cleaner is attached to the docking station successfully it will start the recharging with the recharging start melody Upon a voice message Please check if the dust bin is installed with the filter Upon a voice message Battery is low Please mov...

Страница 53: ...move the Dust Bin Otherwise it will cause dust to fall from the Dust Bin The brush is making a loud abnormal sound s Confirm the correct assembly of the brush by checking the separation groove of the brush s Remove the lower rotating brush from the Robot Cleaner and remove any foreign material from the brush The lower rotating brush or side brush is stuck s Remove any foreign materials such as cab...

Страница 54: ... 43 Ƭ Ƭ Clean the dust bin filter Page 44 Noise becomes louder Ƭ Ƭ Confirm that the dust bin has been mounted properly Ƭ Ƭ Confirm that the dust bin filter has been mounted properly Page 44 Ƭ Ƭ Check whether foreign material is caught in the brush Page 45 The Robot Cleaner will not activate Ƭ Ƭ Confirm that the power switch is turned on Page 16 Ƭ Ƭ Confirm that the battery has been charged Page 18...

Страница 55: ...nect the battery wiring Remove the screws by using a Phillips head screwdriver Remove the battery from the device 2 WARNING Please be careful of fire explosion electric shock or breakdown Do not charge this Battery Pack with any other type of charger other than the one originally provided with the Robot Cleaner Do not damage the battery pack in such ways as dropping crushing cutting or shorting ex...

Страница 56: ...ll be on and flashing 2 In case of testing on Carpet Repeat Operational Status Mute Icon will be on and flashing Change LED expression by pushing Mode button on the Remote Controller 4 Push START STOP button on the Robot Cleaner or button on the Remote Controller and Robot Cleaner will be operated 1 Put fully charged Robot Cleaner down on start point and turn on 2 Push Repeat button on the Remote ...

Отзывы: