background image

4. Operating AC Smart

Installation/Owner's Manual

4-67

2

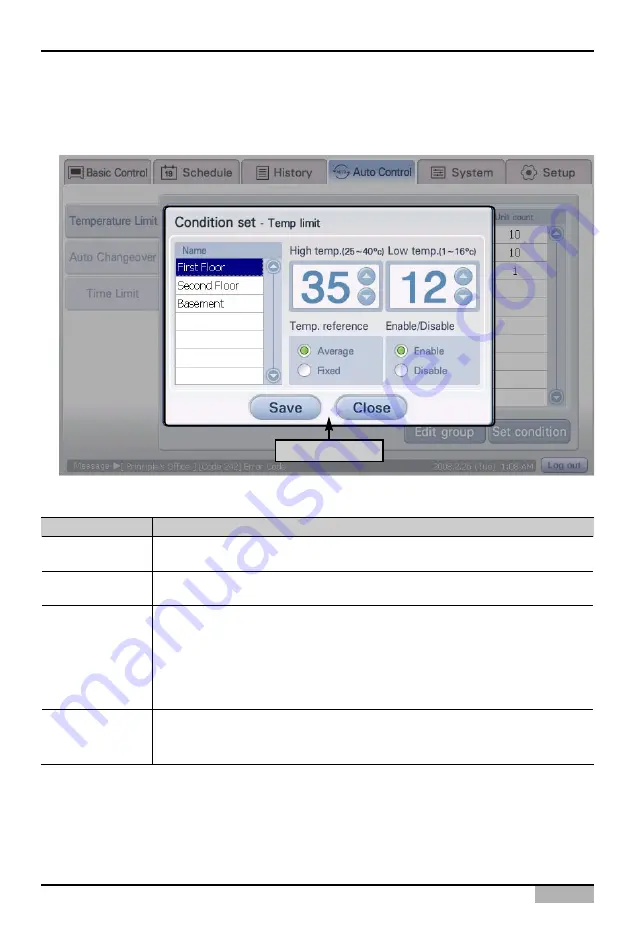
. The ‘Condition setting’ screen is displayed. Select the temperature limit operation group to set the

temperature limit operation function and set each item. For detailed description on the setting item,
refer to the following table.

Set each item

Item

Description

This sets the maximum temperature to execute the temperature limit operation. The
temperature range that can be set is 25°C~40°C.
This sets the minimum to execute the temperature limit operation. The temperature
range that can be set is 1°C~16°C.
Select the method to measure the indoor temperature. Indoor temperature can be
measured in one of the three methods below. 
- All unit average: This is the method of operating the temperature limit function

based on the average temperature detected for the indoor units within the group. 

- Fixed: This is the method of operating the temperature limit function based on the

temperature detected from the first registered indoor unit within the group. 

This sets whether to execute the temperature limit operation function or not.
- Apply: Executes the temperature limit operation function.
- Not apply: Does not execute the temperature limit operation function.

Maximum

temperature

Minimum

temperature

Temperature

reference

Apply/Not apply

Содержание Smart AC

Страница 1: ...W320A0E Note Please read this installation use manual before installing the product Install the product with an expert installation engineer with proper qualifications Even after reading this manual please store this manual so that you can refer to it during operations ...

Страница 2: ...ting address with wireless remote controller 2 5 Setting PI485 and connecting line 2 7 Setting PI485 DIP switch 2 7 Connecting 2PIN connector 2 9 Connecting RS485 line to PI485 2 11 Installing AC Smart and connecting line 2 14 Logging in of the AC Smart 2 16 Logging in as installation professional 2 18 Logging in as administrator 2 19 Logging in as general user 2 20 Registering the unit 2 21 Autom...

Страница 3: ...n 3 32 History menu 3 40 Usage view screen 3 43 Auto control menu 3 45 Temperature limit operation 3 46 Auto change over operation 3 49 Time limited running 3 52 Setting menu 3 54 Setting main screen 3 54 Register unit screen 3 57 Other setting menu 3 59 Version information 3 60 Password setting 3 61 Language 3 62 Time setting 3 63 Screen adjustment 3 64 Screen saver 3 65 Network 3 66 E mail setti...

Страница 4: ... schedule pattern 4 29 History 4 55 Browsing history 4 55 Browsing specific history 4 56 Usage view 4 59 Auto control 4 63 Setting temperature limit operation 4 66 Managing temperature limit operation group 4 69 Setting auto change over operation 4 79 Managing auto change over operation group 4 82 Setting the time limited running 4 92 Managing the time limited running group 4 95 Setting 4 106 Regi...

Страница 5: ...rmation 4 146 Setting the password 4 147 Setting the language by country 4 150 Setting the time 4 153 Calibrating the screen 4 154 Setting the screen saver 4 157 Setting the network information 4 158 Setting the E mail 4 163 S W upgrade 4 167 Backing up and restoring the database 4 170 ...

Страница 6: ...andard parts can cause electric shock explosion injury breakdown Operation To prevent injury to the user or other people and property damage the following instructions must be followed Incorrect operation due to ignoring instruction will cause harm or damage The seriousness is classified by the following indications Meanings of symbols used in this manual are as shown below WARNING CAUTION This sy...

Страница 7: ...stablishment specialty store It can cause an accident electric shock explosion injury shock Do not use the power cord near Flammable gas or combustibles such as gasoline benzene thinner etc It may cause an explosion or fire Do not disjoint randomly or repair and remodel the product It may cause fire and electric shock Cire Diluant During usage Do not change or extend the conductor at random It can...

Страница 8: ... shock Hold the plug by the head of the power plug when taking it out It may cause electric shock and damage Do not place heavy goods on product It can cause product breakdown That increase in case of product was been flood certainly in the service center or establishment specialty store commit I am responsible for fire and electric shock Protect the product from handling by a children It can caus...

Страница 9: ...own and damage to the product Do not place any live part on the surface having water It can cause product breakdown Cire Diluant Use recommended Adapter Otherwise it can result in product breakdown Avoid contact to the metallic goods such as necklace coin key a watch which may touch the battery even for a short time It may cause product breakdown and injury Hold the plug by the head of the power p...

Страница 10: ...he following items by selecting the installed air conditioner by individual unit by group or all Operating condition of the air conditioner Operating mode Fan level Wind direction Lock Set temperature Therefore the manager can control everything just with AC Smart Central control from the administrative office of the building where the air conditioners are installed Group management AC Smart can m...

Страница 11: ...ion for protecting the system from power failure and other accidents by which the stability of the system can be improved and the system can be easily recovered from the accident Upgrading the software to the recent version The AC Smart offers the function to upgrade the software to the recent version by which the AC Smart can be stably operated and a new function can be added Web server The AC Sm...

Страница 12: ...older USB port Reset button 124mm 40mm 217mm AC Smart exterior Note Using the external button to compensate the screen The screen compensation function can be executed by pressing the keyboard button at the top of the AC Smart and then the backlight button When it is hard to execute the screen compensation function by the touch screen you can use this method ...

Страница 13: ...e the control panel of AC Smart Backlight button This is the button to turn on and off the LCD backlight of AC Smart When you do not use AC Smart for a long period of time it is good to turn off the backlight to extend the life of the LCD backlight Keyboard button This is the button to display or hide the keyboard on the screen so that the user can enter the characters Reset button This is the but...

Страница 14: ... shown below Open the AC Smart box and check whether all components are included L G AC Smart Power adapter Manual CD Quick Guide Power cord International Standard IEC320 C8 type Notice In Australia purchase the power code In Australia purchase the power code from local area The power code is not included in the package ...

Страница 15: ...ry DDR SDRAM 128MB 32MB x 4ea Boot ROM Storage NAND Flash 256MB LCD 7 0 WVGA 800 x 480 TFT LCD UART COM1 RS 232 port on_boarding 4 wire touch controller COM2 RS 485 port communication USB One USB 1 1 Host port use USB Flash One USB 2 0 Device port use ActiveSync Buzzer BST 0843A DI S W Input Power DC 12V 5V 3A 3 3V 2A 2 5V 2A 1 8V 2A Touch Screen 4 wire touch controller on_boarding OS Windows CE 5...

Страница 16: ...t address Assign a unique address to the unit connected to AC Smart STEP 3 Set PI485 Install one PI485 for each outdoor unit and set the DIP switch STEP 4 Connect PI485 and AC Smart Connect the PI485 and AC Smart through the RS485 line STEP 5 Login and register unit Login to AC Smart and register the unit which the address has been assigned to Caution AC Smart installation Installation of AC Smart...

Страница 17: ...an also connect 128 units via the extension kit For this AC Smart must be connected to PI485 and PI485 must be connected to the outdoor unit connected to the unit The following is the example of connecting AC Smart to the unit ON L1 2 3 4 KSDO4H ON L1 2 3 4 KSDO4H Multi V Multi V AC Smart PI485 PI485 PI485 PI485 Multi V Multi ON L1 2 3 4 KSDO4H ON L1 2 3 4 KSDO4H ...

Страница 18: ... in hexadecimal from 00 to FF The following is an example of assigning the address to the unit ON L1 2 3 4 KSDO4H ON L1 2 3 4 KSDO4H Multi V Set address Set address Set address Set address Set address Set address Set address Set address Set address Set address 01 02 03 11 21 22 23 24 12 13 Multi V AC Smart PI485 PI485 PI485 Multi ON L1 2 3 4 KSDO4H ON L1 2 3 4 KSDO4H PI485 Ventilator Use the wired...

Страница 19: ...o the production date of wired wireless remote conrollers As it has no concem with customers use use the remote controller available for the address setting during installation Setting address with wired remote controller Timer Cancel Program Week Hour Min Holiday Set Clr RESET ZONE 1 2 3 4 Operation unit Humidify JET AUTO AUTO SWING OPERATION FAN SPEED Program set SUB FUNCTION SET TEMP Room Temp ...

Страница 20: ...ss press the Operate Stop button once toward the indoor unit 4 When the set address is displayed on the indoor unit the address setting is complete 5 When you reset the remote controller it switches from the address setting mode to general operation mode Setting address with wireless remote controller Reference Address display time and method The address display time and method may differ by the t...

Страница 21: ...oceed as follows 1 With the Wind Up Down button pressed press the RESET button The Wind Up Down button must be pressed for more than 3 seconds 2 Press the Operate Stop button once toward the indoor unit The set address will be shown on the display part of the indoor unit The address display time and method can differ by the type of indoor unit 3 Reset the remote controller again to use it in gener...

Страница 22: ...ay differ by the product of the outdoor unit Therefore refer to PI485 manual or installation technology information to proceed Setting PI485 DIP switch DIP switch Setting Product type 1 4 ON 2 3 OFF 2 4 ON 1 3 OFF 1 2 3 4 ON 3 4 ON 1 2 OFF Multi V product Excluding CRUN LRA product MPS static speed product with common PCB applied MPS inverter product MPS static speed product without common PCB app...

Страница 23: ...manual for detail installation method of PI485 Information Checking PI485 DIP switch setting You can check whether the indoor unit address setting and the DIP switch setting of PI485 have been set correctly as follows LED01G will flash for as many as the connected number of indoor units LED02G and LED03G will flash in switching back and forth When connecting LRA CRUN product LED02G can blink more ...

Страница 24: ... lock function that sets the mode fan level and temperature lock function through central control you must connect the 2PIN connector to the CN_DRY terminal of PI485 depending on the type of the outdoor unit Connecting 2PIN connector ON L1 2 3 4 KSDO4H CN_DRY ...

Страница 25: ...ontrol command And the remote controller redisplays the temperature of 20 C sent through the central control command On the other hand let s look at the example where the 2PIN connector is connected to CN_DRY terminal When you command the Cool operation 20 C setting high fan level temperature lock function through central control the applicable command is transmitted to the remote controller HL Ha...

Страница 26: ...Smart 2 11 Connecting PI485 to RS485 line To connect PI485 and AC Smart two RS485 lines must be connected to BUS_A and BUS_B of PI485 Refer to the following figure to connect the RS485 line ON L1 2 3 4 KSDO4H 10V CND BUS_A BUS_B ...

Страница 27: ...on Owner s Manual 2 12 The following figure is an example of several units of PI485 connected to AC Smart 10V GND BUS_A BUS_B AC Smart A B ON L1 2 3 4 KSDO4H ON L1 2 3 4 KSDO4H ON L1 2 3 4 KSDO4H 10V GND BUS_A BUS_B 10V GND BUS_A BUS_B ...

Страница 28: ...lows 1 Connect the BUS A and BUS B port of PI485 to the C and D terminal of the simple central controller using the RS485 communication cable 2 Set the rotary switch of the simple central controller to align with the group number of the indoor unit to control For example when you want to control the indoor units with the address of 00 0F set the rotary switch to 0 3 Set the DIP switch No 1 of the ...

Страница 29: ... the line proceed as follows 1 Decide the space to install AC Smart In order for AC Smart to be installed on the wall there must be a RS485 line near by 2 Fixate the rear panel of AC Smart on the wall top of the RS485 line Fixate the panel using a driver You can fixate the panel as shown below depending on the installation location Reference AC Smart installation AC Smart is designed to be basical...

Страница 30: ...ht driver to connect the tow RS485 communication lines to BUS_A and BUS_B of AC Smart 4 Connect the UTP cable that can be connected to Internet from the rear panel of AC Smart to the LAN port GND B A Caution RS485 communication cable connection When connecting the RS485 communication cable be careful not to mix the polarities of the two lines ...

Страница 31: ...r panel push forward and slide in the bottom of the main unit 7 Connect the power cord of the power adapter to the power outlet Reference UTP cable connection Currently there is no function provided by connecting to the UTP cable In the future connect only when necessary for function related to the Internet 5 Connect the power adapter to the power terminal located at the rear side of the main unit...

Страница 32: ...inistrator When you log in as administrator you can all functions excepting some menus related to the installation and the environment setting offered at the installation professional only Log in for general user When you log in as general user you can use only the Control Monitoring menu to monitor and control the operation of the current air conditioner and cannot use other functions Logging in ...

Страница 33: ... is displayed to enter the password The password is digital21 which cannot be changed When you correctly enter the password and press OK button you are logged in and can set all functions of the AC Smart Logging in as installation professional Pressing and holding here for 5 seconds to display the input screen You can all functions of the AC Smart ...

Страница 34: ... AC Smart for the first time the password is not set When you correctly enter the password and press OK button you log into the AC Smart and you can all functions excepting some menus at System setting menu and Environment setting menu Logging in as administrator Press Administrator button to display the password input screen Possible to use all functions Some functions impossible to use ...

Страница 35: ...no password input procedure When logged into the AC Smart only the functions of the Control Monitoring menu can be used and other menus cannot be selected Logging in as general user Logging in with no password input by press General user button Possible to use only the functions of Control Monitoring menu Impossible to select other menus ...

Страница 36: ...ically register the unit proceed in the following order 1 Select System setting menu from the AC Smart menu When it is selected the following screen is displayed Press Unit button at the right side of the screen Automatically registering the unit Click on Unit button Note Login right for registering a unit In order to register a unit to the AC Smart you should log in as installation professional T...

Страница 37: ...utomatic unit setting is displayed press Yes button 3 The process to search for and register the indoor unit and the ventilator connected to the AC Smart proceeds When this process is finished the registered unit is added and displayed at the table located at the bottom of the screen After clicking Auto when the screen is displayed click on Yes button Registered unit is displayed ...

Страница 38: ...eturns to the previous screen 5 Finally the temporarily saved unit setting should be registered to the system When Save button is pressed Information screen to check whether to apply the current setting to the system is displayed Press Yes button To apply to system click on OK button When the Information screen is displayed click on Yes button To apply to system click on Save button click on Yes b...

Страница 39: ...t the setting has been saved will be displayed Click on the OK button to complete the registration When it is saved click on OK button Reference Change information of registered unit When you want to change the information of the registered unit such as name or form a group with the units refer to the Setting section on page 4 106 ...

Страница 40: ...an directly register the unit connected to AC Smart To register the unit proceed in the order as follows 1 Select System setting menu from the AC Smart menu When it is selected the following screen is displayed Press Unit button at the right side of the screen Click on Unit ...

Страница 41: ... Air conditioner Ventilator On Off device Enter the name of unit The name can be entered to maximum of 20 letters Enter the physical address of the unit The physical address value is a number in the range of 00 FF and cannot be duplicated Enter the model of the unit Maximum of 20 characters can be entered for the model Enter the maximum power consumption of the unit The power must not exceed the s...

Страница 42: ... on the OK button If you want to cancel the setting up to now click on the Cancel button 4 Confirm screen to temporarily save the current setting is displayed When Yes button is pressed it exits from Unit Management screen and returns to the previous screen Click on OK button to apply to system In order to apply to the system click Confirm button When Confirm screen is displayed click Yes button ...

Страница 43: ...28 5 Finally the temporarily saved unit setting should be registered to the system When Save button is pressed Confirm screen to check whether to apply the current setting to the system is displayed Press Yes button Click on Save button to apply to system ...

Страница 44: ...You can use the emergency stop function by connecting the external fire detection sensor to the connection terminal of external non contact point method on the rear side of AC Smart as shown below Setting the emergency stop interlocking Terminal connected to external fire detection sensor When the fire sensor generates the ON signal the AC Smart stops the operation of all indoor units ...

Страница 45: ...trol monitoring menu Zone Logical set of groups to be configured according to installed location or executing function Group Logical set of units to be configured according to installed location or executing function Unit Smallest controlled unit installed at the indoor such as air conditioner or ventilator The screen shown in control monitoring can be composed of 3 screens as follows Zone informa...

Страница 46: ...ntly set zone Zones are displayed in various colors depending on the status of the current group The status description of the zone by color is described as follows Zone Description This displays that the unit within the zone is operating normally This displays that an alarm occurred at the unit within the zone This displays that the unit within the zone is not operating ...

Страница 47: ...zone will be displayed for the list view Displayed item Description Name The name of the selected zone is displayed Total number of units The total number of units is displayed Number of units in operation The number of units in operation is displayed Number of units in alarm The number of units in error status is displayed Average indoor temperature The average indoor temperature where the unit i...

Страница 48: ...the unit is installed is displayed The average set temperature where the unit is installed is displayed The number of units operating in cool mode is displayed The number of units operating in heat mode is displayed The number of units in auto mode is displayed The number of units in locked status is displayed The number of units in unlock status is displayed The number of units in other status is...

Страница 49: ...s displayed The unit with the communication error code 242 occurred is excluded The average set temperature of the room where the unit is running is displayed The unit with the communication error code 242 occurred is excluded Set the desired indoor temperature as the reference of the indoor temperature The desired indoor temperature is set together when the running mode is set Run or stop the uni...

Страница 50: ...urrently set group Groups are displayed in various colors depending on the status of the current unit The status description of the group by color is described as follows Group Description This displays that the unit within the group is operating normally This displays that an alarm occurred at the unit within the group This displays that the unit within the group is not operating ...

Страница 51: ...ll be displayed for the list view Displayed item Description Name The name of the selected group is displayed Total number of units The total number of units is displayed Number of units in operation The number of units in operation is displayed Number of units in alarm The number of units in error status is displayed Average indoor temperature The average indoor temperature where the unit is inst...

Страница 52: ... of units is displayed The number of units in operation is displayed The number of units in error status is displayed The average indoor temperature where the unit is installed is displayed The average set temperature where the unit is installed is displayed The number of units operating in cool mode is displayed The number of units operating in heat mode is displayed The number of units in auto m...

Страница 53: ...it is running is displayed The unit with the communication error code 242 occurred is excluded The average set temperature of the room where the unit is running is displayed The unit with the communication error code 242 occurred is excluded Set the desired indoor temperature as the reference of the indoor temperature The desired indoor temperature is set together when the running mode is set Run ...

Страница 54: ...he unit is classified into air conditioner ventilator and On Off device Indoor unit Ventilator On Off device Unit Description The indoor unit controls the indoor temperature through cooling heating and removes the humidity Ventilator intakes and exhausts the indoor air to maintain a clean and fresh air at all times Device ex lamp by turning on off the power with no detailed setting to operate ...

Страница 55: ... Also when the indoor unit and the ventilator are currently running the icon shows the running mode Unit type Normal running Stopped Alarm generated Indoor unit Ventilator On Off device Unit type Icon Description Icon Description Indoor unit Ventilator Cooling Heating Humidifying Ventilating Automatic running Electric heating Automatic running General running ...

Страница 56: ...Product type Running Mode Error Indoor temperature Set temperature Lock Unit type Indoor unit Control the indoor temperature by cooling heating Ventilator Keep the fresh air by ventilating On Off device Device to be operated by turning on off the power Display whether the unit is running or not and the running mode Display the error code if occurred Display the current indoor temperature Display t...

Страница 57: ...de is displayed The setting of wind direction of the unit is displayed The fan level set in the unit is displayed The indoor temperature where the unit is installed and the desired temperature set by the user is displayed The setting of all lock function of the unit is displayed All lock function is the function disabling all function of the unit so that the user cannot control the unit individual...

Страница 58: ...he set range of the desired temperature Caution Individual lock setting Temperature fan level lock When the 2PIN connector of PI485 is connected and you try to change the operating mode with the wired remote controller it can change to the prior mode when the temperature fan level lock is enabled In this case when you resolve this issue by operating the temperature lock and mode lock simultaneousl...

Страница 59: ...disable all functions of each unit so that the user cannot control the units via remote controller is displayed Enable Condition lock function is enabled Cancel Condition lock function is disabled When there is currently no alarm generated in the unit 0 is displayed When there is an alarm generated the alarm code of the applicable alarm is displayed The average indoor temperature where the unit is...

Страница 60: ...d Disable Condition lock function is disabled This displays whether the fan lock function to disable the user from changing the fan operation of each unit through the remote controller is set or not Enable Condition lock function is enabled Disable Condition lock function is disabled This displays whether the temperature lock function to disable the user from changing the desired temperature of ea...

Страница 61: ...e indoor temperature of the room where the unit is running is displayed The set temperature of the room where the unit is running is displayed Set the desired indoor temperature as the reference of the indoor temperature The desired indoor temperature is set together when the running mode is set Run or stop the unit Set the running mode of the unit Cooling Heating Automatic Set the wind flow of th...

Страница 62: ... the specific period set by the user by grouping the information of schedule for group pattern and period Schedule pattern Unit designating the certain operation of air conditioner in week or day unit Schedule group Collection of units Indoor unit and ventilator applied with same schedule pattern The schedule menu is largely categorized into the following 4 screens Schedule main screen Schedule ed...

Страница 63: ... pattern and period to the schedule group you can set the schedule to operate the air conditioner at specific time 1 Select group In 1 Select group you can check the currently set schedule group and set the schedule group Schedule group list shows the list of currently set schedule groups At the bottom of 1 Select group there is an Edit button When you press the Edit button the Edit group screen w...

Страница 64: ... on the applicable list the applicable list is displayed in 3 Edit and save schedule When you click on the Add button the period designated in 2 2 Select date to apply period is added When you designate the period designated in the list and click on the Delete button the applicable period will be deleted 3 Edit and save schedule In 3 Edit and save schedule you can check the set event Also you can ...

Страница 65: ...up to a different group is displayed You can save the currently set schedule You can reset the currently set schedule Edit group screen Edit group screen is the screen that is displayed when you press the Edit button from schedule group of edit schedule screen From the Edit schedule screen you can check the schedule applied to specific schedule group Also by applying the pattern and period to the ...

Страница 66: ...You can rename the schedule group created before By using the basic control group set from Setting menu as is you can create a group Group Group displays the list of schedule group created up to now Also you can create a new schedule group and delete or rename existing group At the bottom of the Group there are 4 buttons as shown as follows ...

Страница 67: ...de from the group Save and close button When you press the Save button the current setting information will be applied to AC Smart When you do not save the information the applicable information will all be canceled When you press the Save button it will ask whether to save and you must press the Yes button to save the information When there is not content set in the Edit group screen the Save but...

Страница 68: ...rn screen you can create the weekly pattern and set the operation event and time for each pattern Also you can switch to the screen to create the daily pattern 1 Select weekly pattern In 1 Select weekly pattern you can add new weekly pattern and delete or rename the existing weekly pattern In the list you can check the list of weekly patterns currently setup At the bottom of 1 Select weekly patter...

Страница 69: ...nt to apply to the newly created weekly pattern In Edit day and time you can set the day and time to operate the event at a specific time In Select control command or daily pattern you can directly set the control command to operate at a specific time or apply the daily pattern to a specific day You can click the check box located in front of Control command or Daily pattern to select them Descrip...

Страница 70: ...he indoor temperature it operates in fan mode It operates in heat mode You can set the desired temperature from SET TEMP in the range of 18 C 30 C When the desired temperature is lower than the indoor temperature it operates in fan mode It evaluates the indoor condition and maintains the optimal condition automatically You can set the fan level of the indoor unit This sets the fan level of the ind...

Страница 71: ...w Auto The unit evaluates the indoor condition and maintains optimal condition automatically Dehumidify This operates the indoor unit to run dehumidifier operation When you set this during the rainy season or when it is humid the dehumidifier will remove the humidity effectively When you set to this mode When you set up for this mode you cannot set the desired temperature Fan This operates the ind...

Страница 72: ...imum set temperature You can set the maximum indoor temperature Indivisual Lock Maximum Minimum temperature setting Item Description You can turn on off the device connected to the AC Smart Run Run the On Off device Stop Stop the On Off device On Off device Reference Individual lock function and maximum minimum temperature setting Mode lock fan level lock set temperature lock and maximum minimum t...

Страница 73: ...Low This sets the fan level to low High This sets the fan level to high Super This sets the fan level to maximum speed Auto This is set to maintain the optimal condition by measuring the indoor level of contamination automatically You can set the lock function so that the user cannot operate the ventilator individually All lock This is set so that the ventilator cannot be operated All unlock This ...

Страница 74: ...pplicable content of 3 Save weekly pattern is displayed There are 3 buttons as follows on the right side of 2 3 Add event Button Description You can compose and add the currently set time and control command as event information You can set a specific event consistently over several days When you designate a specific event and press the Consistently add event button Consistently add event screen i...

Страница 75: ...ll weekly pattern event button the currently set weekly event will be deleted When you press the Delete all daily pattern event button the currently set daily event for a specific day will be deleted When you select any time internal on a specific day and press this button all events set on that applicable day will be deleted 3 Save weekly pattern You can check the set event from 3 Save weekly pat...

Страница 76: ... weekly pattern 1 Add event In 1 Add event you can create event to newly add to the currently set schedule In Edit day and time you can set the day and time for the event to operate on a specific time In Select control command or daily pattern you can directly set the control command to operate at a specific time or apply the daily pattern to a specific day Click on the check box located in front ...

Страница 77: ...ange of 18 C 30 C When the desired temperature is lower than the indoor temperature it operates in fan mode It operates in heat mode You can set the desired temperature from SET TEMP in the range of 18 C 30 C When the desired temperature is higher than the indoor temperature it operates in fan mode It evaluates the indoor condition and maintains the optimal condition automatically You can set the ...

Страница 78: ...e unit evaluates the indoor condition and maintains optimal condition automatically Dehumidify This operates the indoor unit to run dehumidifier operation When you set this during the rainy season or when it is humid the dehumidifier will remove the humidity effectively When you set to this mode When you set up for this mode you cannot set the desired temperature Fan This operates the indoor unit ...

Страница 79: ...imum indoor temperature that can be permitted Maximum set temperature You can set the maximum indoor temperature Individual Lock Maximum Minimum temperature setting Reference Individual lock function and maximum minimum temperature setting Mode lock fan level lock set temperature lock and maximum minimum temperature setting may not be displayed according to the setting when registering the unit to...

Страница 80: ...sets the fan level to low High This sets the fan level to high Super This sets the fan level to maximum speed Auto This is set to maintain the optimal condition by measuring the indoor level of contamination automatically You can set the lock function so that the user cannot operate the ventilator individually All lock This is set so that the ventilator cannot be operated All unlock This is set so...

Страница 81: ...applicable content of 2 Edit and save schedule detail is displayed There are 3 buttons as follows on the right side of Add event Button Description You can compose and add the currently set time and control command as event information You can set a specific event consistently over several days When you designate a specific event and press the Consistently add event button Consistently add event s...

Страница 82: ... schedule detail you can check the set event Also you can directly edit or reset the set event On tope of the 2 Edit and save schedule detail the operating period in week unit when the designated event is operating is displayed Press the arrow button to move and view In the middle of 2 Edit and save schedule detail the operation event set status of applied indoor unit and ventilator is displayed t...

Страница 83: ...tton Description You can set a new exceptional date When you select the day to be set as exceptional date at 2 Edit and Save the schedule in detail and press Add button Add the exceptional date screen is displayed When you enter the name and press Confirm button the said date is set as exceptional date You can delete the previously created exceptional date When you select the exceptional date to d...

Страница 84: ... or changes the function of indoor unit and ventilator When the reservation information such as schedule is set or operated When the auto operation function such as Auto change over operation or temperature limit operation is executed and completed When there is an error in the indoor unit or ventilator When controlling and monitoring AC Smart by accessing remotely When you select the history menu...

Страница 85: ...ndition setting button the History survey condition screen to select the classification of the history list by the preference of the user is displayed Item Description Date Code Time Unit Message Date of the event for the setting or control condition change is displayed Code number classified by history characteristic is displayed Time of the event is displayed Group name of the indoor unit or ven...

Страница 86: ...isplay the event that occurred one week back from the current time Last month This sets the history list to display the event that occurred one month back from the current time This displays the event that occurred only in the specific period Designate the period by pressing the calendar picture displayed in start and end date Start date Designate the start date of the period End date Designate th...

Страница 87: ...he following information with the table type Item Description Name Total running time Periodical statistics The name of the object to view its usage is displayed It is displayed by zone group or unit according the Set Condition Total running time for the object to be viewed Running time percentage and average indoor temperature for a specific period are displayed according to the Set Condition Run...

Страница 88: ...ion View setting Period setting You can see the running time by type View by zone Usage by registered zone View by group Usage by registered group View by unit Usage by registered unit You can see the running time by period Previous one week Running time for one week before the current time Previous one month Running time for one month before the current time Period setting Display only the runnin...

Страница 89: ...unction to maintain optimal indoor temperature through the automatic switching of air conditioner operating mode Cool heat Temperature limit operation Function to maintain indoor temperature at maximum minimum temperature set by controlling the air conditioner indoor unit automatically by setting the maximum and minimum temperature and by monitoring the indoor temperature Time limited operation Au...

Страница 90: ...nstalled at a certain range 4 C 4 C Temperature limit operation function automatically controls the indoor temperature so that the indoor temperature does not exceed the set maximum and minimum temperature limit based on the indoor temperature The temperature limit operation screen displays the setting information for the current Temperature Limit operation function ...

Страница 91: ...mperature to operate the air conditioner When the indoor temperature where the air conditioner is installed is lower than this temperature the air conditioner operates the heat function to increase the temperature to above minimum temperature Temperature range that can be set is 1 C 16 C Operating method of temperature limit mode is displayed All unit average This is the method of operating the te...

Страница 92: ...ng button When you press the Condition setting button the Condition setting screen of temperature limit operation where you can set various values related to the temperature limit operation function is displayed Reference Temperature limit operation method For method of creating editing and deleting the temperature limit operation group refer to Managing temperature limit operation group section o...

Страница 93: ...ithout user setting That is Auto change over operation operates the heat function to raise the temperature when the current temperature is lower than the temperature difference based on the temperature difference range set by the user On the other hand if the current temperature is higher than the temperature difference it operates the cool function to lower the temperature Auto change over operat...

Страница 94: ... Method to measure the temperature difference is displayed Fixed Method of operating the Auto change over operation function based on the temperature detected by applicable indoor unit by designating the representative indoor unit to operate based on the set temperature within the group Operating unit average Method of operating the Auto change over operation function based on the temperature dete...

Страница 95: ...ayed Condition setting button When you press the Condition setting button the Condition setting screen to set various values related to the Auto change over operation function is displayed Reference Automatic change over operation method For method of creating editing and deleting the automatic change over operation group refer to Managing automatic change over operation group section on page 4 82...

Страница 96: ...ates for the specified time at the specific weekday for preventing this situation The user can use the remote controller to operate the turned off unit The time limited running screen displays the setting information of the current time limited running function Group setting status The group setting status displays the set information of the time limited running by group The information displayed ...

Страница 97: ...s Unit Name of each unit within the time limited running group Status Whether the time limited running of the current unit is operated or not Remaining time Remaining time until the operation of the said unit stops Edit Group screen Set Condition button When you press Set Condition button the Set Condition screen is displayed for setting various values related to the time limited running function ...

Страница 98: ...e this indoor unit ventilator and On Off device into or from the group or zone according to the physical logical structure When you select the setting menu the following setting main screen is displayed In setting main screen you can set and manage the zone and group System tree System tree displays the composition of zone and group of AC Smart in tree structure Also when you select each unit from...

Страница 99: ...me the zone or group Button Description You can cancel the zone group and unit currently registered to the system to unregistered condition But the zone group and unit must be designated in registered unit list When the registration is canceled the applicable zone group and unit will be displayed in the Unregistered unit You can register the zone group and unit currently not registered to the syst...

Страница 100: ...ns Lock Unlock the mode Lock Unlock Wind flow and Lock Unlock the set temperature When the detailed lock function is not supported you can only set to lock unlock all functions Unit management button When Unit management button is pressed Unit management is displayed to register modify delete or rename the unit Note Using the detailed lock and the unit management function Only when logged in as in...

Страница 101: ...nected with the ACP an externally interconnected device To register the unit you must enter the following information Item Description Product type Name Address Model Capacity Enter the type of unit Air conditioner Ventilator On Off Device Enter the name of the unit You can enter up to 20 characters Enter the physical address of the unit The physical address value is between 00 and FF and cannot b...

Страница 102: ...ster a new unit When you select the unit information and press this button you can delete the existing unit When you select the unit information and press this button you can edit the existing unit information The AC Smart and the ACP can be interconnected to be operated In this case the ACP operates as master while the AC Smart operates as slave When the AC Smart operates as slave you cannot use ...

Страница 103: ...the backlight for convenience purposes In other setting menu you can execute various functions to set the environment needed to operate AC Smart as follows Other setting menu is composed of the following 9 sub menus Password Language selection Time setting Screen adjustment Screen saver Backlight Network E mail Setting DB Management This section describes the functions of other setting menu based ...

Страница 104: ...network and USB memory Therefore the user can check the current version of the software and must be able to upgrade the software version if necessary When you press the setting info sub menu in other setting menu you can see the version information screen displaying the software version of AC Smart ...

Страница 105: ...use only the Control monitoring menu with no password You can set a new password for the administrator right for changing the password at the Password setting menu When you press Password setting sub menu at the Environment setting menu the following screen for setting the password is displayed The password is set by entering the following items and pressing Confirm button Item Description Old pas...

Страница 106: ...alled can be set at Language setting screen When you set the supported language at the Language setting screen all menus and messages offered at the AC Smart screen are displayed with the language of the set country The temperature display unit can also be changed The AC Smart basically displays the temperature in centigrade But Apply Fahrenheit check box is checked at Language setting screen the ...

Страница 107: ...or setting and control of indoor unit and ventilator When you press the sub menu of Time setting from other setting menu time setting screen to set the time is displayed You can set the following item from time setting After selecting the language to change click on the OK button to change the language Item Description Date Set the date Year month and date Current time Select the time AM PM hour m...

Страница 108: ...ss the screen adjustment menu from other setting menu the Screen adjustment screen to adjust the touch screen is displayed When you click on the cross at the corner of the screen you can renew the coordinate of the touch screen Note Using the external button to compensate the screen The screen compensation function can be executed by pressing the keyboard button at the top of the AC Smart and then...

Страница 109: ...be set at the Screen saver menu Item Description Set to use Screen saver Select Screen saver theme Waiting time of Screen saver Set Brightness Waiting time for turning off the monitor Protect with the password when turning on the screen Set whether to use the screen saver function or not Select the type of the screen saver to be displayed on the LCD screen Set the waiting time for the screen saver...

Страница 110: ... air conditioner by using the web server function of the AC Smart Others Send Receive the related information for the automated test The remote service and the IP can be set for communicating with the external system at the Network sub menu When you select Network sub menu at the Environment setting menu the following Network screen is displayed Note Limiting the right to set The network function ...

Страница 111: ...Enter the server address of the SVCNet Service server port Enter the server port of the SVCNet Update period min Specify the period to update the information at the SVCNet by minute Field address Enter the IP address set at the current AC Smart Field name Enter the information about the location where the current AC Smart is installed Field code The code given for managing the field Select whether...

Страница 112: ...een When you double click ENDS41SA1 icon the screen for setting the IP address is displayed Type Item Description IP address Enter the IP address to be set at the AC Smart Subnet mask Enter the subnet mask for the IP address Default gateway Enter the IP address of the gateway Primary DNS Enter the IP address of the primary DNS server Secondary DNS Enter the IP address of the secondary DNS server P...

Страница 113: ...be set only when logging in as installation professional This menu is inactivated when logged in with other rights The following items should be set at the E mail setting screen Item Description Set to use the e mail Enter the e mail subject Enter the recipient s e mail address Set the period to send Set whether to use Send the e mail function or not Enter the subject of the e mail to be sent to t...

Страница 114: ...at the E mail account setting Type Item Description User name Enter the user s name E mail address Enter the user s e mail address Sending mail server SMTP Enter the mail server address Sending mail server port Enter the mail server port User name Enter the user name for logging into the mail server Password Enter the password to log into the mail server Press Account setting test to check whether...

Страница 115: ...upgrade menu from the sub menus of the Environment setting menu the window for upgrading the software is displayed Note Limit the right to set The S W upgrade function can be set only when logging in as installation professional This menu is inactivated when logged in with other rights After the procedure to re confirm the S W upgrade the software upgrade is automatically executed Note System rebo...

Страница 116: ...played for backing up or restoring the database Note Limit the right to set The DB management function can be set only when logging in as installation professional This menu is inactivated when logged in with other rights When you press DB backup or DB recovery button after connecting the USB port of the AC Smart to the USB memory the backup or recovery procedure of the database is automatically p...

Страница 117: ...order to use the web server function of the AC Smart the login procedure should be performed The displayed language Korean English and the temperature display unit Centigrade Fahrenheit can be set at the Login screen Control Monitoring menu Control Monitoring menu is similar to Control Monitoring menu of the AC Smart The structure of the zone group can be shown at this menu Also the operation stat...

Страница 118: ...r function of the AC Smart User management menu At the User management menu the right for the user other than the system administrator to access the web server of the AC Smart for controlling the air conditioner can be allowed or deleted Zone setting menu At the Zone setting menu the right for the user other than the system administrator to control the air conditioner only included at a specific z...

Страница 119: ... the login screen The AC Smart can be logged in with three method such as professional administrator and general user as follows Log in for installation professional When you log in as installation professional you can set all functions related to the installation of the AC Smart When logged in as administrator or general user the following menus are hidden Setting the model to be locked in detail...

Страница 120: ... for administrator When you log in as administrator you can all functions excepting some menus related to the installation and the environment setting offered at the installation professional only Log in for general user When you log in as general user you can use only the Control Monitoring menu to monitor and control the operation of the current air conditioner and cannot use other functions Pre...

Страница 121: ...into the AC Smart for the first time the password is not set When you correctly enter the password and press Confirm button you log into the AC Smart and you can all functions excepting some menus at System setting menu and Environment setting menu Press Administrator button to display the password input screen Possible to use all functions Some functions impossible to use Logging in as administra...

Страница 122: ...input procedure When logged into the AC Smart only the functions of the Control Monitoring menu can be used and other menus cannot be selected Logging in with no password input by press General user button Possible to use only the functions of Control Monitoring menu Impossible to select other menus Logging in as general user ...

Страница 123: ... the network as zone or group according to the installed location or the functional property The Control Monitoring menu offers the function to check the status of the unit indoor unit ventilator On Off device and to be directly controlled by the user via this group and zone This section describes how to operate the AC Smart function in order by using the control monitoring menu ...

Страница 124: ...nction simultaneously for all the units included in the applicable zone or group The function of the unit to control is as follows Indoor temperature setting of unit Operating and stopping the unit Operating mode of the unit Fan level of the unit Lock function of the unit Reference Detail unit control The unit consists of air conditioner ventilator and On Off device Here can control only some of f...

Страница 125: ... Designate the target to execute the various function of the unit from the screen with zone group or unit displayed When you press the Move up or Move down button or double click on the applicable icon you can change the screen displaying the zone group or unit 2 Press the button for each function and then press the Apply button Refer to the following chart of the description of each function Use ...

Страница 126: ...es in cool mode You can set the desired temperature from SET TEMP in the range of 18 C 30 C When the desired temperature is lower than the indoor temperature it operates in fan mode It operates in heat mode You can set the desired temperature from SET TEMP in the range of 18 C 30 C When the desired temperature is higher than the indoor temperature it operates in fan mode This sets the lock functio...

Страница 127: ...an lock should be applied concurrently for Multi and Single model Caution Unsupported function Lock functions shell work abnormally if products do not support lock functions Example Cooling only product shell not support Heat mode lock Caution Individual lock setting Temperature fan level lock When the 2PIN connector of PI485 is connected and you try to change the operating mode with the wired rem...

Страница 128: ...instruction to set the detailed function of air conditioner ventilator and On Off device 1 Select Control Monitoring menu from the menu of AC Smart When you select the Control Monitoring menu the following Control Monitoring screen is displayed From the screen with zone group or unit displayed designate the target to execute various functions of the unit When you press the Move up or Move down but...

Страница 129: ...the button of the function to set click on the OK button Refer to the following chart for the description of each function In order to use the individual lock function and the upper lower temperature setting function you should check Model to be locked in detail at the System setting menu and save the setting ...

Страница 130: ...emperature from SET TEMP in the range of 18 C 30 C When the desired temperature is lower than the indoor temperature it operates in fan mode It evaluates the indoor and outdoor condition and maintains the optimal condition automatically This operates the dehumidify mode When you set this during the rainy season or when it is humid the dehumidifier will remove the humidity effectively This operates...

Страница 131: ... the maximum indoor setting temperature You can operate or stop the indoor unit Operation You can set the operating mode of the ventilator Mode Both inlet outlet go through heat exchange device for ventilation Use this mode during summer and winter when the difference between the indoor and outdoor is significant in terms of temperature and humidity This measures the indoor temperature and outdoor...

Страница 132: ...he power save function This enables the quick operation function This enables the unit to operate in maximum performance to prevent the expansion of contaminated indoor air or humidity to other space This disables the heater function This enables the power save function Ventilator operates in the most efficient condition to save the power consumption Ventilator This sets the fan level of the venti...

Страница 133: ...Schedule group Schedule group is a group executing a different function from control group Auto change over operation group and temperature limit group Schedule group is only used for apply the schedule and units included in the group may not be duplicated with other groups Click on Edit button Schedule Schedule is the function to run the reserved operation at the specific time by previously speci...

Страница 134: ...up click on the Add button Group name screen to enter the name of the schedule group to create is displayed 3 After entering the name of the schedule group to create click on the OK button When you click on Add button Group name screen is displayed After entering the group name click on OK button ...

Страница 135: ...right and press the button to add to the schedule group 5 Click on the Save button to save the current setting Information screen to confirm the saving process is displayed Click on the Yes button Check created schedule group After selecting units from the list click on the button to add the units to the schedule group After clicking the Save button when you see the Information screen click on Yes...

Страница 136: ...g process is completed When the saving process is completed the Save button is deactivated and then reactivated when information is changed Click on the Close button to return to the prior screen Click on Close button to return to prior screen ...

Страница 137: ...sic group setting button located at the bottom left corner of the Edit group screen you can create the same group as the basic control group set for control and monitoring from the Setting menu as a schedule group When you click on Basic group setting button same group as the one composed from Setting menu is automatically created as a schedule group ...

Страница 138: ...u the following schedule screen is displayed To rename the schedule group click on the Edit button 2 Edit group screen is displayed Select the schedule group to rename and click on the Rename button Group name screen to enter the name of the schedule group to change is displayed Click on Edit button After selecting the schedule group when you click on Rename button Group name change screen is disp...

Страница 139: ... applicable schedule group has changed in Group and click on the Save button to save the current setting When the Information screen to check the saving process is displayed click on the Yes button After entering the schedule group name click on OK button After click on Save button when Information screen is displayed click on Yes button Check created schedule group ...

Страница 140: ...g process is completed When the saving process is completed the Save button is deactivated and then reactivated when information is changed Click on the Close button to return to the prior screen Click on Close button to return to prior screen ...

Страница 141: ...enu of AC Smart When you select the Schedule menu the following schedule screen is displayed To delete the schedule group click on the Edit button 2 Edit group screen is displayed Select the schedule group to delete and click on the Delete button The applicable schedule group will be deleted Click on Edit button After selecting schedule group to delete click on Delete button ...

Страница 142: ...ss is displayed click on the Yes button 4 Saving process is completed When the saving process is completed the Save button is deactivated and then reactivated when information is changed Click on the Close button to return to the prior screen Check whether schedule group is deleted After clicking on Save button when Information screen is displayed click on Yes button Click on Close button to retur...

Страница 143: ...e schedule group applied with the pattern To apply the schedule proceed in the following order 1 Select the Schedule menu from the menu of AC Smart When you select the Schedule menu the following schedule screen is displayed Select the group to set the schedule to from 1 Select group If there is an existing schedule applied to the selected group the set schedule is displayed in 3 Edit and save sch...

Страница 144: ... Select weekly pattern you can create and apply a new schedule For detail information refer to 4 29 Creating schedule pattern section TIP Directly set schedule pattern When you click on the Edit button in 3 Edit and save schedule you can directly set the schedule without having to use weekly pattern Refer to Directly setting schedule pattern section of this chapter If you want to delete and reset ...

Страница 145: ...e displayed in 3 Edit and save schedule 4 Click on Save button to save the current setting After the schedule is saved you can select group from 1 Select group and check the applied schedule of the applicable group When you select period to apply you can check the schedule You can select group after saving to check the schedule Click on Save button to save When you click on Add button the period t...

Страница 146: ...different schedule group 1 To copy the schedule click on the Copy button from 3 Edit and save schedule Copy schedule screen is displayed 2 After selecting the group to copy the schedule from and to click on OK button When you click on Copy button Copy schedule screen is displayed After selecting group to copy click on OK button ...

Страница 147: ... conditioner in a weekly or daily unit You can create a schedule pattern according to the following description 1 Select the Schedule menu from the menu of AC Smart When you select the Schedule menu the following schedule screen is displayed To create a schedule pattern click on the Edit button located in 2 Apply weekly pattern Click on Edit button ...

Страница 148: ...enter the name of the new weekly pattern is displayed 3 Edit weekly pattern screen is displayed To create a new weekly pattern click on the Add button located at the bottom of 1 Select weekly pattern Add weekly pattern screen to enter the name of the new weekly pattern is displayed When you click on Add button Add weekly pattern screen is displayed After entering the name of weekly pattern click o...

Страница 149: ...it as an event To set an event through control command check the check box located in front of Control command to select the control command If you want to set the event through daily pattern check the check box in front of the Daily pattern to designate the daily pattern Refer to the following chart for the operations you can select from Control command After checking whether the weekly pattern n...

Страница 150: ... Cool This operates the cool mode of indoor unit Execute this mode when the indoor temperature is high Heat This operates the heat mode of indoor unit Execute this mode when the indoor temperature is low Auto This evaluates the indoor condition and automatically maintains the optimal condition This sets the fan speed of the ventilator You can adjust the fan level considering the level of indoor co...

Страница 151: ... operation Execute when the indoor temperature is high Heat This operates the indoor unit to run heat operation Execute when the indoor temperature is low Auto The unit evaluates the indoor condition and maintains optimal condition automatically Dehumidify This operates the indoor unit to run dehumidifier operation When you set this during the rainy season or when it is humid the dehumidifier will...

Страница 152: ...an level lock function so that the user cannot individually control the fan level of the indoor unit Fan level unlock This disables the Fan level lock function Set temperature lock This enables the Set temperature lock function so that the user cannot individually control the indoor temperature setting Set temperature unlock This disables the set temperature lock function Minimum set temperature Y...

Страница 153: ...uper This sets the fan level to maximum speed Auto This is set to maintain the optimal condition by measuring the indoor level of contamination automatically You can set the lock function so that the user cannot operate the ventilator individually All lock This is set so that the ventilator cannot be operated All unlock This is set so that the ventilator can be operated You can designate the addit...

Страница 154: ...hedule planned repeat the process to continuously add the set event Click on Add button you can check the set event Reference Delete event When you click on the Delete all weekly event from 3 Save weekly pattern all events currently set will be deleted Also when you select a specific time zone and click on the Delete all daily event button all events of the applicable date will be deleted ...

Страница 155: ... must save the set events in weekly pattern Click on the Save button to display saving progress and the current setting will be saved When saving weekly pattern has been completed it will return to the prior screen Click on Save button to save pattern click on Save button to return to prior screen ...

Страница 156: ...ent and press the Add event consistently button to easily apply the setting When you press the Add event consistently button the Add event consistently screen is displayed as follows Designate the days to add the event and click on the OK button to add the event to the applicable days in 3 Save weekly pattern Click on Add event consistently button after designating the day click on OK button ...

Страница 157: ...the following order 1 Select the Schedule menu from the menu of AC Smart When you select the Schedule menu the following schedule screen is displayed To create the schedule pattern click on the Pattern button in 2 Apply weekly pattern 2 Check the check box of Daily pattern located in 2 Add event and click on the Edit button Click Edit button After checking the check box click on Edit button ...

Страница 158: ...n located at the bottom of 1 Select daily pattern Add daily pattern screen to enter the name of new daily pattern is displayed 4 After entering the name of the daily pattern to create click on OK button When you click on Add button Add weekly pattern screen is displayed After entering daily pattern name click on OK button ...

Страница 159: ...t you must add an event Set the time to start the event from Edit time 6 Set the control command to set which operation to execute for the unit Refer to the following chart for the operations you can select for Control command After checking whether name of daily pattern is created set event time Set event operation ...

Страница 160: ...g considering the level of indoor contamination Low This sets the fan speed to low Med This sets the fan speed to med Strong This sets the fan speed to high You can set the lock function of air condition so that the user cannot control the air conditioner individually All lock Enable lock function All unlock This disables the lock function Set temperature Operation Stop Mode Fan level Lock 7 When ...

Страница 161: ...t to this mode you cannot set t This sets the fan speed of the ventilator You can adjust the setting considering the level of indoor contamination Low This sets the fan speed to low Med This sets the fan speed to med High This sets the fan speed to high Auto This sets to automatically measure the indoor level of contamination and maintain the optimal condition This sets the automatic rotation of t...

Страница 162: ...st the level by considering the indoor level of contamination Low This sets the fan level to low High This sets the fan level to high Super This sets the fan level to maximum speed Auto This is set to maintain the optimal condition by measuring the indoor level of contamination automatically You can set the lock function so that the user cannot operate the ventilator individually All lock This is ...

Страница 163: ...ring the winter when the outdoor air is cold Disable heater This disable the heater function Enable power save Ventilator operates in the most efficient condition to save the power consumption Disable power save This disables the power save function Enable quick operation This enables the unit to operate in maximum performance to prevent the expansion of contaminated indoor air or humidity to othe...

Страница 164: ...e to add repeat the current process and add the set event continuously 9 When all planned events are set you must save the event in daily pattern Click on the Save button to display the saving progress and save the current setting When the daily pattern saving is completed click on the Close button to return to the prior screen Can check set event ...

Страница 165: ...up proceed in the following order 1 Select Schedule menu from the menu of AC Smart When you select the Schedule menu the following schedule screen is displayed Select the group to set the schedule of from 1 Select group If the selected group is already set the set schedule is displayed in 3 Edit and save schedule Click on the Edit button Reference Create schedule group To create a new schedule gro...

Страница 166: ...r the unit To set the event through control command check the check box in front of the Control command to select the control command If you want to set the event through daily pattern check the check box in front of the Daily pattern to designate the daily pattern Refer to the following chart for the operation you can select for Control command Set event date and time Set operation for control co...

Страница 167: ...an adjust the level by considering the indoor level of contamination Low This sets the fan level to low Med This sets the fan level to med High This sets the fan speed to high You can set the lock function of air condition so that the user cannot control the air conditioner individually All lock Enable lock function All unlock This disables the lock function Set temperature Operation stop Mode Fan...

Страница 168: ... mode you cannot set t This sets the fan speed of the ventilator You can adjust the setting considering the level of indoor contamination Low This sets the fan speed to low Med This sets the fan speed to med High This sets the fan speed to high Auto This sets to automatically measure the indoor level of contamination and maintain the optimal condition This sets the automatic rotation of the fan Yo...

Страница 169: ...r air is maintained to maintain the optimal condition This sets the fan speed of the ventilator You can adjust the level by considering the indoor level of contamination Low This sets the fan level to low High This sets the fan level to high Super This sets the fan level to maximum speed Auto This is set to maintain the optimal condition by measuring the indoor level of contamination automatically...

Страница 170: ... cannot be designated Enable heater You can enable the heater function to provide heated air during the winter when the outdoor air is cold Disable heater This disable the heater function Enable power save Ventilator operates in the most efficient condition to save the power consumption Disable power save This disables the power save function Enable quick operation This enables the unit to operate...

Страница 171: ...ntinuously 6 When all planned events are set you must save the event in weekly pattern Click on the Save button to display the saving progress and save the current setting When the weekly pattern saving is completed click on the Close button to return to the prior screen Click on Add button you check the set event Click on Save button to save pattern Click on Close button to return to prior screen...

Страница 172: ...e the exception day pattern for the event that occurs on a date when the unit must operate exceptionally such as anniversary or holiday etc From 2 Edit and save schedule detail of Schedule detail edit select the day to designate as exception day and click on Add button from 3 Exception day setting ...

Страница 173: ...AC Smart are displayed in the table format The displayed information is as follows To browse the setting and changes of the record of indoor unit and ventilator proceed in the following order Select the history menu from the menu of LCD panel When you select the history menu the following history screen is displayed Browsing history Item Description No Order the event occurred is displayed Date Da...

Страница 174: ... AC Smart When you select the History menu the following screen is displayed Click on the Condition setting button Record search condition to classify and search the event by history code and period is displayed 2 Designate the history code or history period and click on the Apply button For detailed description of the setting item refer to the following chart When you click on Condition setting b...

Страница 175: ...ssing remotely Last week This sets the history list to display the event that occurred one week back from the current time Last month This sets the history list to display the event that occurred one month back from the current time Period setting This displays the event that occurred only in the specific period Designate the period by pressing the calendar picture displayed in start and end date ...

Страница 176: ...n the history screen the setting information and changes can occur This information is not immediately reflected to the history screen currently displayed To view the latest history information click on the Refresh button The history displayed on the screen is refreshed to the latest information Click on Refresh button ...

Страница 177: ...otal running time Periodical statistics Name of object to view the usage It is displayed by zone group or unit according to the Set Condition Total running time of the viewed object Running time percentage and average indoor temperature for a specific period are displayed according to the Set Condition Running time Running time for a specific period Percentage The percentage is displayed by calcul...

Страница 178: ...1 Select History menu from the AC Smart menu When History menu is displayed the following history screen is displayed Press Usage view button 2 When Usage view screen is displayed press Set Condition button Usage view condition screen is displayed for setting the unit and the period to view Setting the usage for a specific period Click Usage button When Set Option button is clicked Usage view cond...

Страница 179: ... the information about the usage for one week from the current time at the Periodical statistics Display the information about the usage for one month from the current time at the Periodical statistics Display the information about the usage within a specific period You can specify it by pressing the calendar image displayed at the starting date and the end date Starting date Specify the starting ...

Страница 180: ...4 Operating AC Smart AC Smart 4 62 4 The information about the usage meeting the specified condition is displayed on the screen ...

Страница 181: ...indoor temperature is lower than the set temperature the air conditioner runs the heat operation to raise the temperature above the temperature set for the space The temperature range that can be set is 1 C 16 C To execute the temperature limit operation function you must set the maximum and minimum temperature and the temperature reference You can set the maximum temperature in the range of 25 C ...

Страница 182: ...he auto change over operation function the changed setting is reflected when operating mode Cool heat changes This chapter will describe the method and order of operating the function of AC Smart by using the Auto control menu Auto change over operation Auto changer over operation is the function to maintain the optimal indoor temperature without any manual control through automatic change over of...

Страница 183: ...o clock The following figure shows the example for the operation of the time limited running The time limited running is set to stop the unit by 4 hours on Tuesday and Wednesday from Monday to Thursday The Unit A operates from 22 00 on Monday before applying the time limited running The time limited operation is applied to run the Unit A on Tuesday and to stop at 4 00 after 4 hours The Unit B oper...

Страница 184: ...hen you select the Auto control menu the following auto control screen is displayed Click on the Condition setting button Reference Temperature limit operation group To apply the temperature limit operation function by creating a new temperature limit operation group refer to Creating temperature limit operation group in Chapter 4 69 and create a new group before proceeding Click on Set condition ...

Страница 185: ...n be set is 1 C 16 C Select the method to measure the indoor temperature Indoor temperature can be measured in one of the three methods below All unit average This is the method of operating the temperature limit function based on the average temperature detected for the indoor units within the group Fixed This is the method of operating the temperature limit function based on the temperature dete...

Страница 186: ...ed Click on the Yes button 4 It is saved When the setting is saved the Save button will be deactivated and will be reactivated when the current information changes Click on the Close button to move to the prior screen After clicking on Save button when the Information screen is displayed click on Yes button Click on Close button to return to prior screen ...

Страница 187: ... operation group proceed in the following order 1 Select Auto control menu from the menu of AC Smart When you select the Auto control menu the following auto control screen is displayed Click on the Edit group button Managing temperature limit operation group Reference Temperature limit operation group Temperature limit operation group is a group executing a difference function than control group ...

Страница 188: ... temperature limit operation group Group name screen to enter the name of the group to create is displayed 3 Enter the name of the temperature limit operation group to create and click on the OK button When you click on Add button Group name screen is displayed After clicking on group name click on OK button ...

Страница 189: ...n the button to include the units 5 Click on the Save button to save the current setting Information screen to confirm saving is displayed Click on Yes button Check whether auto change over operation group is created After selecting the unit from the list click on the button to include the unit to the temperature limit operation group After clicking on Save button when the Information screen is di...

Страница 190: ...g process is completed When the saving process is completed the Save button is deactivated and then reactivated when information is changed Click on the Close button to return to the prior screen Click on Close button to return to prior screen ...

Страница 191: ...setting button located at the left bottom of the Edit group screen you can create the same group as the basic control group set from the Setting menu for control and monitoring as temperature limit operation group When you click on Basic group setting button the same group as the one composed in Setting menu is automatically created as temperature limit operation group ...

Страница 192: ... of AC Smart When you select the Auto control menu the following auto control screen is displayed Click on the Edit group button 2 When the Edit group screen is displayed select the temperature limit operation group to delete and click on the Delete button Applicable group is deleted Click on Edit group button After selecting the temperature limit operation group to delete click on Delete button ...

Страница 193: ... screen to check the saving process is displayed click on the Yes button 4 Saving process is completed When the saving process is completed the Save button is deactivated and then reactivated when information is changed Click on the Close button to return to the prior screen After clicking on Save button when the Information screen is displayed click on Yes button Click on Close button to return t...

Страница 194: ... the Auto control menu the following auto control screen is displayed Click on the Edit group button to create a new temperature limit operation group 2 Edit group screen is displayed Select the temperature limit operation group to rename and click on the Rename button Group name to enter the name of the group to rename is displayed Click on Edit group button When you click on Rename button Rename...

Страница 195: ...name of the applicable temperature limit operation group has been renamed in Group and click on the Save button to save the current setting When the Information screen to check the saving process is displayed click on the Yes button After clicking on the group name click on OK button After clicking on Save button when the Information screen is displayed click on Yes button ...

Страница 196: ...g process is completed When the saving process is completed the Save button is deactivated and then reactivated when information is changed Click on the Close button to return to the prior screen Click on Close button to return to prior screen ...

Страница 197: ...f the screen Setting auto change over operation Reference Auto change over operation group To create a new auto changer over operation group and apply the auto change over function refer to Creating auto change over operation group in Chapter 4 and create a new group before proceeding Notice Auto Change over operation group If outdoor is not concurrence type set the auto change over operation grou...

Страница 198: ...ng the auto change over function based on the average temperature detected for the indoor units within the group Operating unit average This is the method of operating the auto change over function based on the average temperature of the operating indoor units within the group Fixed This is the method of operating the auto change over function based on the temperature detected from the first regis...

Страница 199: ...pply 4 When you have completed all the setting click on the Save button The Information screen to ask to save will be displayed Click on the Yes button 5 It is saved When the setting is saved the Save button will be deactivated and will be reactivated when the current information changes Click on the Close button to move to the prior screen After clicking on Save button when the Information screen...

Страница 200: ...of AC Smart When you select the Auto control menu the following auto control screen is displayed Click on Auto change over operation from the sub menu on the left side of the screen Reference Auto change over operation group Auto change over operation group is a group executing a difference function than control group schedule group and temperature limit operation group Auto change over operation ...

Страница 201: ...group button to create a new auto change over operation group 3 Edit group screen is displayed To create a new auto change over operation group click on the Add button Group name screen to enter the name of the group to create is displayed Click on Edit group button When you click on Add button Group name screen is displayed ...

Страница 202: ...o change over group has been created in Group New select the unit to include in the created group from the right unit list and click on the button to include the units to the group After entering group name click on OK button Check whether auto chanage over operation group is created After selecting unit from list click on button to include the unit to schedule group ...

Страница 203: ...ed Click on Yes button 7 Saving process is completed When the saving process is completed the Save button is deactivated and then reactivated when information is changed Click on the Close button to return to the prior screen After clicking Save button when Information screen is displayed click on Yes button Click on Close button to return to prior screen ...

Страница 204: ...m the menu of AC Smart When you select the Auto control menu the following auto control screen is displayed Click on Auto change over operation from the sub menu on the left side of the screen 2 When the Auto change over operation screen appears click on the Edit group button to create a new auto power operation group Click on Auto change over operation menu Click on Edit group button ...

Страница 205: ... 4 Check whether the auto power operation group is deleted from the Group and click on the Save button to save the current setting When the Information screen to check the saving process is displayed click on the Yes button After selecting the auto change over operation group to delete click on Delete button After clicking on Save button when the Information screen is displayed click on Yes button...

Страница 206: ...g process is completed When the saving process is completed the Save button is deactivated and then reactivated when information is changed Click on the Close button to return to the prior screen Click on Close button to return to prior screen ...

Страница 207: ... menu from the menu of AC Smart When you select the Auto control menu the following auto control screen is displayed Click on Auto change over operation from the sub menu on the left side of the screen 2 When the Auto change over operation screen appears click on the Edit group button to create a new auto power operation group Click on Auto change over operation menu Click on Edit group button ...

Страница 208: ...rename and click on the Rename button Group name screen to enter the name of the group to rename is displayed 4 After entering the name of the auto change over operation group click on the OK button When you click on Rename button Rename group screen is displayed After clicking on group name click on OK button ...

Страница 209: ...ormation screen to check the saving process is displayed click on the Yes button 6 Saving process is completed When the saving process is completed the Save button is deactivated and then reactivated when information is changed Click on the Close button to return to the prior screen After clicking on Save button when the Information screen is displayed click on Yes button Click on Close button to ...

Страница 210: ...tic control screen is displayed Press Time limited running at the sub menu at the left side of the screen Setting the time limited running Click Time limited running menu Note Time limited running group In order to apply the time limited running function by creating a new time limited running group perform this procedure after creating a new group by referring to Creating the time limited running ...

Страница 211: ... When Set Condition button is clicked Set Condition screen is displayed Item Description Apply No apply Time limit Apply week Set whether to perform the time limited running or not Apply Perform the time limited running No apply The time limited running is not performed Set the time 1 4 hours to limit the running of the time limited running group The time limited running group is run for the set t...

Страница 212: ...Press Yes button 5 Saving is finished When saving is finished Save button is deactivated and when the current information is changed it is activated again Click Close button to return to the previous screen When Confirm screen is displayed after clicking Save button click Yes button Click Close button to return to the previous screen ...

Страница 213: ...hen Automatic control menu is selected the following Automatic control screen is displayed Press Time limited running at the sub menu at the left side of the screen Managing the time limited running group Click Time limited running menu Note Time limited running group It is the group performing the function different from Control group Schedule group Temperature limited running group and Automatic...

Страница 214: ...utton to create a new time limited running group 3 Edit Group screen is displayed Press Add button to create a new time limited running group Group name screen is displayed for getting the name of the group to be created Click Edit group button When Add button is clicked Group name screen is displayed ...

Страница 215: ...limited running group is created at Group And select the unit to be included to the created group from the unit light at the right side and click button to include it to the group After entering the group name click Confirm button After selecting the unit from the list press button to include to the schedule group Make sure that the time limited running group is created ...

Страница 216: ...Press Yes button 7 Saving is finished When saving is finished Save button is deactivated and when the current information is changed it is activated again Click Close button to return to the previous screen When Confirm screen is displayed after clicking Save button click Yes button Click Close button to return to the previous screen ...

Страница 217: ...t Default group button at the top right of Edit Group screen the group same to the default control groups set for controlling and monitoring at System setting menu is created as Time limited running group When you click Set Default group button the groups same to the groups configured at Setting menu are automatically created as Time limited running group ...

Страница 218: ...l menu from the AC Smart menu When Automatic control menu is selected the following Automatic control screen is displayed Press Time limited running at the sub menu at the left side of the screen 2 When Time limited running screen is displayed click Edit group button to delete the time limited running group Click Time limited running menu Click Edit group button ...

Страница 219: ...Delete button The said group is deleted 4 Make sure that the said time limited running group is deleted and press Save to save the current setting When Confirm screen to confirm saving is displayed press Yes button After selecting the group to delete click Delete button When Confirm screen is displayed after clicking Save button click Yes button ...

Страница 220: ...Saving is finished When saving is finished Save button is deactivated and when the current information is changed it is activated again Click Close button to return to the previous screen Click Close button to return to the previous screen ...

Страница 221: ...omatic control menu from the AC Smart menu When Automatic control menu is selected the following Automatic control screen is displayed Press Time limited running at the sub menu at the left side of the screen 2 When Time limited running screen is displayed click Edit Group button to rename the time limited running group Click Time limited running menu Click Edit Group button ...

Страница 222: ...to rename and press Rename button Rename Group screen is displayed for getting the name of the group to rename 4 After entering the name of the time limited running group to rename press Confirm button When Rename button is clicked Group name screen is displayed After entering the group name click OK button ...

Страница 223: ...nfirm screen to confirm saving is displayed press Yes button When Confirm screen is displayed after clicking Save button click Yes button 6 Saving is finished When saving is finished Save button is deactivated and when the current information is changed it is activated again Click Close button to return to the previous screen Click Close button to return to the previous screen ...

Страница 224: ...r the unit proceed in the following order 1 Edit unit screen to register the unit will be displayed Click on the Auto setting When the Information screen to check unit auto setting click on the Yes button Setting You can conveniently manage the indoor units and ventilators connected to the network with AC Smart in zone and group depending on the installed location or function characteristic Settin...

Страница 225: ... to the below table 3 Save the searched unit When you click on the OK button an Information screen to check whether to apply the current setting will be displayed Click on Yes to save the setting and it will return to the prior screen Registered unit is displayed To apply to system click on OK button when Information screen is displayed click on Yes button and click on Yes button ...

Страница 226: ... to check whether to apply the current setting will be displayed Click on the Yes button 5 The setting to now will be applied to the system and you will see a message saying that you have completed saving the setting on the screen Click on the OK button to complete the registration To apply to system click on Save button and click on Yes button When it is saved click on OK button ...

Страница 227: ...g menu from the menu of AC Smart When you select the Setting menu the following screen is displayed Click on the Edit unit button located on the right side of the screen 2 Edit unit screen to register the unit is displayed Enter the information of the unit and click on the Add button Refer to the following chart for information to enter Click on Register unit button After entering unit information...

Страница 228: ... OK button Item Description Enter the type of unit Air conditioner Ventilator On Off Device Enter the name of the unit You can enter up to 20 characters Enter the physical address of the unit The physical address value is between 00 and FF and cannot be duplicated Enter the model of the unit You can enter up to 20 characters Enter the maximum power consumption value The power consumption must not ...

Страница 229: ...screen 5 Lastly you must register the temporarily saved unit setting to the system When you click on the Save button the current setting will be applied to the system and the screen will display the message saying that saving process has been completed Click on the OK button to complete the registration To apply to system click on Yes button To apply to system click on Save button When saving is c...

Страница 230: ...new zone click on AC Smart which is the highest node of the System tree List of unregistered units is displayed in Unregistered unit on the right side of the screen Reference When the unregistered unit is not shown When you initially execute AC Smart and have not executed the process of registering the unit unregistered unit will not be displayed Proceed after executing registering unit process If...

Страница 231: ...e system tree screen Zone name screen to enter the name of the new zone to create is displayed 3 After entering the name of the zone to create click on the OK button To apply to system click on OK button To apply to system click on Save button When saving is completed click on OK button ...

Страница 232: ...ted at the lower node of AC Smart node 5 Click on the Save button to save the setting Message confirming to save will be displayed on screen Click on the Yes button Check whether zone has been created After clicking on Save button when Information screen is displayed click on Yes button ...

Страница 233: ...llation Owner s Manual 4 115 6 After the setting process is displayed on the screen the save complete message is displayed When you click on the OK button the save process will be completed Click on OK button to complete saving ...

Страница 234: ...ayed Select the zone to delete from the System tree and click on the Delete button 2 Applicable zone is deleted Check whether the applicable zone has been deleted from the System tree Unit included in zone to delete is transferred to Unregistered unit After selecting zone to delete click on Delete button Check whether zone has been deleted Can check whether unit included in applicable zone is in U...

Страница 235: ...l be displayed on screen Click on the Yes button 4 After the setting process is displayed on the screen the save complete message is displayed When you click on the OK button the save process will be completed After clicking on Save button when Information screen is displayed click on Yes button Click on OK button to complete saving ...

Страница 236: ...ting menu from the menu of AC Smart When you select the Setting menu the following screen is displayed Select the zone to rename from System tree 2 Click on the Rename button Rename zone screen to enter the name of zone is displayed Select zone to rename When you click on Rename button Rename zone screen is displayed ...

Страница 237: ...tallation Owner s Manual 4 119 3 After renaming the zone click on the OK button 4 Check whether the applicable zone has been renamed in System tree After renaming the zone click on OK button Check whether zone has been renamed ...

Страница 238: ...ayed on screen Click on the Yes button 6 After the setting process is displayed on the screen the save complete message is displayed When you click on the OK button the save process will be completed After clicking on Save button when Information screen is displayed click on Yes button Click on OK button to complete saving ...

Страница 239: ...ing new group Deleting group Renaming group Resetting group To reset the group proceed in the following order 1 Select the Setting menu from the menu of AC Smart When you select the Setting menu the following screen is displayed Click on the name of the zone to reset the group from the System tree Select the group to reset After selecting zone select the group to reset ...

Страница 240: ...up not assigned to any zone Use the and button to include or delete the group 3 Select the zone to include the excluded group Registered unit displays the group including the applicable zone Select the excluded group Exclude group by clicking on button and excluded group is displayed in Unregistered unit After selecting zone select group to include ...

Страница 241: ...up is moved and displayed in Registered unit 5 Click on the Save button to save the setting Message confirming to save will be displayed on screen Click on the Yes button Click on button to move designated group Applicable group displayed in Registered unit After clicking on Save button when Information screen is displayed click on Yes button ...

Страница 242: ...mart AC Smart 4 124 6 After the setting process is displayed on the screen the save complete message is displayed When you click on the OK button the save process will be completed Click on OK button to complete saving ...

Страница 243: ...nu of AC Smart When you select the Setting menu the following screen is displayed Select the zone to include the new group to from the System tree 2 Click on Add button in system tree screen Group name screen to enter the name of the group to create is displayed Select zone to include newly created group When you click on Add button Group name screen is displayed ...

Страница 244: ...After entering the name of the group to create click on the OK button 4 Check whether the applicable group is created in the lower node of the selected zone After entering the group name click on OK button Check whether the group is created ...

Страница 245: ...l be displayed on screen Click on the Yes button 6 After the setting process is displayed on the screen the save complete message is displayed When you click on the OK button the save process will be completed After clicking on Save button when Information screen is displayed click on Yes button Click on OK button to complete saving ...

Страница 246: ...of AC Smart When you select the Setting menu the following screen is displayed Select the group to delete from System tree and click on the Delete button 2 Applicable group is deleted Check whether the applicable group is deleted from the System tree After selecting the group to delete click on the Delete button Check whether group is deleted ...

Страница 247: ... is displayed on the screen the save complete message is displayed When you click on the OK button the save process will be completed The unit included in the deleted group is moved to the Unregistered unit After clicking on Save button when Information screen is displayed click on Yes button When you click on OK button the saving is completed Can check the unit included in deleted group in Unregi...

Страница 248: ...menu from the menu of AC Smart When you select the Setting menu the following screen is displayed Select the group to rename from the System tree 2 Click on the Rename button Rename group screen to enter the name of the group is displayed Select group to rename When you click on Rename button Rename zone screen is displayed ...

Страница 249: ...Owner s Manual 4 131 3 After renaming the group click on the OK button 4 Check whether the name of the applicable group has been renamed in the System tree After renaming group click on OK button Check whether the group has been renamed ...

Страница 250: ...ayed on screen Click on the Yes button 6 After the setting process is displayed on the screen the save complete message is displayed When you click on the OK button the save process will be completed After clicking on Save button when Information screen is displayed click on Yes button Click on OK button to complete saving ...

Страница 251: ...unit To reset the unit proceed in the following order 1 Select the Setting menu from the menu of AC Smart When you select the Setting menu the following screen is displayed Click on the name of the group to reset the unit from the System tree The unit included in the applicable group will be displayed in the Registered unit list Select the unit to reset After selecting group select the unit to res...

Страница 252: ...unit list and the unit not assigned to any group is displayed in the Unregistered unit list Press the and button to add or delete the unit 3 Select the group and unit to add the excluded unit to Press the button to exclude unit Excluded unit is displayed in Unregistered unit After selecting the group select unit to add ...

Страница 253: ...isplayed in the Registered unit list 5 Click on the Save button to save the current setting Message confirming to save will be displayed on screen Click on the Yes button Press the to move the designated unit Applicable unit will be displayed in the Registered unit After clicking the Save button When the Information screen is displayed click on the Yes button ...

Страница 254: ...AC Smart 4 136 6 After the setting process is displayed on the screen the save complete message is displayed When you click on the OK button the save process will be completed Click on OK button to complete the save process ...

Страница 255: ...e Setting menu from the menu of AC Smart When you select the Setting menu the following screen is displayed Click on the Register unit button located on the right side of the screen 2 Edit unit screen is displayed Select the unit to delete from the registered unit list and click on the Delete button The applicable unit will be deleted Click on Register unit button After selecting the unit to delet...

Страница 256: ...button the Edit unit screen will end and return to the prior screen 4 Lastly you must register the setting of the unit temporarily saved Click on the Save button to save the setting Message confirming to save will be displayed on screen Click on the Yes button Click on Yes button to save to system Click on Save button to apply to system When Information screen is displayed click on Yes button ...

Страница 257: ...allation Owner s Manual 4 139 5 After the setting process is displayed on the screen the save complete message is displayed When you click on the OK button the save process will be completed Click on OK button to complete save ...

Страница 258: ...enu of AC Smart When you select the Setting menu the following screen is displayed Click on the Register unit located on the right side of the screen 2 Edit unit screen is displayed Select the unit to change the information of from the unit list Change the information of the selected unit Refer to the following chart for the information entered Click on Register unit button After selecting the uni...

Страница 259: ... Ventilator On Off Device Enter the name of the unit You can enter up to 20 characters Enter the physical address of the unit The physical address value is between 00 and FF and cannot be duplicated Enter the model of the unit You can enter up to 20 characters Enter the maximum power consumption value The power consumption must not exceed the set value You can enter up to 5 digits When you click o...

Страница 260: ...the Edit unit screen will end and return to the prior screen 5 Lastly you must register the setting of the unit temporarily saved Click on the Save button to save the setting Message confirming to save will be displayed on screen Click on the Yes button Click on Yes button to save to system Click on Save button to apply to system When Information screen is displayed click on Yes button ...

Страница 261: ...chedule automatic control and detailed lock functions In order to set the interconnection with the external central controller press Control interconnection button Unit management screen When Set to interconnect with the external central controller screen is displayed check the check box at the bottom and press OK button ON L1 2 3 4 KSDO4H Multi V Multi V AC Smart AC Smart PI485 PI485 ON L1 2 3 4 ...

Страница 262: ...e specified not to conflict with the address set the other controller When you Automatic setting button the screen to specify the range is displayed Click Auto button Specify the address range and click OK button Caution When interconnecting ACP First Set unit Address in AC Smart and ACP And then reset ACP if AC Smart interconnect ACP If not reset ACP AC smart could not work well ...

Страница 263: ...em time Set the coordinate screen calibration for the touch pad Set the screen saver and the backlight for protecting the LCD Set the network information for the web server function Set the e mail for notifying the administrator of the error Upgrade the S W Save and restore the database for protecting the critical information This section describes how to use the Environment setting menu to check ...

Страница 264: ...are Therefore the user should be able to check the version of the current software and upgrade the version of the software when necessary Select Environment setting from the AC Smart menu When Environment setting menu is selected the following screen is displayed showing the software version of the AC Smart Check the S W version ...

Страница 265: ... be able to set and control the AC Smart Keep the following steps to set a new password 1 Select Environment setting from the AC Smart menu Press Set Password menu from the sub menus at the left side Set the password screen is displayed for setting the password When Set the Password menu is clicked Set the password screen is displayed ...

Страница 266: ...ord is set Refer to the following table for the detailed description about each item Item Description Old password New password Confirm the password Enter the password currently set and used Enter the new password to use Enter the new password to confirm that the new password is correctly entered Enter the information about the item and click OK button ...

Страница 267: ...erating AC Smart Installation Owner s Manual 4 149 3 The message that the password is changed is displayed Click OK button to finish setting the password Click Conform button to finish setting the password ...

Страница 268: ... the set country Also the temperature unit Centigrade Fahrenheit can be specified according to the said country Keep the following steps to change the language and the temperature unit displayed on the screen 1 Select Environment setting from the AC Smart menu Press Language menu from the sub menus at the left side Set Language screen is displayed for setting the language and the temperature unit ...

Страница 269: ...t the AC Smart and press OK button After selecting the language click OK button 3 In order to change the language and the temperature unit to display the AC Smart should be restarted When the screen asking to restart is displayed press Yes button to restart the AC Smart Click Yes button to restart the AC Smart ...

Страница 270: ...4 Operating AC Smart AC Smart 4 152 4 After the AC Smart is restarted the login screen is displayed The login screen of the said language is displayed according to the language setting ...

Страница 271: ...te Apply button Apply button is deactivated before the time information is changed at Date Time attribute screen When the time information is changed Apply button is activated The AC Smart needs the correct time setting to drive the air conditioner and the ventilator according to the schedule set by the user or to record the history information about the occurred event You can set the date and the...

Страница 272: ...ethod If the coordinate operated by the user does not meet the coordinate displayed on the LCD panel the coordinate should be reset by calibrating the touch screen When Calibrate screen menu is clicked Stylus attribute screen is displayed Click Re calibrate button Information Using the external button of the AC Smart to calibrate the screen The screen calibration function can be executed by pressi...

Страница 273: ...g to the system or not Press the screen with the touch pen to apply it to the system 2 The crosshair is displayed at the bottom left of the screen Use the touch pen to press the crosshair This procedure is repeated by the order of bottom left bottom right top right and then top left Click the displayed crosshair Click the screen to use the current setting ...

Страница 274: ...Stylus attribute screen When you press OK button setting the screen calibration is finished and it returns to the initial screen of the Environment setting menu When OK button is clicked the screen calibration function is finished and it returns to the initial screen ...

Страница 275: ... saver screen is displayed 2 When you enter the information about each item and press OK button it returns to the previous screen and the setting is applied Refer to the following table for the detailed description for each item Item Description Set the screen saver to use Backlight Select whether to use the screen saver or not and the theme of the screen saver to be displayed on the LCD panel Als...

Страница 276: ... computer for monitoring and controlling the air conditioner by using the web server function of the AC Smart So the network setting of the AC Smart consists of the remote service setting for the SVCNet connection and the adapter network setting for the IP setting Setting the remote service Keep the following steps to set the remote service for accessing the SVCNet 1 Select Environment setting fro...

Страница 277: ...t by minute Field address Enter the IP address set at the current AC Smart Field name Enter the information about the location where the current AC Smart is installed Field code The code given for managing the field Select whether to use the function for sending the information of the AC Smart to the SVCNet Remote service information Field information Set to use the remote service Adapter network ...

Страница 278: ...river setting screen to set the network is displayed 3 Press IP address tab and select whether to get the IP address with the DHCP or to directly enter the IP address When you directly enter the IP address enter the additional information as shown at the below table When you click ENDS4ISA1 icon CS8900 Ethernet Driver screen is displayed Set the IP address ...

Страница 279: ... select whether to set the IP address of the additional DNS Domain Name Server When you enter the IP address of the DNS enter the additional information as shown at the below table Set the name server Item Description Primary DNS Enter the IP address of the primary DNS server Secondary DNS Enter the IP address of the secondary DNS server Primary WINS Enter the IP address when the WINS is used Seco...

Страница 280: ... to the previous adapter network setting screen Finally when you press X button at the top right on the screen setting the adapter network is finished Click X button to return to the initial screen Click OK button to end setting 6 When you press Save button all network settings are saved and it returns to the Environment setting menu Press Save button to end setting the network ...

Страница 281: ...l setting screen is displayed Enter the information to send the e mail Refer to the following table for the description about the information to set Item Description Set to use the e mail Enter the e mail subject Enter the recipient s e mail address Set the period to send Set whether to use Send the e mail function or not Enter the subject of the e mail to be sent to the receiver You can enter it ...

Страница 282: ...ent button is inactivated Click Account management button Classification Item Description User name Enter the user s name E mail address Enter the user s e mail address Enter the mail server address Sending mail server port Enter the mail server port User name Enter the user name for logging into the mail server Password Enter the password to log into the mail server When you log in by using the s...

Страница 283: ...st to make sure that the set account is correct Setting the e mail account can be finished by passing this test Click Account setting test button 4 When the account setting test is successfully performed the finish message is displayed Press OK button to end testing Click OK button ...

Страница 284: ...ve button to save the set account information Click Save button 6 When it returns to E mail setting screen the set e mail information should be saved When you press OK button E mail setting screen disappears setting the e mail is ended and it returns to Environment setting screen Click OK button ...

Страница 285: ... setting from the AC Smart menu Select Environment setting menu and press S W upgrade menu from the sub menus at the left side When the message confirming to restart the AC Smart is displayed press Yes button Note Before upgrading the software Before upgrading the software the left USB port of the AC Smart should be connected to the USB device containing the software update image After selecting S...

Страница 286: ... Smart AC Smart 4 168 2 The message showing that it takes some time to upgrade the software is displayed Press OK button Click OK button 3 The progress of the S W update is displayed with the graph and the percentage ...

Страница 287: ...169 4 When the procedure of the S W upgrade is finished the message showing that the system is to be restarted is displayed When you press OK button upgrading is ended And then the AC Smart is restarted and the Login screen is displayed Click OK button ...

Страница 288: ... Select Environment setting from the AC Smart menu Press DB management menu from the sub menus at the left side to display DB management screen Click DB backup button to back up the database Note Before backing up and restoring the database Before backing up and restoring the database the left USB port of the AC Smart should be connected to the USB device containing the database After the database...

Страница 289: ...played and the database backup progress is displayed After selecting DB management menu click DB recovery button Restoring the database Keep the following steps to import the database into the AC Smart 1 Select Environment setting from the AC Smart menu Press DB management menu from the sub menus at the left side to display DB management screen Click DB recovery button to back up the database ...

Страница 290: ...o restart the system When you press Yes button Upgrader screen is exited and then the procedure to import the database is automatically performed 3 When the database is successfully restored the AC Smart program is restarted and the Login screen is displayed Click Yes button to upgrade the software Update screen and Upgrader screen are displayed ...

Страница 291: ...P No MFL37115808 After reading this manual keep it in a place easily accessible to the user for future reference Printed in Korea ...

Отзывы: