3-11
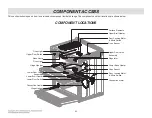
COmpONENT ACCESS
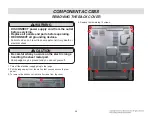
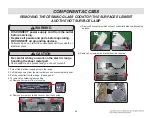
REmOvING ThE BROIL ELEmENT
5. Release 2 hooks and remove 4 screws.
4 Screws
2 Hooks
6. Remove 2 screws and separate the broil assembly from the upper
cavity.
2 Screws
WARNING
• DISCONNECT power supply cord from the outlet
before servicing.
• Replace all panels and parts before operating.
• RECONNECT all grounding devices.
- Failure to do so can result in severe personal injury, death or
electric shock.
CAUTION
• Use caution when handling sheet metal parts
while servicing the range.
- Some parts may have sharp edges, which could result in injury.
1. Turn off the electrical supply going to the range.
2. remove the back cover, cooktop plate, manifold panel and cooling
fan(see page 3-2, 3-4, 3-8 and 3-9 for the procedure).
3. Remove the upper case (see page 3-9 for the procedure).
4. Unplug 2 connectors at each point.
2 Connectors
Содержание LUTE4619SN
Страница 68: ...5 3 Lower Selfclean Oven Lamp Bridge Cook top Element CR Cook top Element ...
Страница 69: ...5 4 RR Cook top Element RF Cook top Element Upper BROIL EASY Clean Lower Broil ...
Страница 70: ...5 5 Upper BAKE WARM Clock Display On ...
Страница 71: ...6 1 COMPOSITION OF CONTROL Wiring Diagram ...
Страница 74: ...6 4 COMPOSITION OF CONTROL P N EBR80595411 Oven Relay PCB CN53 CN52 CN51 ...
Страница 75: ...6 5 COMPOSITION OF CONTROL SMPS PCB Touch PCB P N EBR80595701 P N EBR82864102 CN02 CN01 CN1 ...
Страница 104: ...UPPER DOOR PARTS EV 1021 1009 170R 1035 1035 170L 1015 1020 173U 173U 1008 102S 102S 102L W243 1000 W222 1801 ...
Страница 105: ...LOWER DOOR PARTS EV 1041 1009 1115 1120 102L 1018 173L 102U W243 W222 W222 1100 1704 1704 102L 173L 102U W101 W101 1801 ...
Страница 107: ...COOKTOP PARTS EV 330M 3204 3204 3204 3204 3204 3215 3056 3079 3022 330H 330S 5700 3014 3016 ...
Страница 110: ......


