background image

7

FRANÇAIS

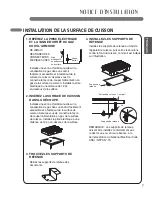
INSTALLATION DE LA SURFACE DE CUISSON

N OT I C E   D ' I N S TA L L AT I O N

1.  REPÉREZ LA PRISE ÉLECTRIQUE 

ET LA VANNE D'ARRÊT DU GAZ 

SOUS L'ARMOIRE

2.  INSÉREZ LA SURFACE DE CUISSON 

DANS LA DÉCOUPE

Installez une vanne d'arrêt manuelle sur la 

canalisation de gaz dans un endroit facilement 

accessible et à l'extérieur de la surface de 

cuisson. Assurez-vous de connaître la façon 

de couper l'alimentation en gaz de la surface 

de cuisson. Installez la prise électrique à une 

distance de 12 po en-dessous de la surface.

3.  TROUVEZ LES SUPPORTS DE 

RETENUE

Retirez les supports de retenue des 

documents.

NE JAMAIS 

RÉUTILISER DES 

CONNECTEURS 

FLEXIBLES USÉS

Installez une vanne d'arrêt manuelle sur la 

canalisation de gaz dans un endroit 

facilement accessible et à l'extérieur de la 

surface de cuisson. Assurez-vous de 

connaître la façon de couper l'alimentation en 

gaz de la surface de cuisson. Installez la prise 

électrique à une distance de 12 po 

en-dessous de la surface.

Vanne 

d'arrêt

Supports de 

retenue

Surface de cuisson

Vis

Comptoir

Supports de retenue

REMARQUE : Les supports de retenue 

doivent être installés conformément aux 

codes locaux ou, en leur absence, à la 

dernière édition du National Electrical Code 

ANSI / NFPA N° 70

4.  INSTALLEZ LES SUPPORTS DE 

RETENUE

Installez les supports de retenue au fond de 

l'appareil de cuisson. puis serrez les boulons 

contre le fond du cuisson, comme il est indiqué 

sur l'illustration.

Prise 

électrique 12 

po en-dessous 

de la surface

Содержание LSCG306ST

Страница 1: ...INSTALLATION MANUAL GAS COOKTOP LSCG366ST LSCG306ST LSCG367ST LSCG307ST Please read this guide thoroughly before installation www lg com MFL62725506_01 ENGLISH FRANÇAIS ...

Страница 2: ...u will find these precautions in the lmportant Safety Information section in your User s Guide Read them carefully IMPORTANT Save these instructions for local electrical inspector s use IMPORTANT Observe all governing codes and ordinances Note to Installer Leave these instructions with the appliance after installation is completed Note to Consumer Keep the User s Guide and Installation Instruction...

Страница 3: ...ighbor s phone Follow the gas supplier instructions If you cannot contact your gas supplier call the fire department Installation and service must be performed by a qualified installer service agency or the gas supplier TOOLS YOU WILL NEED MATERIALS YOU MAY NEED MATERIALS YOU MAY NEED Gas line shut off valve To reduce the possibility of gas leaks apply teflon tape or a thread compound approved for...

Страница 4: ...S This is the safety alert symbol This symbol alerts you to potential hazards that can kill or hurt you and others All safety messages will follow the safety alert symbol and either the word WARNING or CAUTION BEFORE YOU BEGIN Remove all tape and packing materials before using the cooktop Dispose all plastic bags after unpacking the cooktop Never allow children to play with packing materials IMPOR...

Страница 5: ... the cabinets above the cooktop with not less than 1 4 insulating millboard covered with sheet metal not less than 0 0122 thick Clearance between the cooking surface and protected cabinets MUST NEVER BE LESS THAN 24 INCHES The vertical distance from the plane of the cooking surface to the bottom of adjacent overhead cabinets extending closer than 1 to the plane of the cooktop sides must not be les...

Страница 6: ...MIN clearance from cutout to side wall on the right of the unit 18 MIN height from countertop to nearest cabinet on either side of unit 30 MIN clearance from countertop to unprotected overhead surface A MIN clearance from cutout to side wall on the left of unit L MIN Between cutout and the wall behind the cooktop K MIN From front edge of cutout and front edge of countertop Recommended gas supply l...

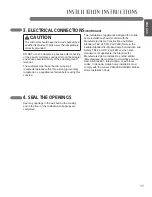
Страница 7: ...E USE OLD FLEX CONNECTORS Install a manual shut off valve in the gas line in an easily accessible location outside the cooktop Be sure you know how and where to shut off the gas supply to the cooktop Install the electrical outlet 12 below the countertop Shut Off valve Retainer brackets Cooktop Screw Countertop Retainer brackets NOTE The retainer brackets MUST be installed to meet local codes or in...

Страница 8: ...ped connection Never reuse an old connector when installing a new cooktop If the hard piping method is used you must carefully align the pipe the cooktop cannot be moved after the connection is made To prevent gas leaks put pipe joint compound on all male external pipe threads 1 Install a manual gas line shut off valve in the gas line in an easily accessed location outside of the cooktop Be sure e...

Страница 9: ...STRUCTIONS FLEXIBLE CONNECTOR HOOKUP Pressure regulator Installer Inform the consumer of the location of the gas shut off valve 1 2 or 3 4 Gas pipe Flex connector 6 ft max Gas Flow into Range Adapter Gas shut off valve Adapter ...

Страница 10: ...he personal responsibility and obligation of the customer to have it replaced with a properly grounded three prong wall receptacle DO NOT UNDER ANY CIRCUMSTANCES CUT OR REMOVE THE THIRD GROUND PRONG FROM THE POWER CORD A word about Ground Fault Circuit Interrupters Ground Fault Circuit Interrupters are not required or recommended for gas range receptacles Ground Fault Circuit Interrupters are devi...

Страница 11: ... home installation should conform with the Manufactured Home Construction and Safety Standard Title 24 CFR Part 3280 formerly the Federal Standard for Mobile Home Construction and Safety Title 24 HUD Part 280 or when such standard is not applicable the Standard for Manufactured Home Installations latest edition Manufactured Home Sites Communities and Set Ups ANSI A225 1 latest edition or with loca...

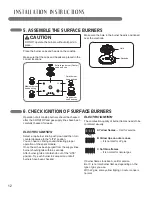
Страница 12: ... top burner knob push down and then turn counterclockwise to the LITE position You can hear a clicking sound indicating proper operation of the spark module Once the air has been purged from the supply lines burner should ignite within 4 seconds After burner ignites rotate knob out of the LITE position Try each burner in succession until all burners have been checked ELECTRIC IGNITION The combusti...

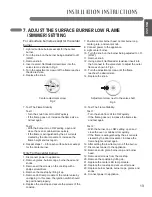
Страница 13: ...roperly 6 Replace the cooktop and secure the screws of the cooktop 7 Position center burner head center burner cap center grate and center knob 8 Connect power to the appliance 9 Light center burner 10 Turn the knob on the burner being adjusted to LO LOW 11 Remove knob 12 Using a small flat bladed screwdriver insert into the hole next to the valve stem to adjust the outer flame as shown in Fig 3 1...

Страница 14: ...RUCTIONS This cooktop leaves the factory set for use with natural gas When converting to LP gas the conversion must be performed by a qualified LP gas installer The conversion instructions and LP orifices are supplied with your cooktop Keep these instructions and the orifices in case you want to convert back to natural gas CONVERTING TO LP GAS OR CONVERTING BACK TO NATURAL GAS FROM LP ...

Страница 15: ...GUIDE D INSTALLATION SURFACE DE CUISSON AU GAZ Veuillez lire attentivement ce guide avant de procéder à l installation P No MFL62725506 www lg com FRANÇAIS LSCG366ST LSCG306ST LSCG367ST LSCG307ST ...

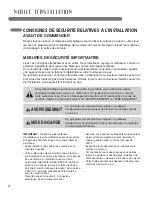
Страница 16: ...ateur Veuillez les lire attentivement IMPORTANT Conservez la notice d installation qui sera utile à l inspecteur en électricité IMPORTANT Nous vous invitons à respecter tous les codes et règlements en vigueur Note à l intention de l installateur Veuillez laisser la notice d installation avec l appareil à la fin de l installation Note à l intention de l utilisateur Conservez ce Guide d installation...

Страница 17: ...s du fournisseur de gaz Si vous ne pouvez pas communiquer avec votre fournisseur de gaz appelez le service d incendie L installation et l entretien doivent être effectués par un installateur qualifié une agence de service ou le fournisseur de gaz OUTILS DONT VOUS AUREZ BESOIN MATÉRIAUX DONT VOUS AUREZ BESOIN MATÉRIAUX DONT VOUS AUREZ BESOIN Vanne d arrêt de la conduite de gaz Pour réduire tout ris...

Страница 18: ...ertit des risques potentiels de blessures graves ou même de mort qui peuvent survenir pour vous et toute autre personne Tous les messages de sécurité seront mentionnés à la suite du symbole d alerte à la sécurité et des mots AVERTISSEMENT ou MISE EN GARDE AVANT DE COMMENCER Retirez tous les rubans et matériaux d emballage avant d utiliser la surface de cuisson Jetez tous les sacs en plastique aprè...

Страница 19: ...ace de cuisson à l aide d un isolant de carton d une épaisseur d au moins 1 4 po 0 5 cm recouvert d une tôle en feuille d au moins 0 0221 po 3 mm d épaisseur Les intervalles entre la surface de cuisson et les armoires protégées ne doivent jamais être inférieurs à 24 pouces La distance verticale séparant la surface de cuisson et le bas des armoires adjacentes doit être de moins de 1 po par rapport ...

Страница 20: ...ce supérieure non protégée A MIN Dégagement allant de la découpe jusqu à la paroi latérale à droite de l appareil L MIN Entre la découpe et le mur derrière la surface de cuisson K MIN A partir du bord avant de la découpe et du bord avant du comptoir Emplacement recommandé pour l alimentation en gaz Au moins 1 po à partir du mur arrière À partir de la ligne centrale de découpe Pour garantir la préc...

Страница 21: ...LEXIBLES USÉS Installez une vanne d arrêt manuelle sur la canalisation de gaz dans un endroit facilement accessible et à l extérieur de la surface de cuisson Assurez vous de connaître la façon de couper l alimentation en gaz de la surface de cuisson Installez la prise électrique à une distance de 12 po en dessous de la surface Vanne d arrêt Supports de retenue Surface de cuisson Vis Comptoir Suppo...
Страница 22: ...n ancien connecteur lors de l installation d une nouvelle surface de cuisson Si vous utilisez une tuyauterie dure vous devez soigneusement aligner le tuyau et la cuisinière ne pourra alors plus être déplacée une fois que le raccordement aura été effectué Pour éviter toute fuite de gaz posez la pâte à joint sur toutes les canalisations mâles externes 1 Installez une vanne d arrêt manuelle sur la ca...

Страница 23: ...OUPLE Régulateur de pression Remarque à l intention de l installateur informez l utilisateur de l emplacement de la vanne d arrêt gaz Canalisation de gaz de 1 2 ou 3 4 po Raccord souple 6 pi max Débit de gaz en gamme Adaptateur Vanne d arrêt de gaz Adaptateur ...

Страница 24: ... correctement mise à la terre NE TENTEZ JAMAIS DE COUPER OU DE RETIRER LA TROISIEÈME BROCHE MISE A LA MASSE DU CORDON D ALIMENTATION Un mot sur les disjoncteurs différentiels de fuite à la terre les disjoncteurs différentiels de fuite à la terre ne sont pas nécessaires ou recommandés pour les prises de courant utilisées pour les cuisinières au gaz Les disjoncteurs différentiels de fuite à la terre...

Страница 25: ...biles doit être conforme avec la Manufactured Home Construction and Safety Standard Title 24 CFR Part 3280 anciennement Federal Standard for Mobile Home Construction and Safety Title 24 HUD Part 280 ou lorsque cette norme n est pas applicable la dernière édition de la Standard for Manufactured Home Installation Manufactured Home Sites Communities and Setups ANSI A225 1 dernière édition ou aux code...

Страница 26: ...ers le bas puis tournez le dans le sens antihoraire à la position LITE allumage Vous entendrez un déclic indiquant le bon fonctionnement du module d allumage Une fois que l air a été purgé des canalisations d alimentation le brûleur devrait alors s enflammer dans les 4 secondes qui suivent Après avoir enflammé le brûleur tournez le bouton à la position LITE Essayez chaque brûleur successivement ju...

Страница 27: ...s vis de fixation 7 Positionnez la tête du brûleur au centre centrez le chapeau du brûleur la grille centrale et le bouton central 8 Branchez l alimentation de l appareil 9 Allumez le brûleur au centre 10 Tournez le bouton du brûleur à la position LO BAS 11 Retirez le bouton 12 En utilisant un petit tournevis à lame plate inséré dans le trou à proximité de la tige de la vanne vous pourrez ajuster ...

Страница 28: ... de fonctionnement depuis l usine de fabrication sont ceux conçus pour une utilisation avec du gaz naturel La conversion au GPL doit être effectuée par un installateur qualifié GPL Les instructions de conversion et les orifices PL sont fournis avec votre surface de cuisson Conservez les instructions et les orifices dans le cas où vous souhaiteriez reconvertir votre cuisinière au gaz naturel CONVER...

Страница 29: ...NOTES ...

Страница 30: ...NOTES ...

Страница 31: ...NOTES ...

Страница 32: ...Printed in Korea www lg com Register your product Online LG Customer Information Center 1 800 243 0000 1 888 865 3026 1 888 542 2623 USA Consumer User USA Commercial User CANADA ...

Отзывы: