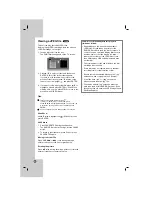
background image

20

DVD Audio Discs

DVD Audio is a new disc format building on the
success of DVD to provide high quality,
uncompressed, multi-channel audio for a new
experience in audio quality. A DVD Audio disc can be
identified by the DVD audio logo on the disc jacket or
on the disc itself.

DVD Audio can provide higher quality stereo than
Audio CDs with a sampling rate of up to 192kHz
(compared to 44.1kHz for CDs). DVD Audio digital
sound can be delivered with up to 24 bits of data
(compared to 16 bits for a standard CD).

A typical DVD Audio disc contains up to seven times
the data capacity of a CD. This additional space is
used for music, either Advanced Resolution multi-
channel sound quality that is closer to the artist’s
master recording or for longer recordings. Many DVD
Audio discs contain on-screen text, such as artist
biographies, playlists, or lyrics. Some DVD Audio
discs contain photo galleries or video clips.

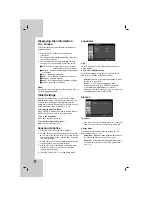
Moving to another GROUP

Some DVD Audio discs divide content into different
groups. Your player enables you to quickly access
different groups during playback via the on-screen
display.

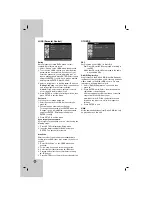
1. Press DISPLAY during playback on in stop mode. 

2. Press 

3

3

/

4

4

to select Group icon. 

3. Press 

1

/

2

or the numbered buttons (0-9) to select

a group number.

Note:

Sometimes the author of the disc creates hidden
content that can only be accessed by entering a
password. If the lock icon appears on the TV screen,
enter the password (sometimes you’ll find it on the
disc’s jacket cover or on a web site). This password
control isn’t dictated by your DVD/CD Receiver — it is
a function of the disc.

Since the authoring of DVD Audio Discs varies, some
of the on-screen display choices might not be
available for the disc you’re playing.

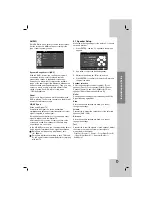
Viewing another PAGE

Since DVD Audio discs can hold a lot of content, there
are various ways to see what’s available on the disc.

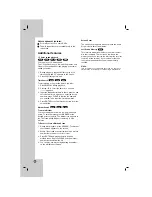
1. Press DISPLAY during playback.

2. Press 

3

3

/

4

4

to select Page icon. 

3. Press 

1

/

2

to select a page number.

What appears on the screen will vary from disc to
disc because the information available depends
upon the way the disc was created.

Note:

Since the authoring of DVD Audio Discs varies, some
of the on-screen display choices might not be
available for the disc you’re playing.

Содержание HT762PZ

Страница 1: ...1791 DVD RECEIVER OWNER S MANUAL MODEL HT762PZ HT762PZ SH72PZ F SH72PZ S SH72PZ C SH72PZ W Before connecting operating or adjusting this product please read this instruction booklet carefully and completely R http www lg ca ...

Страница 2: ...ctric shock or fire Periodically examine the cord of your appliance and if its appearance indicates damage or deterioration unplug it discontinue use of the appliance and have the cord replaced with an exact replacement part by an authorized servicer Protect the power cord from physical or mechanical abuse such as being twisted kinked pinched closed in a door or walked upon Pay particular attentio...

Страница 3: ...han the other A grounding type plug has two blades and a third grounding prong The wide blade or the third prong are provided for your safety If the provided plug does not fit into your outlet consult an electrician for replacement of the obsolete outlet 10 Protect the power cord from being walked on or pinched particularly at plugs convenience receptacles and the point where they exit from the ap...

Страница 4: ... the original shipping carton and packing materials If you need to ship the unit for maximum protection re pack the unit as it was originally packed at the factory Keeping the exterior surfaces clean Do not use volatile liquids such as insecticide spray near the unit Do not leave rubber or plastic products in contact with the unit for a long period of time since they leave marks on the surface Cle...

Страница 5: ...Inc All Rights Reserved Types of Playable Discs DVD 8 cm 12 cm disc Video CD VCD 8 cm 12 cm disc Audio CD 8 cm 12 cm disc In addition this unit can play a DVD R DVD RW SVCD and CD R or CD RW that contains audio titles MP3 WMA JPEG or DivX files Notes Depending on the conditions of the recording equipment or the CD R RW or DVD RW DVD RW disc itself some CD R RW or DVD RW DVD RW discs may not be pla...

Страница 6: ... connectors Power Cord MONITOR OUT connector COMPONENT VIDEO OUT terminals Connect to a TV with Y PB PR inputs Front Panel Rear Panel Cooling fan OPTICAL IN connector AUX AUDIO Input L R connector HDMI OUT HDMI output providing a high quality interface for digital audio and video OPEN CLOSE button TUNING SKIP SEARCH Remote sensor AUDIO IN connector VOLUME controller POWER DISPLAY Window DISC Tray ...

Страница 7: ...V s channel VOLUME Adjusts TV s volume INPUT Selects the TV s source TUNER AUX USB AUDIO OPEN CLOSE SOUND S TITLE CLEAR MENU SLEEP MUTE POWER INPUT CHANNEL VOLUME HDMI RESOL ZOOM SETUP ENTER DISPLAY RETURN VOL SCAN SKIP SCAN TITLE STOP PLAY PAUSE STEP REPEAT REPEATA B MARKER SEARCH DVD PROG MEMO POWER DIMMER POWER TUNER Selects the System s tuner FM AM bands AUX Selects input source USB Plays the ...

Страница 8: ... the DVD CD Receiver to the VIDEO IN jack on the TV using the video cable V Component Video connection Connect the COMPONENT VIDEO OUT jacks from the DVD CD Receiver to the corresponding jacks on the TV using a Y PB PR cable C If your television is a high definition or digital ready television you may take advantage of the DVD CD Receiver s progressive scan output for the highest video resolution ...

Страница 9: ...initial menu after you select a folder press RETURN Digital cameras and mobile phones are not supported AUX IN connection A Connect a Output of auxiliary device to the AUX AUDIO Input L R Connector OPTICAL IN connection O Connect an optical output of DVD Player or Digital Device etc to the OPTICAL IN connector AUDIO IN connection D Connect a output of portable device MP3 or PMP etc to the AUDIO in...

Страница 10: ...opriate terminal on the components to and to If the cables are reversed the sound will be distorted and will lack bass If you use front speakers with low maximum input rating adjust the volume carefully to avoid excessive output on the speakers Front speaker Right Front speaker Left Rear speaker Right surround Rear speaker Left surround Subwoofer Center speaker Base Hole Post 1 2 3 1 Fix the post ...

Страница 11: ...ill work with this DVD CD Receiver If TV does not support HDCP snow noise appears on the screen or picture may be vibrated Tip When you use HDMI connection you can change the resolution 480p 720p 1080i 1080p for the HDMI output by pressing RESOL on the Remote Control Resolution setting You can change the resolution for the COMPONENT VIDEO OUT by pressing RESOL on the Remote Control Available resol...

Страница 12: ...pears 2 Use v V to select the desired option then press B to move to the second level The screen shows the current setting for the selected item as well as alternate setting s 3 Use v V to select the second desired option and then press B to move to the third level 4 Use v V to select the desired setting then press ENTER to confirm your selection Some items require additional steps 5 Press SETUP o...

Страница 13: ...al transmission Delay time could be set up with 10msec unit 0 300ms Delay time is different according to each TV Brand So you need to adjust optimal delay time complying with your TV 5 1 Speaker Setup Make the following settings for the built in 5 1 channel surround decoder 1 Press ENTER and the 5 1 Speaker Setup menu appears 2 Use b B to select the desired speaker 3 Adjust options using v V b B b...

Страница 14: ...y the Setup menu 2 Input the 6 digit number 210499 and press ENTER The password is cleared Area Code Enter the code of the area whose standards were used to rate the DVD video disc based on the list on page 25 1 Select Area Code on the LOCK menu then press B 2 Follow step 2 as shown in the rating section 3 Select the first character using v V buttons 4 Press B and select the second character using...

Страница 15: ...playback press REPEAT A B to select a point A and a point B and repeats a sequence from point A Starting point to point B End point Press REPEAT A B to exit ZOOM During playback or in the pause mode press ZOOM to enlarge the video image 3 steps You can move through the zoomed picture using b B v V buttons TITLE If the current DVD title has a menu the title menu appears on the screen Otherwise the ...

Страница 16: ...ized points To enter a marker press MARKER at the desired point on the disc The Marker icon appears on the TV screen briefly Repeat to enter up to nine markers To Recall or Clear a Marked Scene 1 During disc playback press SEARCH The marker search menu appears on the screen 2 Within 10 seconds press b B to select a marker number that you want to recall or clear 3 Press ENTER and playback starts fr...

Страница 17: ...ent track ALL repeats all the tracks on programmed list Off No display does not play repeatedly Erasing a Track from Program List 1 Use v V to select the track that you wish to erase from the Program list 2 Press CLEAR Alternatively select Delete icon then press ENTER to place the selected track on the Program list Repeat to erase additional tracks on the list Erasing the Complete Program List Use...

Страница 18: ... PLAY or press PAUSE STEP again Moving to another File Press SKIP or once during viewing a picture to advance to the next or previous file Rotating the picture Press v V b B during showing a picture to rotate the picture clockwise or counter clockwise JPEG Preview List JPEG Folder 1 JPEG Folder 2 JPEG Folder 3 JPEG Folder 4 JPEG Folder 5 JPEG Folder 6 JPEG Folder 7 JPEG Folder 8 PHOTO JPEG disc co...

Страница 19: ...before playing a DivX file When the subtile has more than two languages in the file original subtile is only available You can not adjust sound mode and VIRTUAL sound during the DivX file playing Operation List Movie Folder 1 Movie Folder 2 Movie Folder 3 Movie Folder 4 Movie Folder 5 Movie Folder 6 Movie Folder 7 Movie Folder 8 MOVIE 0 00 00 DivX disc compatibility with this player is limited as ...

Страница 20: ...es you to quickly access different groups during playback via the on screen display 1 Press DISPLAY during playback on in stop mode 2 Press 3 3 4 4 to select Group icon 3 Press 1 2 or the numbered buttons 0 9 to select a group number Note Sometimes the author of the disc creates hidden content that can only be accessed by entering a password If the lock icon appears on the TV screen enter the pass...

Страница 21: ...ow for a moment and then a preset number will flash To change the preset number follow steps 5 6 as above Listening to the Radio Preset radio stations in the DVD CD Receiver s memory first see Presetting radio stations on the left 1 Press TUNER until FM or AM MW appears in the display window The last received station is tuned in 2 Press PRESET repeatedly on the remote control to select the preset ...

Страница 22: ... Press and hold this button for about 3 seconds then press repeatedly to select other function XTS XTS pro Each time you press XTS pro the setting changes in the following order XTS ON NORMAL XTS P ON XTS P ON The unique sound quality of the LG Technology creates the optimum sound for you to play the perfect playback of the original sound and to feel the living sound source XTS ON When playing a m...

Страница 23: ...er switch of your LG TV with the supplied Remote Control You can control your TV using the buttons below By pressing You can TV POWER Turn the TV on or off CHANNEL v V Scans up or down through memorized channels VOLUME Adjust the volume of the TV TV INPUT Switch the TV s input source between the TV and other input sources Note Depending on the unit being connected you may not be able to control yo...

Страница 24: ... 58 PHILIPS 06 07 43 61 62 65 PIONEER 30 PORTLAND 09 PROSCAN 03 37 44 QUASAR 11 13 RADIO SHACK 16 17 23 RCA 01 03 37 44 69 REALISTIC 16 17 23 SAMPO 08 SAMSUNG 01 08 09 25 68 SANYO 28 29 SCOTT 01 08 SEARS 09 25 26 27 28 29 SEMP 64 SHARP 09 22 23 24 60 66 SIGNATURE 2000 01 06 08 09 10 23 24 33 34 SONY 12 62 SOUNDESIGN 51 SYLVANIA 01 04 05 06 07 08 35 51 SYMPHONIC 46 47 TATUNG 11 TEKNIKA 07 09 16 33 ...

Страница 25: ...elorussian 6669 Cambodian 7577 Catalan 6765 Chinese 9072 Corsican 6779 Croatian 7282 Czech 6783 Danish 6865 Dutch 7876 English 6978 Esperanto 6979 Estonian 6984 Faroese 7079 Language Code Fiji 7074 Finnish 7073 French 7082 Frisian 7089 Galician 7176 Georgian 7565 German 6869 Greek 6976 Greenlandic 7576 Guarani 7178 Gujarati 7185 Hausa 7265 Hebrew 7387 Hindi 7273 Hungarian 7285 Icelandic 7383 Indon...

Страница 26: ...l is set The disc is dirty The speakers and components are connected poorly The DVD CD Receiver is located too close to the TV Correction Plug the power cord securely into the wall outlet Insert a disc Check that the DVD or audio CD indicator in the DVD display is lit Select the appropriate video input mode on the TV so the picture from the DVD CD Receiver appears on the TV screen Connect the vide...

Страница 27: ...sensor of the DVD CD Receiver The remote control is too far from the DVD CD Receiver There is an obstacle in the path of the remote control and the DVD CD Receiver The batteries in the remote control are flat Nothing is displayed on the front panel display Correction Connect the antenna securely Adjust the antennas and connect an external antenna if necessary Tune in the station manually Preset th...

Страница 28: ...oise Ratio 60 dB Mono Frequency Response 240 10 000 Hz Tuning Range 522 1 620 kHz or 520 1 720 kHz Intermediate Frequency 450 kHz Stereo mode 100 W 100 W 4Ω at 1 kHz THD 10 Surround mode Front 100 W 100 W THD 10 Center 100 W Surround 100 W 100 W 4Ω at 1 kHz THD 10 Subwoofer 200 W 3Ω at 70 Hz THD 10 Inputs AUDIO IN OPTICAL IN Outputs MONITOR OUT HDMI OUT COMPONENT VIDEO OUT Front Speaker Rear Speak...

Отзывы: