


21
ENGLISH
NOTE
•
For the best image quality, using the monitor with HDMI connection is recommended.
•
To comply with the standard specifications of the product, use a shielded interface cable with a ferrite core, such as a
DVI-D cable.
•
If you turn the monitor on when the set is cold, the screen may flicker. This is normal.
•
Sometimes red, green, or blue spots may appear on the screen. This is normal.
•
Use a High Speed HDMI
®
/™ cable. (3 m or less)
•
Use a certified cable with the HDMI logo attached. If you do not use a certified HDMI cable, the screen may not
display or a connection error may occur.
•
Recommended HDMI Cable Types
- High Speed HDMI
®
/™ Cable
- High Speed HDMI
®
/™ Cable with Ethernet
A
B
A
B
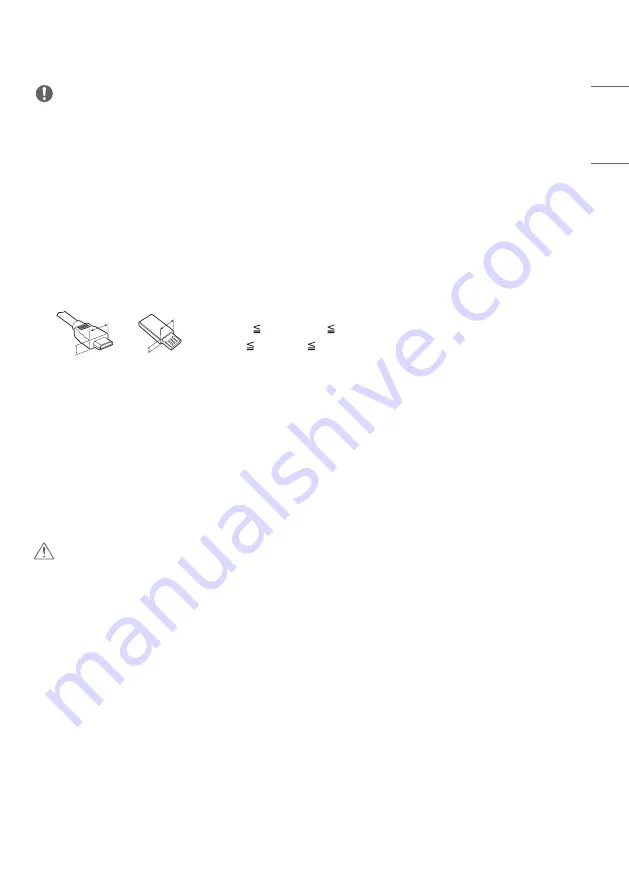
HDMI : A 11.65 mm ; B 20.65 mm
USB : A 8.3 mm ; B 16 mm
•
If you cannot hear any sound in HDMI mode please check your PC settings. Some PCs require you to manually change
the default audio output to HDMI.
•
If you want to use HDMI-PC mode, you must set your PC/DTV to PC mode.
•
You may experience compatibility issues if you use HDMI-PC mode.
•
Make sure the power cable is disconnected.
•
If you connect a gaming device to the monitor, use the cable provided with the gaming device.
•
The contents from the HDMI INPUT port cannot be transferred to the HDMI OUT port. (HDMI OUT port supports only
Android/VGA/USB.)
CAUTION
•
Connect the signal input cable and tighten it by turning the screws clockwise.
•
Do not press the screen with your finger for a prolonged period as this may result in temporary distortion on the
screen.
•
Avoid placing a reflective object in front of the set at a distance of 50 cm or less.
•
Avoid displaying static images on the screen for a long period of time to prevent image retention. Use a screensaver
if possible.
•
A wireless communication device near your monitor can affect the image.
Содержание 86TR3PJ-B.AEUQ
Страница 26: ...26 ENGLISH 2 Create and manage the shortcuts for apps files websites in Launcher ...
Страница 27: ...27 ENGLISH 3 Customize the colorful wallpapers ...
Страница 29: ...29 ENGLISH Brightness and Sound Click the icon will open Touch Menu that you can customize the adjustment ...
Страница 30: ...30 ENGLISH Ethernet Click the icon on the top right to open the Settings Ethernet page ...
Страница 32: ...32 ENGLISH Time Click the will open the Settings Date Time page ...
Страница 34: ...34 ENGLISH Step 2 Drag to the storage area where you want to place it ...
Страница 35: ...35 ENGLISH Step 3 Create shortcut successfully after raising hand ...
Страница 36: ...36 ENGLISH The application can be quickly launched by clicking the icon now ...
Страница 38: ...38 ENGLISH Step 2 Drag to the storage area where you want to place it ...
Страница 39: ...39 ENGLISH Step 3 Create shortcut successfully after raising hand ...
Страница 40: ...40 ENGLISH The folder path can be quickly open by clicking the icon now ...
Страница 42: ...42 ENGLISH Tips 2 Long press the icon to quickly find the source file path ...
Страница 44: ...44 ENGLISH The website can be quickly open by clicking the icon now ...
Страница 47: ...47 ENGLISH Change Position Long press and drag to change the position in Launcher ...
Страница 48: ...48 ENGLISH Wallpaper Launcher has customized wallpapers for teachers to choose Default Wallpaper ...
Страница 49: ...49 ENGLISH Custom Wallpaper Open Settings Personal Wallpaper Stills page to set the wallpapers ...
Страница 51: ...51 ENGLISH All Apps All tools ...
Страница 52: ...52 ENGLISH 2 Customize the display of System Bar including content and position Customize content ...
Страница 53: ...53 ENGLISH Customize position ...
Страница 57: ...57 ENGLISH Step 2 Long press and drag it ...
Страница 58: ...58 ENGLISH Step 3 Move to the System Bar to create a shortcut in the default shortcut area ...
Страница 64: ...64 ENGLISH Step 2 Click to remove the display in System Bar ...
Страница 65: ...65 ENGLISH Click to add the display in System Bar ...
Страница 66: ...66 ENGLISH System Bar Settings By default the entrance to the bottom and sides is provided ...
Страница 67: ...67 ENGLISH Teachers can also configure hide display in settings according to their usage habits ...
Страница 69: ...69 ENGLISH Example 2 Settings for Windows mode ...
Страница 71: ...71 ENGLISH Example 2 Drag the top bar of the Windows to the edge of the screen to quickly enter 1 4 size ...
Страница 73: ...73 ENGLISH Example 2 Three apps are displayed on the screen at the same time ...
Страница 74: ...74 ENGLISH Tips Finder and Browser support new windows ...
Страница 77: ...77 ENGLISH 5 Multi Window Mode ...
Страница 83: ...83 ENGLISH Table Note supports creating multiple tables and displaying them simultaneously ...
Страница 89: ...89 ENGLISH Palette Click to open the Palette Menu Click to open the Menu window ...
Страница 93: ...93 ENGLISH Pens Pen Stroke Slider ...
Страница 97: ...97 ENGLISH Finder Click to open the Finder ...
Страница 106: ...106 ENGLISH Settings Click to open the Settings ...
Страница 108: ...108 ENGLISH In addition you can click on to see your Wi Fi address and install certificates ...
Страница 133: ...133 ENGLISH For the added startup tasks and shutdown tasks the user can also modify these tasks or delete tasks ...
Страница 143: ...143 ENGLISH WPS Office Click to open the WPS Photo 1 Click a picture to open the Photo ...
Страница 145: ...145 ENGLISH Music Click a music file to open the Music Video Click a video file to open the Video ...
Страница 179: ......


